Introduction
If you have a story bubbling inside you that you want to share using the Ghost blogging platform. But do not know how to start your website on Ghost, then this guide is for you.
With this "Getting started with Ghost" guide, I aim to remove the confusion and technical noise so you can focus on what truly matters: creating great content.
We'll first explore whether Ghost is the perfect fit for your goals and then launch your website together. You'll learn how to personalize your site's look, master the essentials of writing and publishing, and tap into Ghost’s built-in tools to grow your audience and generate revenue with memberships.
By the end, you won't just have another blog—you'll have a professional-grade publication ready to make a real impact online.
Ready? Let's dive in!
Is Ghost Right for You?
Before you take the leap, it's crucial to understand not just what Ghost is, but what it stands for. The platform you choose will shape your entire publishing workflow, so making an informed decision now is crucial before you start your publishing journey.
The Ghost Philosophy: Speed, Simplicity, and Subscriptions
Ghost's entire design is built on three core pillars that directly address the biggest pain points for modern creators.
- Incredible Speed: Ghost is built on a modern technology stack called Node.js, which makes it astonishingly fast. Independent tests have found Ghost can be up to 1,900% faster than a standard WordPress site. Site speed isn't just a technical vanity metric. It directly impacts your Google search rankings, how long readers stay on your site, and their overall experience. A faster site is simply a better site.
- Radical Simplicity: Unlike platforms that have become cluttered and complex over the years, Ghost is laser-focused on the act of publishing. This manifests in a beautiful, minimalist editor that gets out of your way and lets you focus on your words. Key features that other platforms require complicated plugins for—like search engine optimization (SEO), newsletters, and memberships—are elegantly built right into the core product. This integrated approach means you spend less time wrestling with technology and more time creating.
- Native Subscriptions: Ghost was designed from the ground up for the creator economy. It has the most powerful built-in tools for creating a membership business, allowing you to offer premium content to your audience through free and paid subscriptions. This direct-to-creator model is the future of independent publishing.
Ghost vs. The Titans (WordPress & Substack)
To truly understand Ghost's place in the world, we need to compare it to the two other giants you've likely heard of.
WordPress is the undisputed king of the internet, powering a staggering 43.5% of all websites. It's the versatile workhorse that can build anything. On the other end of the spectrum is Substack, the ultra-simple platform that has popularized the newsletter-as-a-business model.
So, where does Ghost fit? It occupies the powerful space between WordPress's complexity and Substack's limitations. It combines the professional publishing power of WordPress with the membership focus of Substack, but in a faster, more integrated, and more economically favorable package.
This WordPress vs Ghost distinction is crucial. The platform you choose depends entirely on your goals. WordPress is a modular system, a core that you extend with third-party plugins for everything from SEO to e-commerce.
Ghost is an integrated system, where these essential publishing features are part of the core product. This fundamental difference has cascading effects. Ghost's integrated nature is a primary reason for its superior speed and security; fewer plugins mean less code bloat and fewer potential vulnerabilities.
For a non-technical creator, this means a more stable and predictable foundation, allowing you to focus on your content, not on managing a fragile ecosystem of plugins.
To make this choice crystal clear, here is a simple scorecard comparing the platforms on the factors that matter most to a creator in 2025.
Who Should Choose Ghost in 2025?
The choice becomes clear when you look at the table.
You should choose Ghost if:
- Your primary goal is to publish content—articles, newsletters, a news website, or podcasts.
- You want to build a sustainable membership business and keep all of the revenue you earn (the 0% fee is a massive advantage over Substack's 10%).
- You care deeply about site speed, performance, and a clean user experience for your readers.
- You want powerful tools that are beautifully designed and intuitive to use, without the technical overhead of managing dozens of plugins.
While Ghost is perfect for professional publishers, it's not the right tool for every job. If you need to build a complex e-commerce store with a shopping cart, a social network, or a highly customized web application, the immense flexibility of WordPress and its vast plugin library would be a better fit. But for the modern creator focused on content and community, Ghost is the purpose-built solution.
Choosing Your Ghost Hosting
Now that you're excited about Ghost, you have one foundational choice to make: how you're going to host your site. There are two paths, and for non-technical creators, one is the clear winner.
Ghost(Pro) vs. Self-Hosting
Think of it like this: Ghost(Pro) is like leasing a brand-new, fully serviced performance car. You get in, turn the key, and it just works, with a team of expert mechanics making sure it's always perfectly tuned.
Self-hosting is like being given a high-performance engine for free and being told to build the rest of the car yourself. It's possible, but it requires a different set of technical skills.
- Ghost(Pro): This is the official, fully managed hosting service from the non-profit foundation that builds Ghost. It's a "platform-as-a-service" (PaaS) where all the technical heavy lifting is done for you.
- Self-Hosting: This involves downloading the free, open-source Ghost software and installing it on your own server, which you rent from a company like DigitalOcean or Linode. You are responsible for everything: installation, maintenance, security, and updates.
Why Ghost(Pro) is the Best Choice for 99% of New Bloggers
For anyone who isn't a professional developer or a server administrator, Ghost(Pro) is unequivocally the right choice. Here's why:
- Hassle-Free Everything: Ghost(Pro) offers a one-click setup, automatic weekly updates, and continuous backups. You never have to touch a line of code or a command-line interface to install Ghost on a server.
- World-Class Infrastructure: Your site is served via a global Content Delivery Network (CDN), the same kind used by major companies. This ensures it's lightning-fast for readers anywhere in the world. Setting this up on your own would cost a significant amount of your time, effort, and money.
- Security: Ghost(Pro) includes enterprise-grade security, firewalls, and protection against attacks, all managed by experts.
- Built-in Email Delivery: Sending newsletters is a core Ghost feature. With Ghost(Pro), the complex task of setting up and paying for a mail-sending service like Mailgun is handled for you. This is a common and frustrating stumbling block for self-hosters, often leading to emails landing in spam folders or not being delivered at all.
- Expert Support: If something goes wrong, you have a dedicated support team to help you. With self-hosting, you're on your own, relying on community forums and possibly hiring a Ghost expert to fix it for you.
The "free" self-hosted software is tempting, but its hidden costs are measured in your time, stress, and additional service fees. You have to pay for a private server, learn how to configure it, manually run updates, and troubleshoot errors.
Understanding Ghost(Pro) Pricing
Ghost(Pro)'s pricing is straightforward. Instead of charging you based on traffic or page views, it scales with the size of your audience—your number of members (both free and paid subscribers).
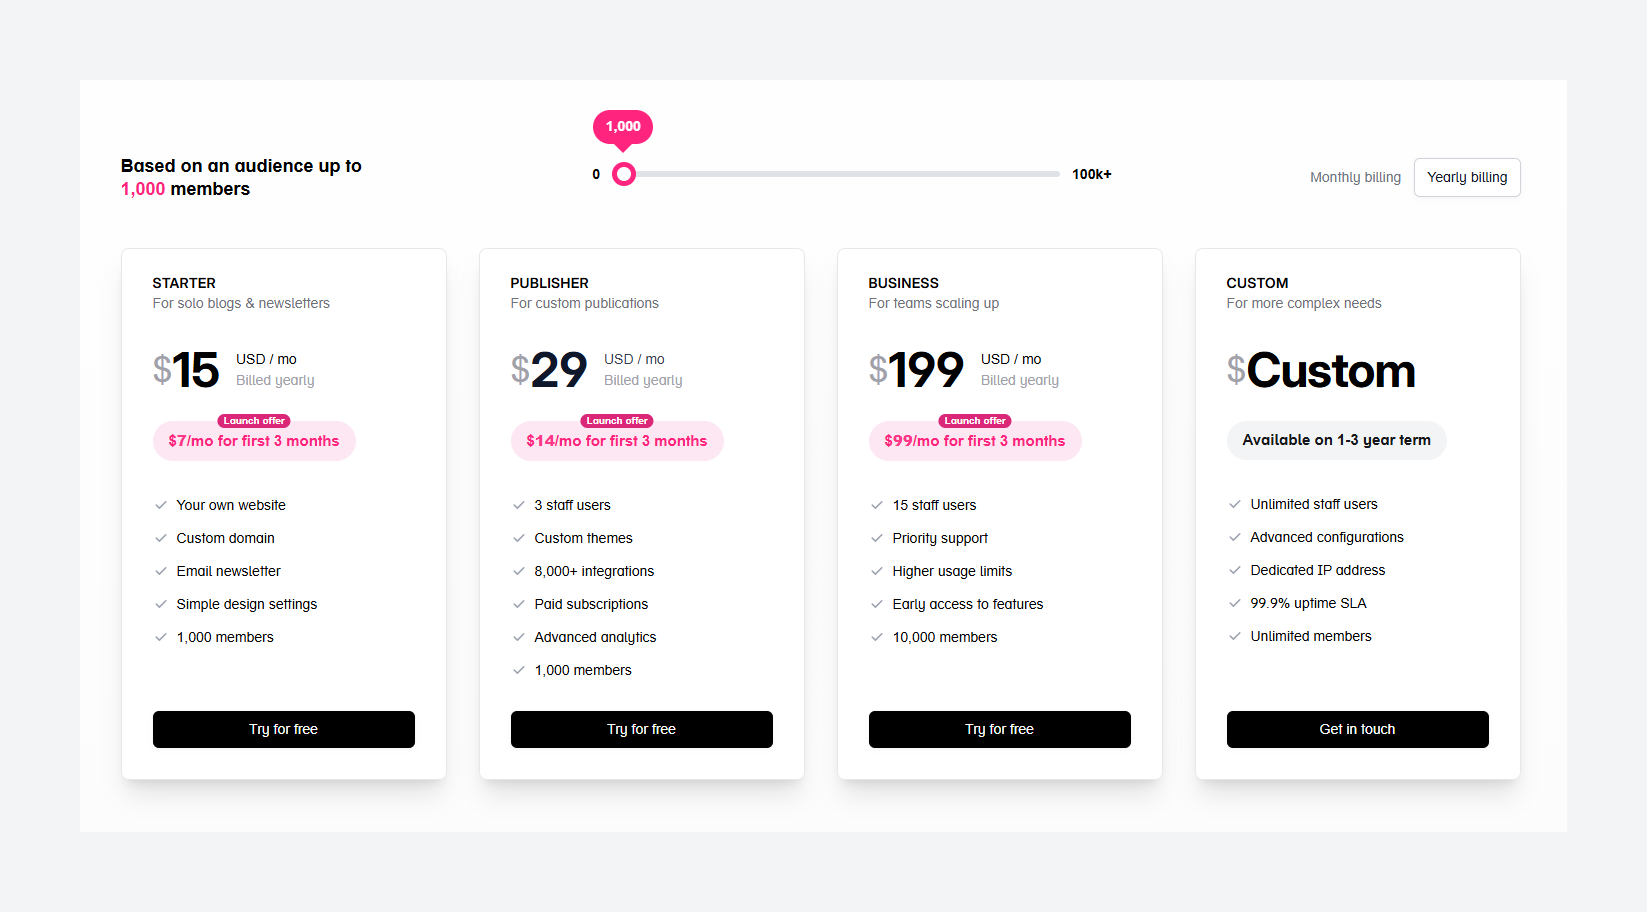
Here are the typical plans for a new creator:
- Starter Plan: Starts at $15 per month (billed yearly). This gets you up to 1000 members and includes one staff user. It's perfect for getting your footing, but it has two key limitations: you cannot upload custom themes, and your newsletters are sent from a generic
ghost.ioemail address. - Publisher Plan (Recommended): Starts at $29 per month (billed yearly). This is the sweet spot for most serious creators. It supports up to 1,000 members and unlocks the platform's full power: you can upload any theme and use a custom sending domain for your emails (e.g.,
newsletter@yourdomain.com), and add more advanced integrations. - Business Plan: Starts at $199 per month (billed yearly) for 10,000 members and allows for unlimited staff users, newsletters, premium membership tiers, and higher file upload limits. The best feature about this plan (apart from unlimited staff) is that with an additional fee of $50/month, you can get Ghost installed at a sub-directory level (e.g., instead of
blog.example.comyou can have it atexample.com/blog). You also get a 99.9% uptime SLA and a dedicated Account Manager for any help. This is suitable for big publishing houses, and as a solo creator, this plan does not bring much value to you.
On the pricing page, a slider allows you to see how prices adjust for a larger audience. Be aware that if your member count exceeds your plan's limit, you will need to upgrade to the next tier.
Ghost(Pro) vs Self-hosting
To put the value of Ghost(Pro) in perspective, consider the real-world trade-offs. A beginner might see $5/mo for a server and $29/mo for Ghost(Pro) and assume the former is the better deal.
The following table breaks down that illusion by itemizing the true costs and effort involved.
This choice is about more than just cost; it's about managing risk and investing in your most valuable asset: your time. The hours a self-hoster spends debugging a server issue is the time they do not spend writing, marketing, or engaging with their community.
Furthermore, Ghost(Pro) acts as an insurance policy against success. When your article goes viral, they guarantee your site will stay online to capture all that new traffic. You cannot predict when you will get more traffic and stay up till the middle of the night to scale your self-hosted server to handle the spike.
A cheap self-hosted server would likely crash, squandering your biggest opportunity for growth. For an ambitious creator, paying for Ghost(Pro) is a strategic business decision that buys back time and provides peace of mind.
Launching Your Ghost Blog in Under 10 Minutes
With the big hosting decision made, it's time for the fun part. You are literally minutes away from having a live, functioning blog. Let's walk through the simple setup process for Ghost(Pro).
Step-by-Step Guide for Ghost(Pro)
This process is designed to be as frictionless as possible, a deliberate choice by Ghost to get you from spark to publication with minimal delay. You can launch your blog on Ghost(Pro) within a few minutes after signing up.
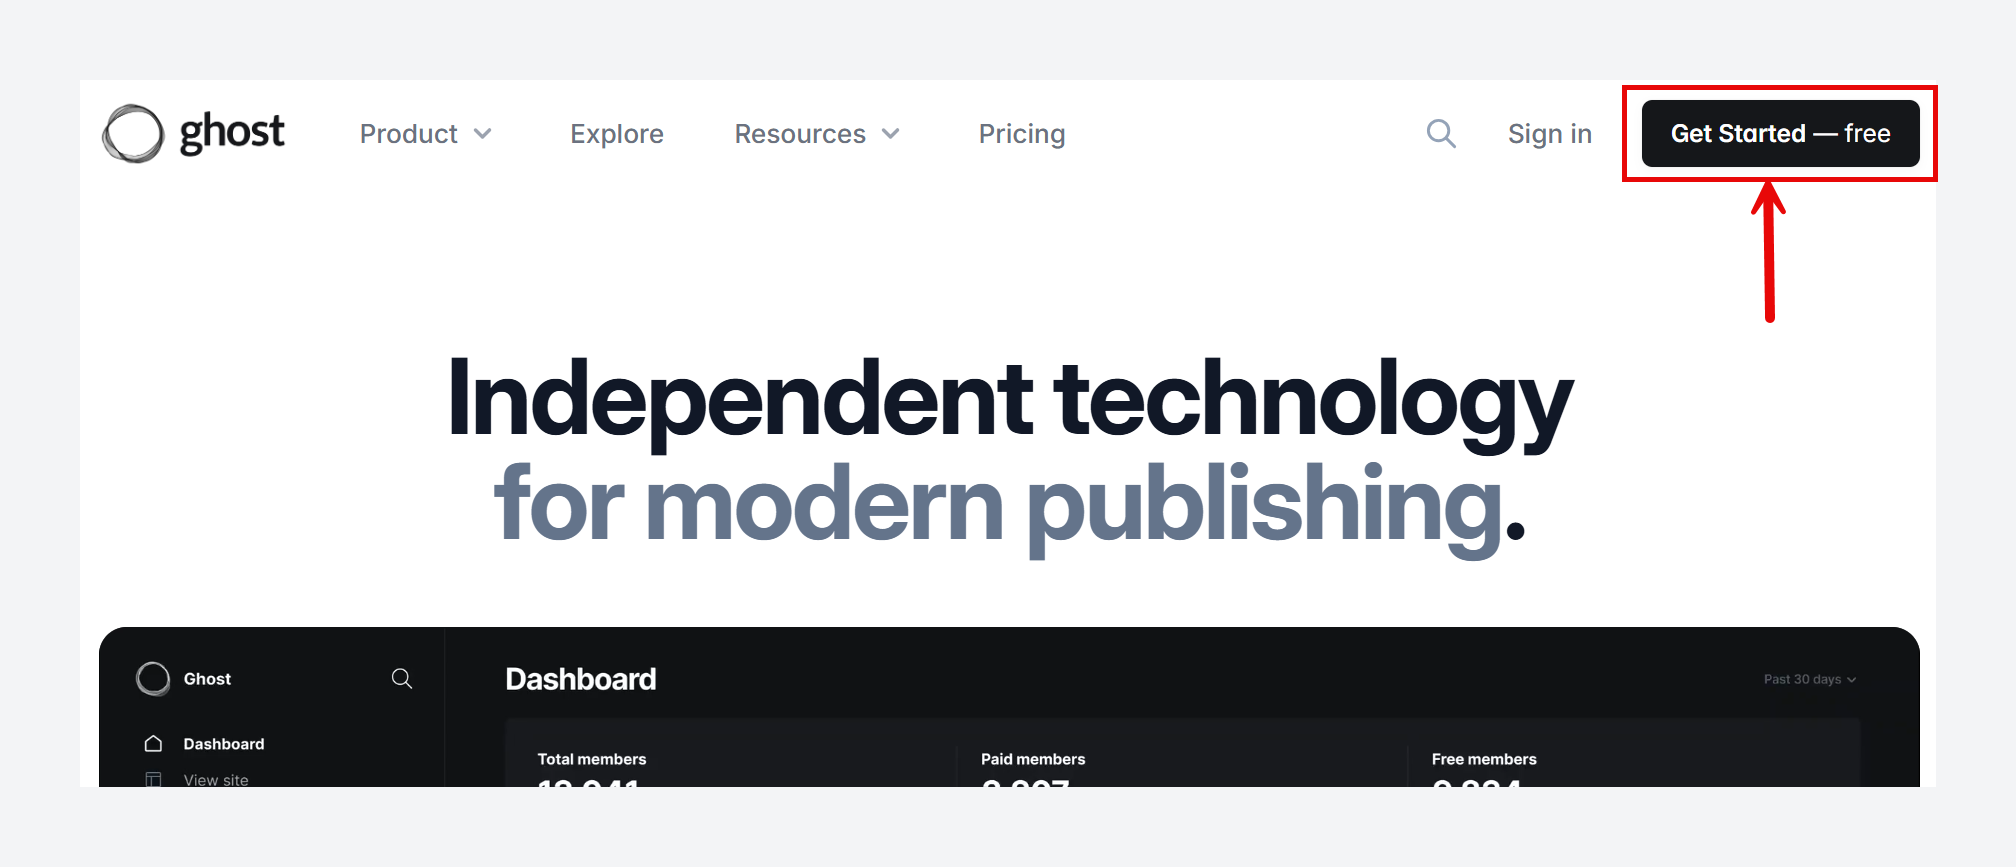
- Start Your Trial: Navigate to the Ghost website and click on one of the prominent buttons to "Get Started - free". Ghost offers a 14-day free trial, giving you plenty of time to explore without commitment.
- Create an account: Create an account by entering your name, email and password.

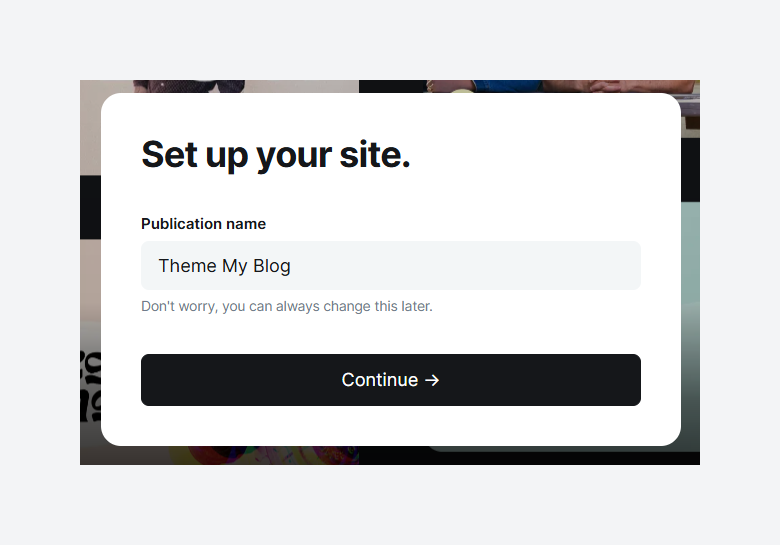
- Name Your Site: You'll be prompted to enter your publication's name. Don't overthink this; you can easily change it later in the settings.
- Prove that you are human: You need to enter credit card details. Ghost uses this to prevent spam and abuse on its platform.
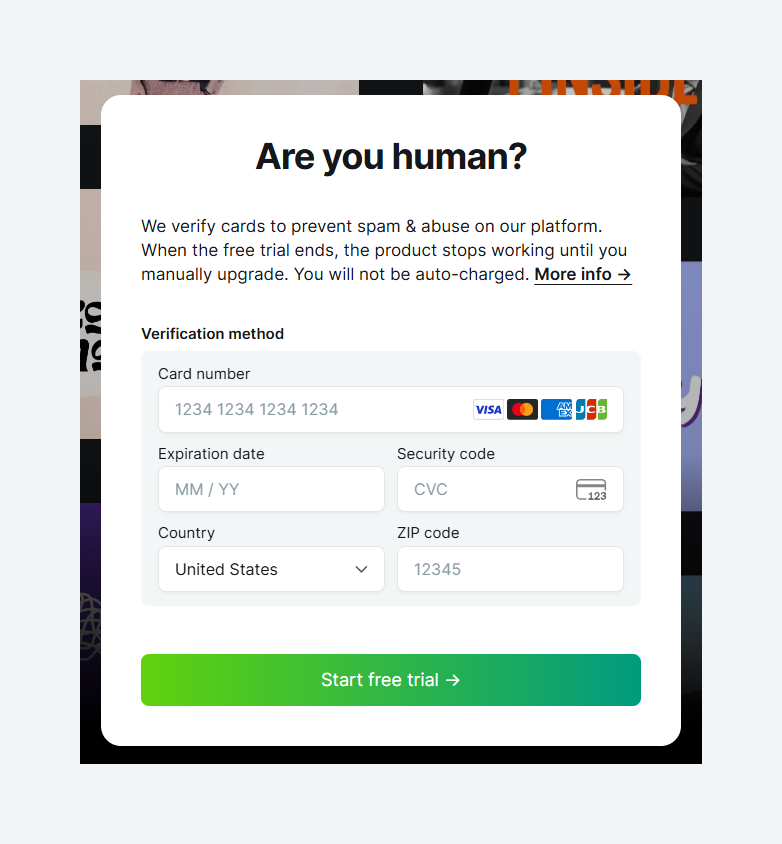
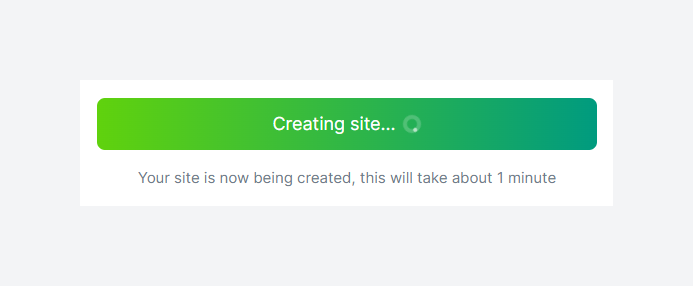
Once you add the credit card, hit the Green button, and Ghost will start creating your new blog website.
- Welcome to Your Dashboard! And just like that, you're in. Your site is instantly live on a temporary
yourname.ghost.iosubdomain.
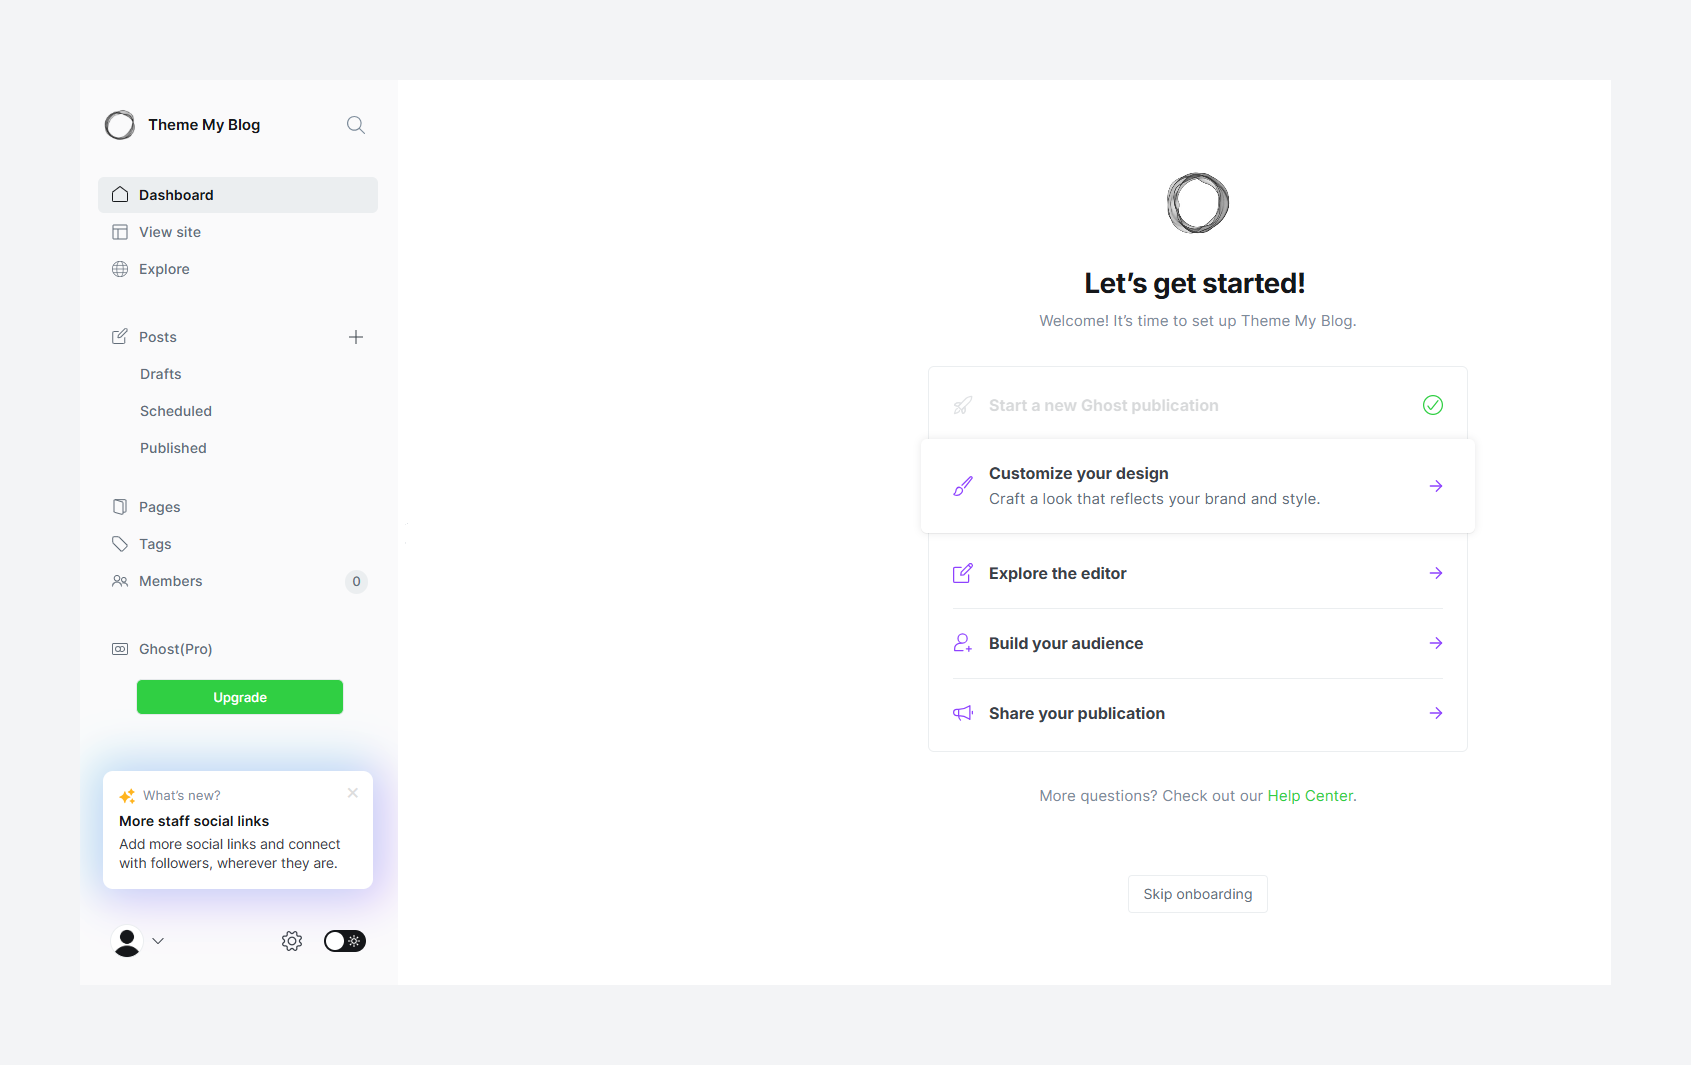
- Onboarding: You will see a prominent onboarding section in your Ghost dashboard. You can choose to either go step-by-step and follow the steps there. I generally skip it and explore on my own.
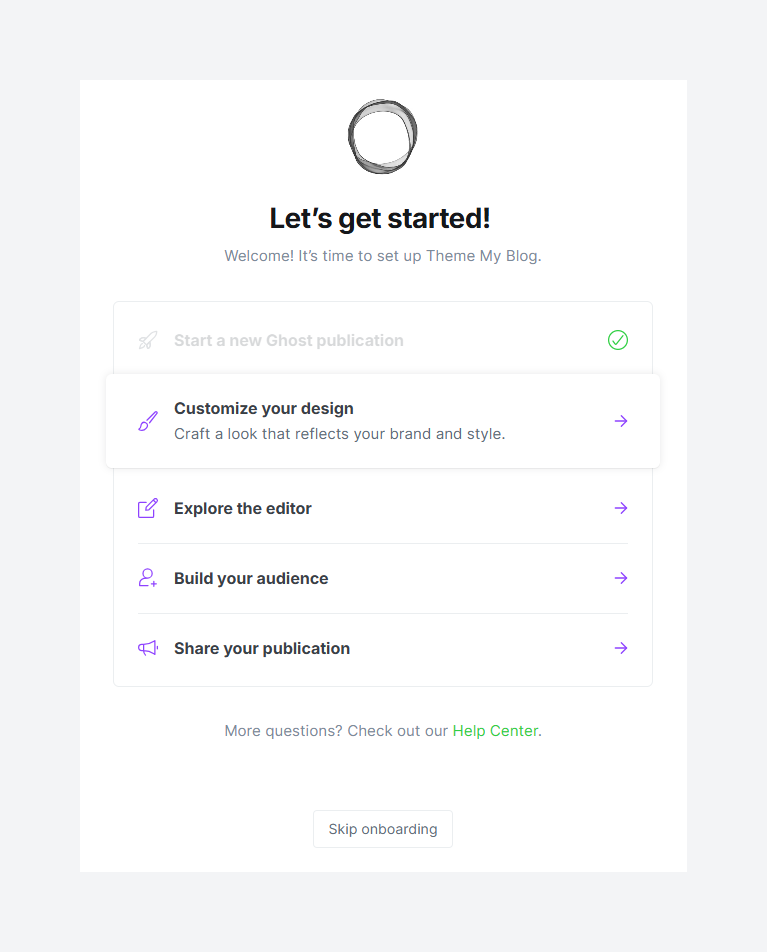
In the following sections, we will go through the Ghost Admin Dashboard.
A Guided Tour of the Ghost Admin Dashboard
The screen you land on is your new command center. It's clean and uncluttered. Here's a quick orientation:
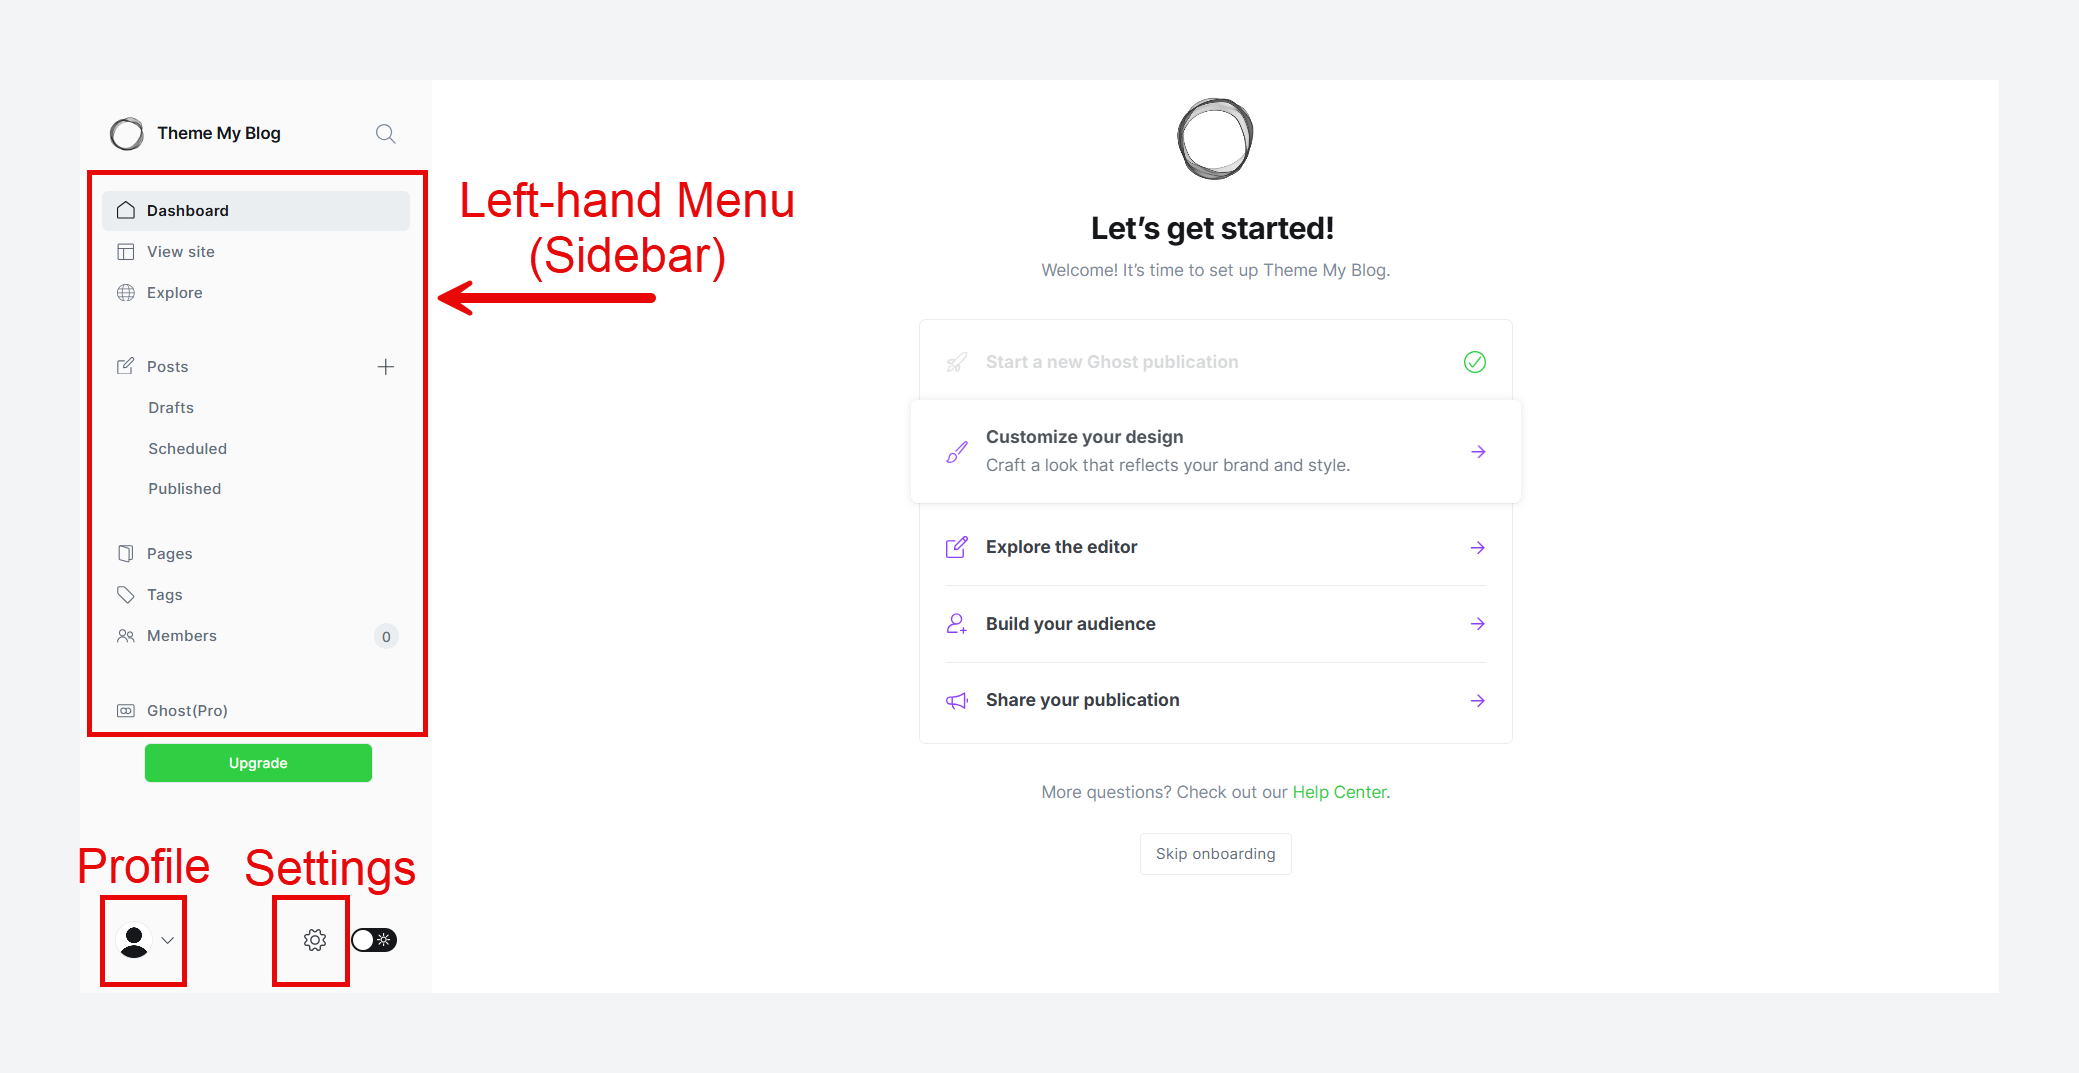
- Left-Hand Menu: This is your main navigation.
- Dashboard: Your homepage, with a helpful checklist for getting started.
- Posts / Pages / Tags: This is where you'll live, creating and managing all your content.
- Members: A list of everyone who has subscribed to your site.
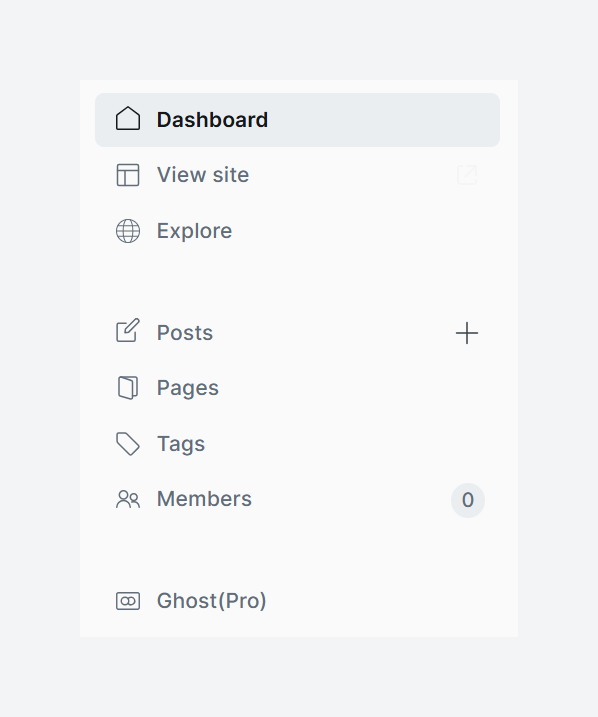
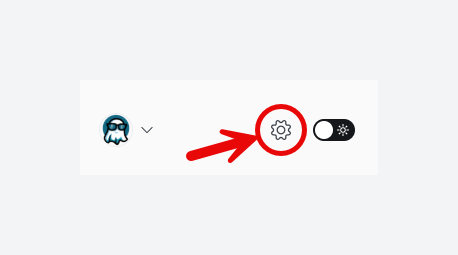
- Gear Icon (Settings): This is the control panel for your entire publication. We'll be spending a lot of time here customizing the Ghost website. You will see this in the bottom left corner.
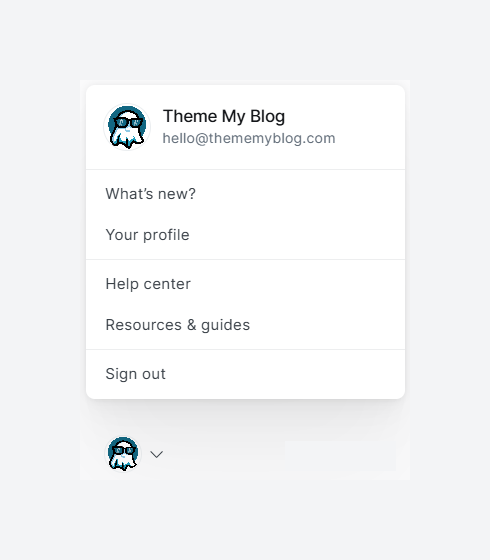
- Profile: Profile for logged-in staff user. You can manage your staff profile or sign out.
Connecting Your Custom Domain
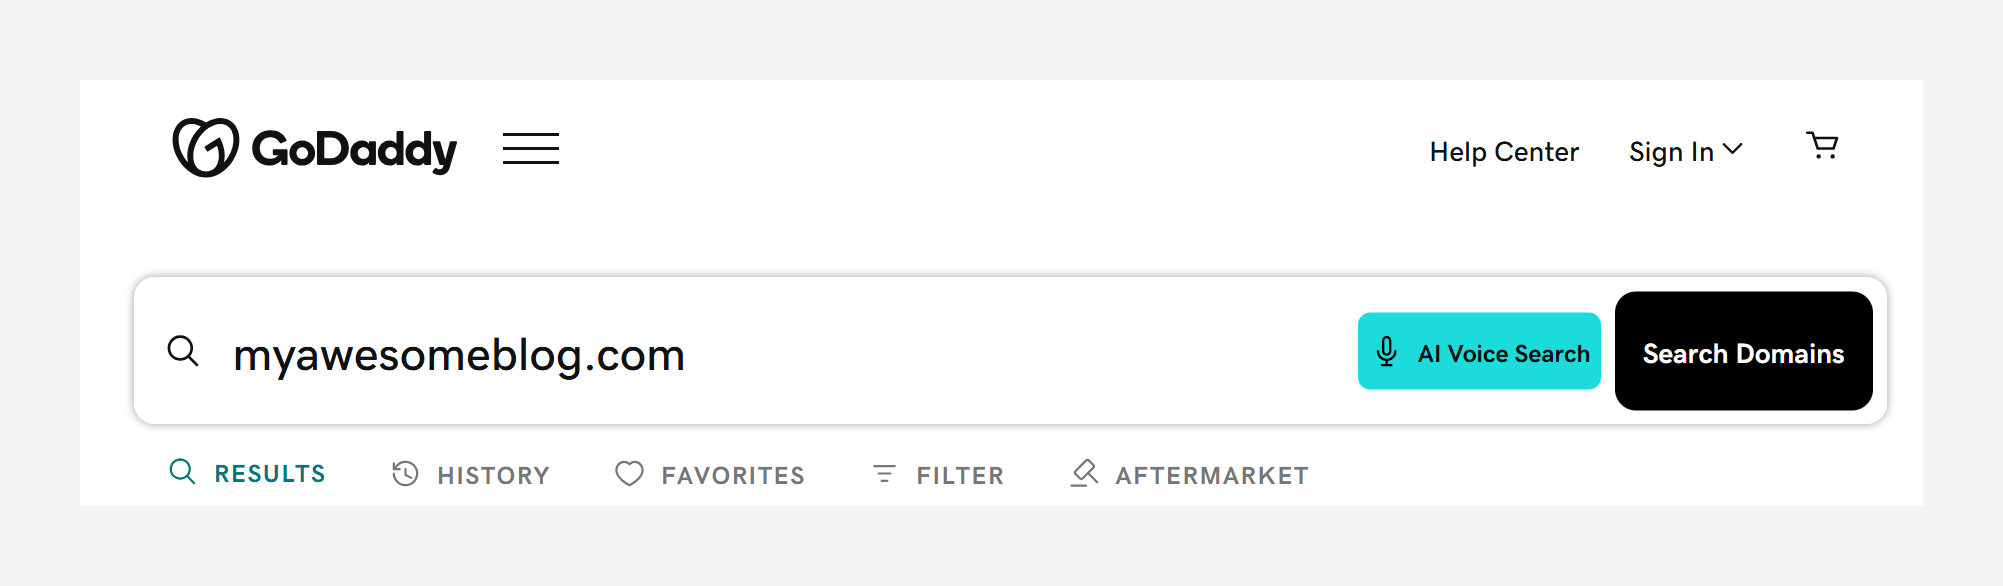
Your ghost.io subdomain is great for the trial, but for a professional publication, you need a custom domain (e.g., myawesomeblog.com). This is the most technical part of the initial setup, but it's a one-time process.
- Buy Your Domain: If you don't already own a domain, you'll need to purchase one from a domain registrar. Services like Namecheap and GoDaddy are popular, affordable, and easy to use. You can get a domain from any registrar. We need to add a few DNS records (explained below) to the domain.
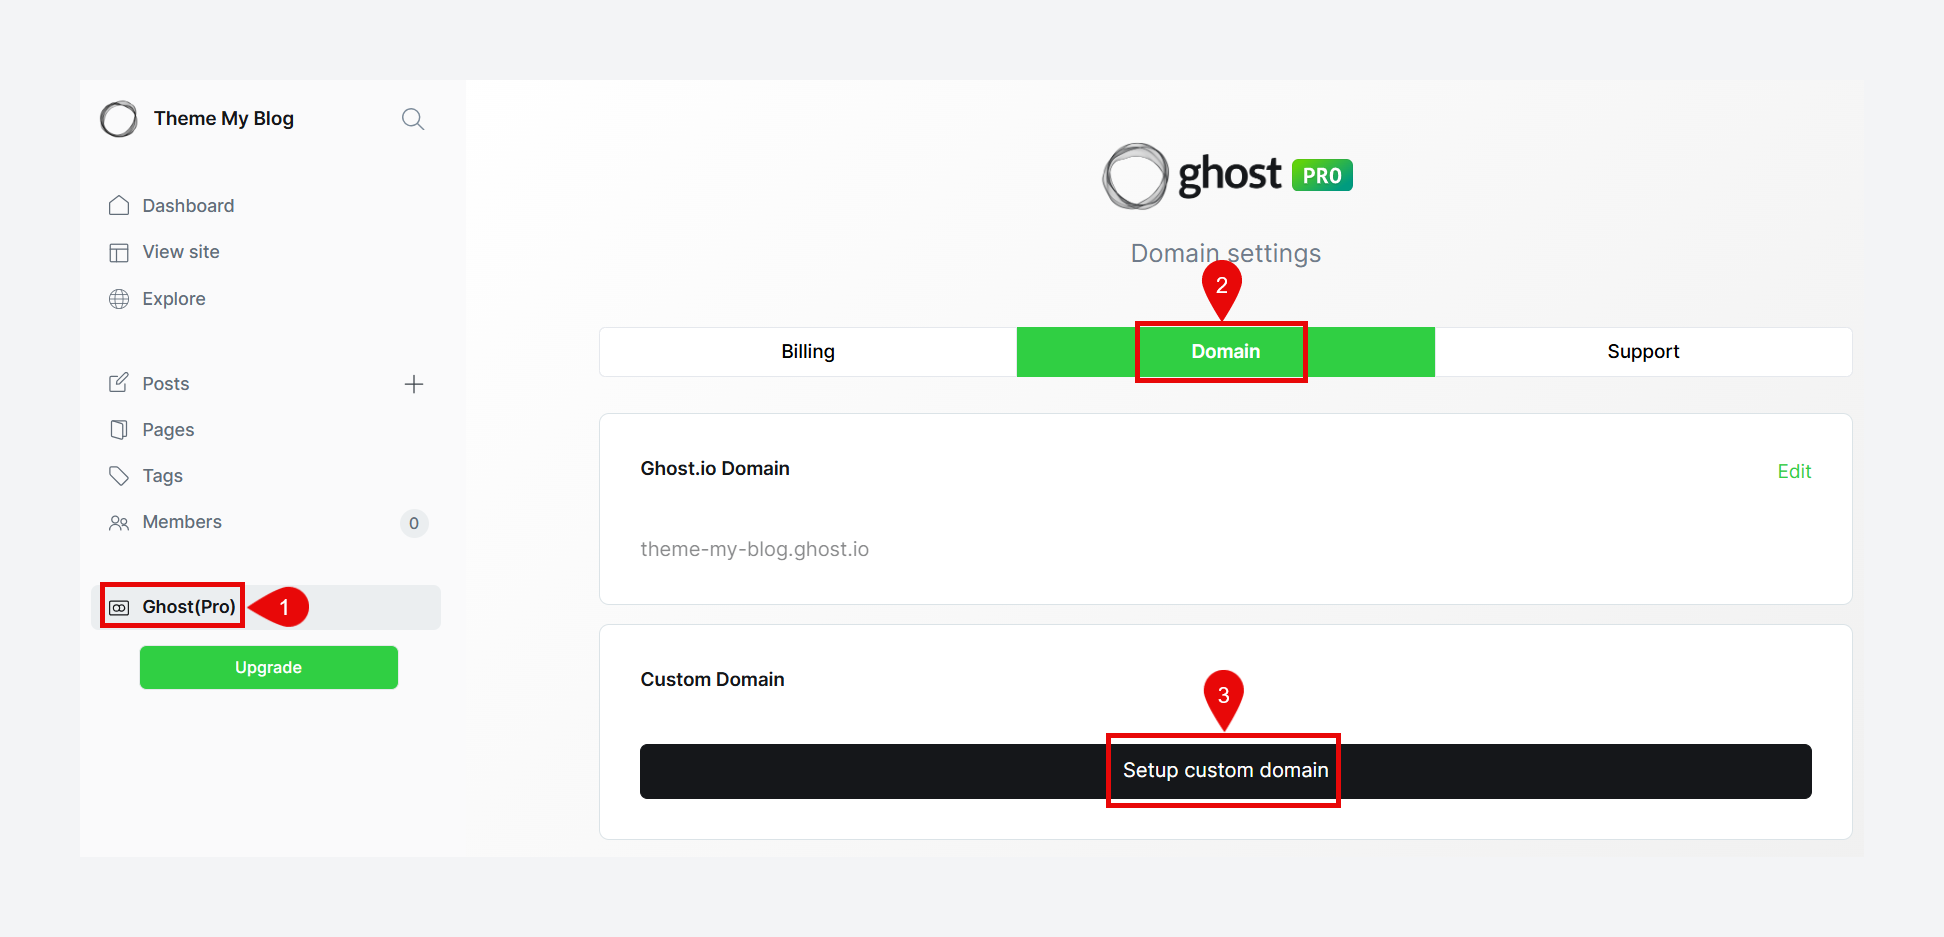
- Add the Domain in Ghost: In your Ghost admin dashboard, click Ghost(Pro) -> Domain -> Setup custom domain. See the image below for clear steps.
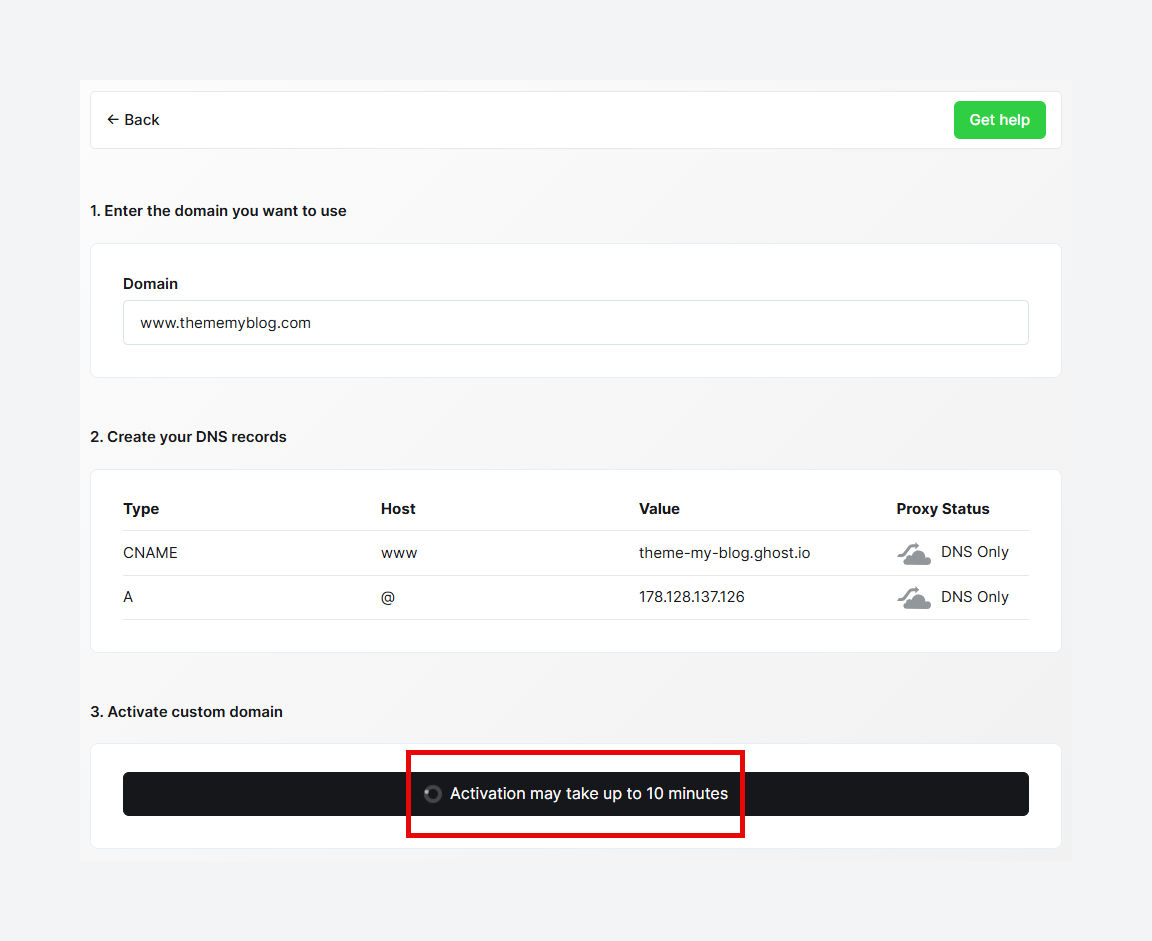
- Update Your DNS Records: Once you click 'Setup custom domain' in the previous step, you will see a dedicated page to configure and add your domain, as shown below.
- Add your domain name in '1. Enter the domain you want to use' field. I generally prefer to use the www version instead of the naked domain. It works better for cookies. More on that in a future blog post.
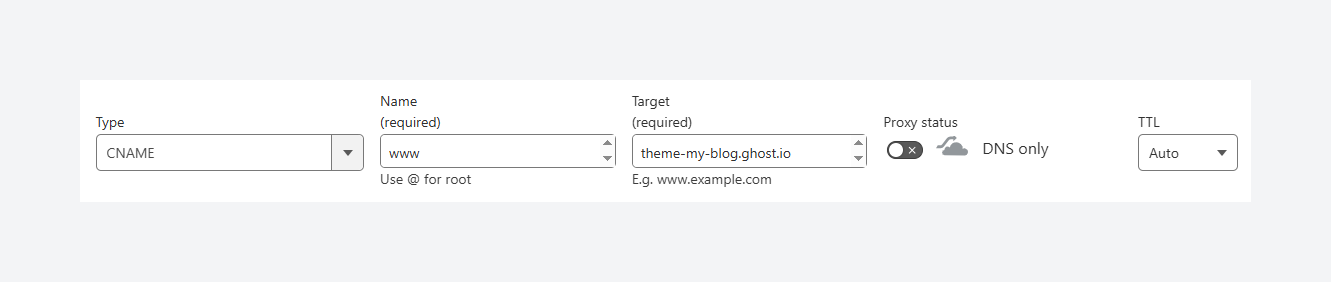
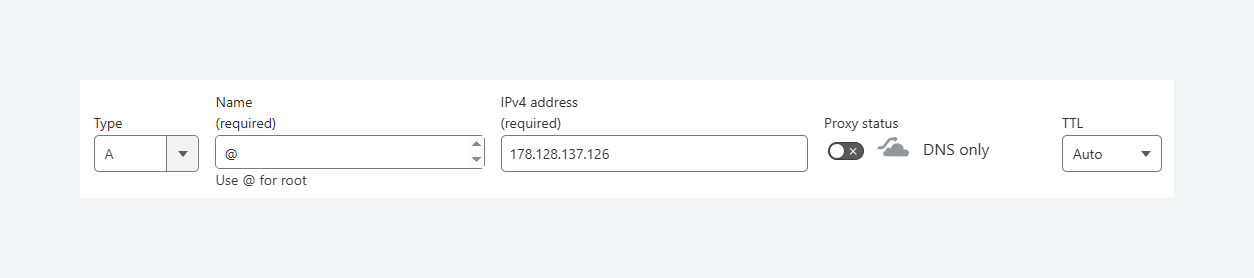
- Once you add your domain, Ghost will provide you with a value for a
CNAMEand anArecord. These records will differ slightly depending on how you want to configure the domain (www or naked). You'll need to log in to your domain registrar (e.g., Namecheap) and add these records. In simple terms, a CNAME record is just a signpost on the internet. It tells any browser looking formyawesomeblog.comthat the actual content "lives" at your unique Ghost(Pro) address.

- Now it's time to add these records to the registrar. If you have added your domain to Cloudflare, then you will see an additional Proxy Status column, as shown in the image above. Basically, it means we need to turn off the proxy status (we can turn it on after it is activated).
- Go to your registrar's dashboard. I am using Cloudflare. Find a section where you can add the DNS records.
Once you save the records, the changes can take anywhere from a few minutes to a few hours to propagate across the internet. You can check the propagation using online tools like Whats My DNS.
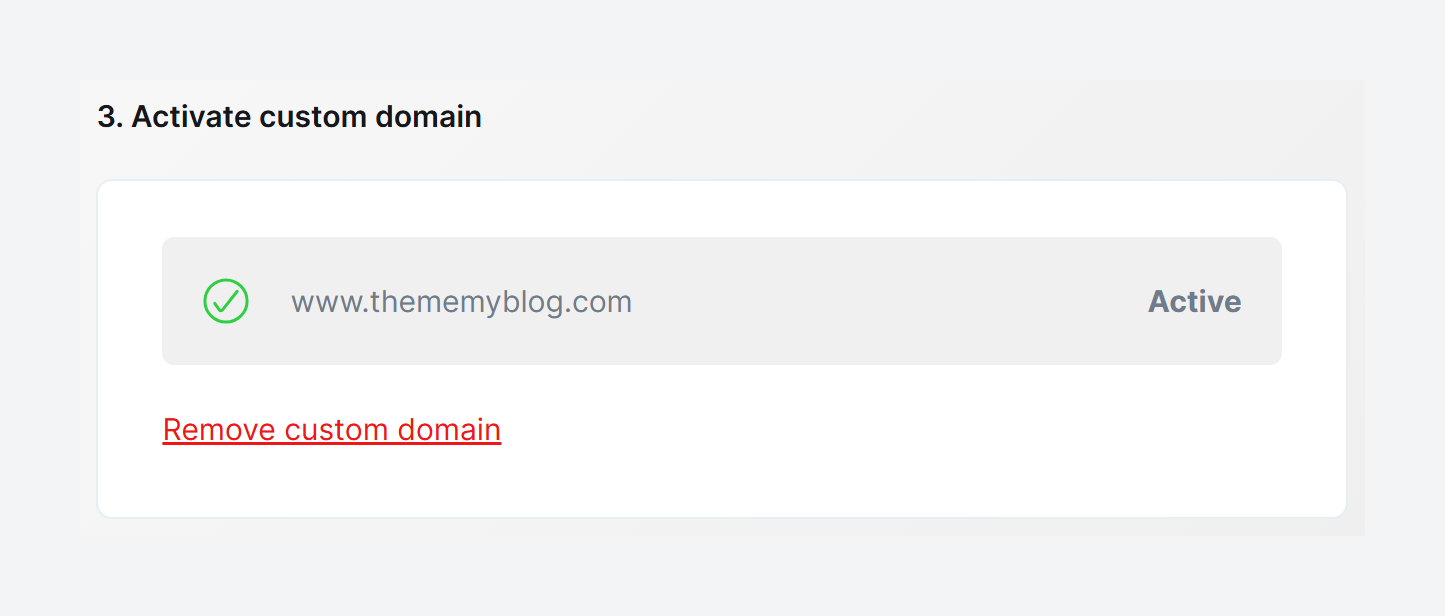
Once the DNS is propagated to most of the DNS servers across the globe, you can hit the 'Activate' button. It may take around 10 minutes.
After that, your professional, branded blog will be live on your own domain.
Your Blog's Essential First Settings
With your site live and your domain connected, it's time to infuse it with your unique identity. These next steps are about establishing your brand and setting up the structure of your site.
This process is strategically important. It forces you to think about your blog as a coherent publication from the very beginning, which leads to a more professional and user-friendly experience later on.
We'll be working primarily in the Settings area (the gear icon).
Step 1: Establishing Your Brand Identity
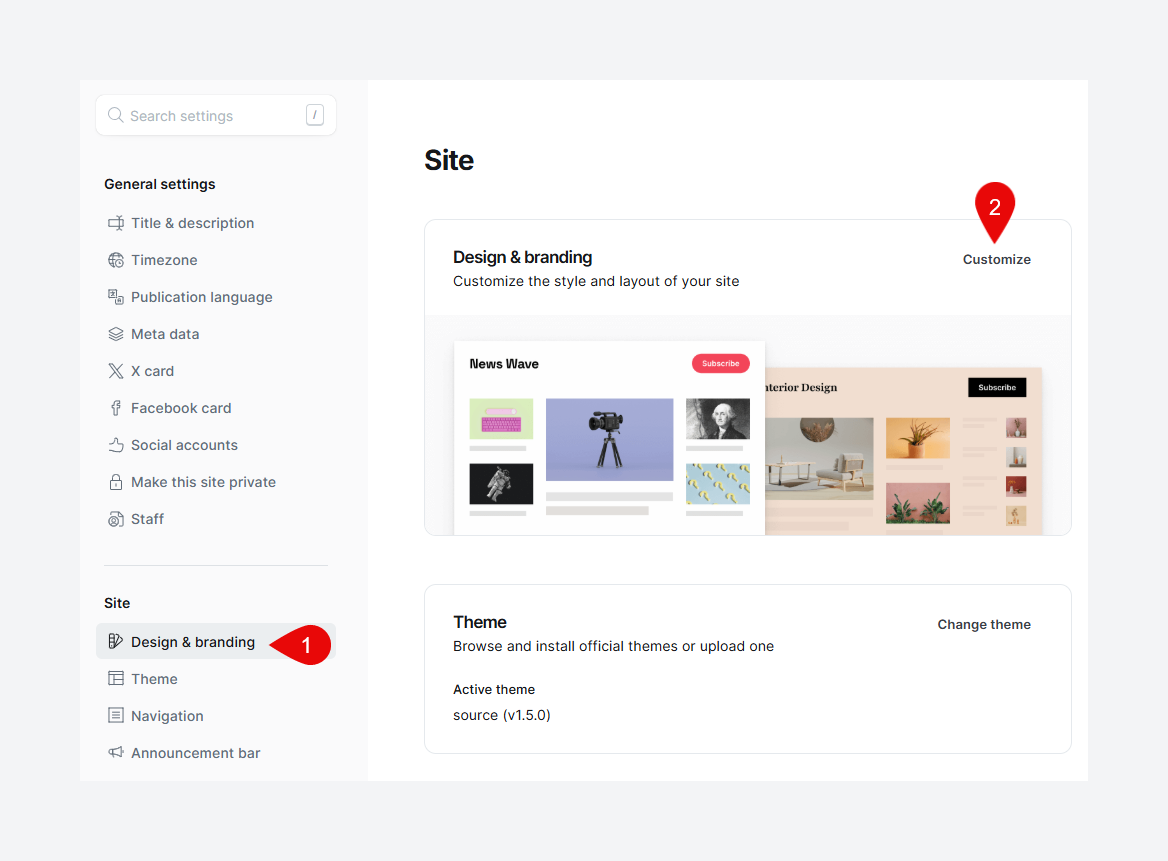
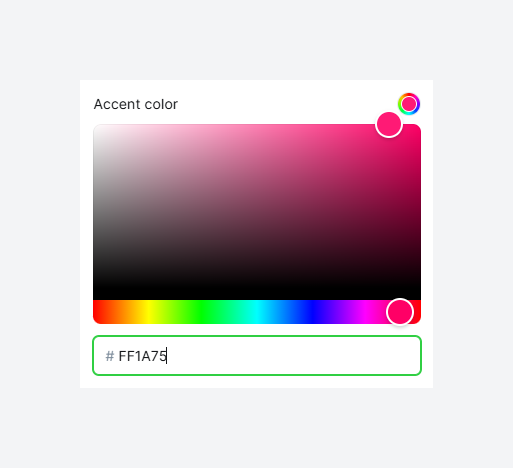
Navigate to Settings -> Design & branding. Click the Customize button to open the design panel. Here, you'll focus on the Brand tab.
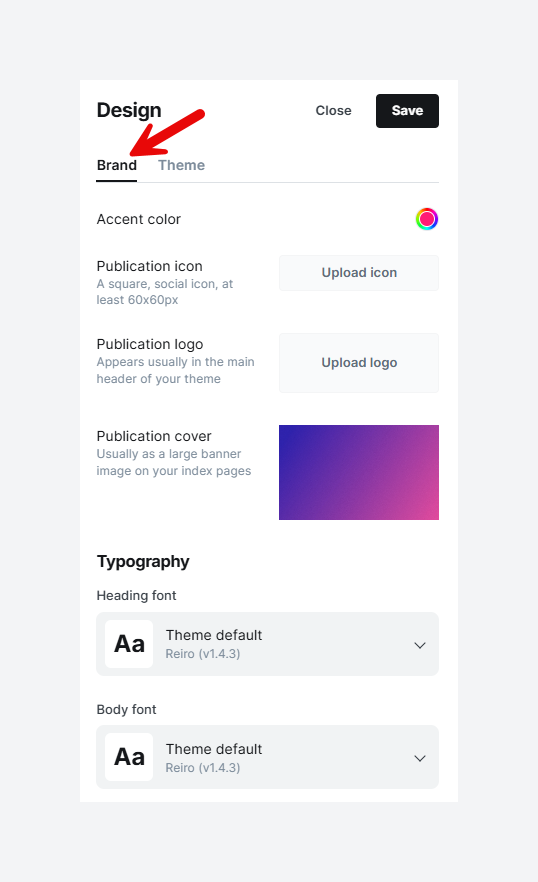
- Accent Color: This is the primary color used for links, buttons, and other highlighted elements in your theme. Choose a color that represents your brand and provides good contrast for readability.
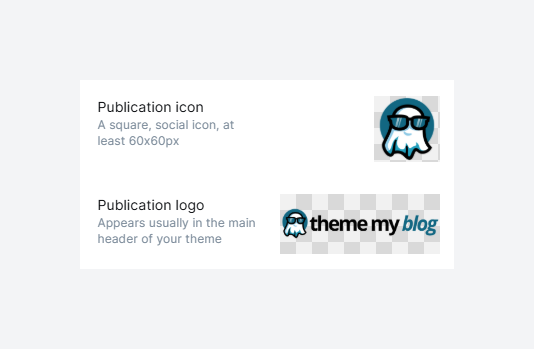
- Publication Icon (Favicon): This is the small square icon that appears in browser tabs. It's a small but crucial branding element.
- Requirement: Must be a square image, at least 60px by 60px. Generally, I keep it at 512 x 512 px. If it is a
png, convert it towebpfor reduced size.
- Requirement: Must be a square image, at least 60px by 60px. Generally, I keep it at 512 x 512 px. If it is a
- Publication Logo: This is your main logo displayed on the site, usually in the header.
- Requirement: For best results, use a transparent
webpfile that is at least 600px wide by 72px tall. The logo size depends on the theme you are using. Read the theme documentation and choose the recommended size.
- Requirement: For best results, use a transparent
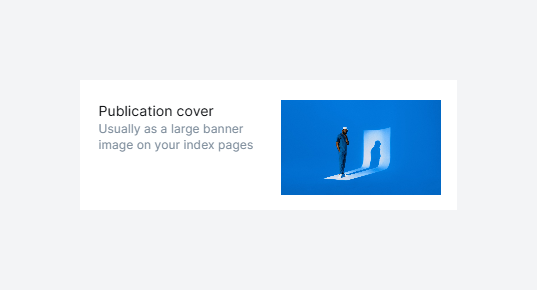
- Publication Cover: Some themes use a large cover image as a banner on the homepage. If your theme supports it, this is a great place to use a high-impact, brand-defining photograph. Read the theme documentation for the recommended size. And don't forget to convert to
webp.
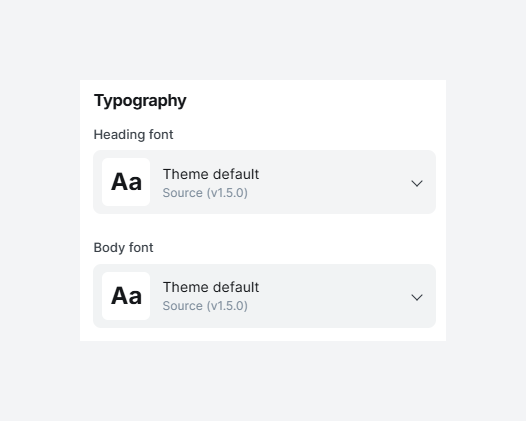
- Typography: With version 5.104.0, Ghost released custom font support. Now, you can select a heading and body font that is directly supported by Ghost core.
Apart from the Brand settings, there are also custom Theme settings provided by the theme you are using. These settings differ from theme to theme. Read the theme documentation to understand more about them.

Step 2: Crafting Your Navigation Menu
Your navigation is the roadmap for your readers. A clear menu is essential for a good user experience. Go to Settings -> Navigation and click Customize.
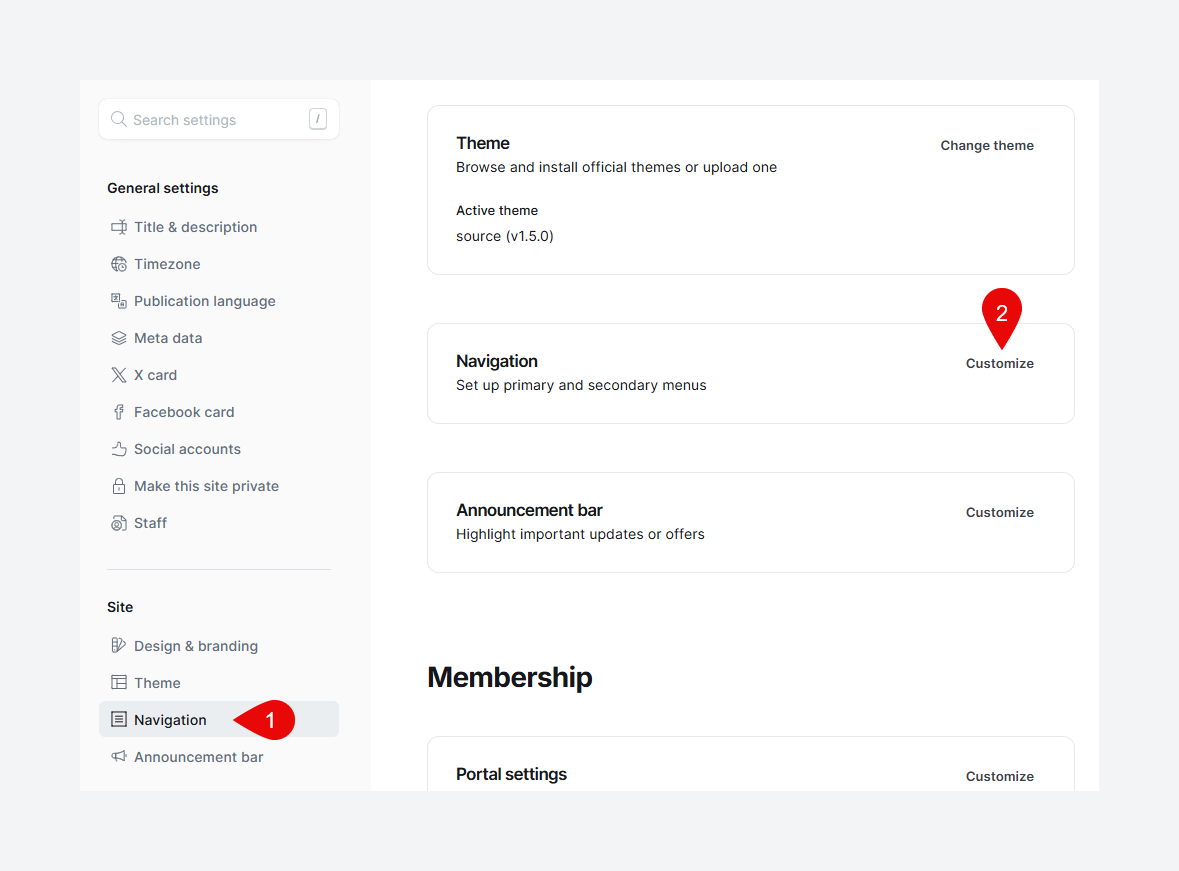
- Primary & Secondary Navigation: You'll see fields for both. Primary navigation is your main menu (usually at the top of the page). Secondary navigation is often used for links in the footer, like "Terms of Service" or "Disclaimer". Different themes use the secondary navigation in different ways and places.
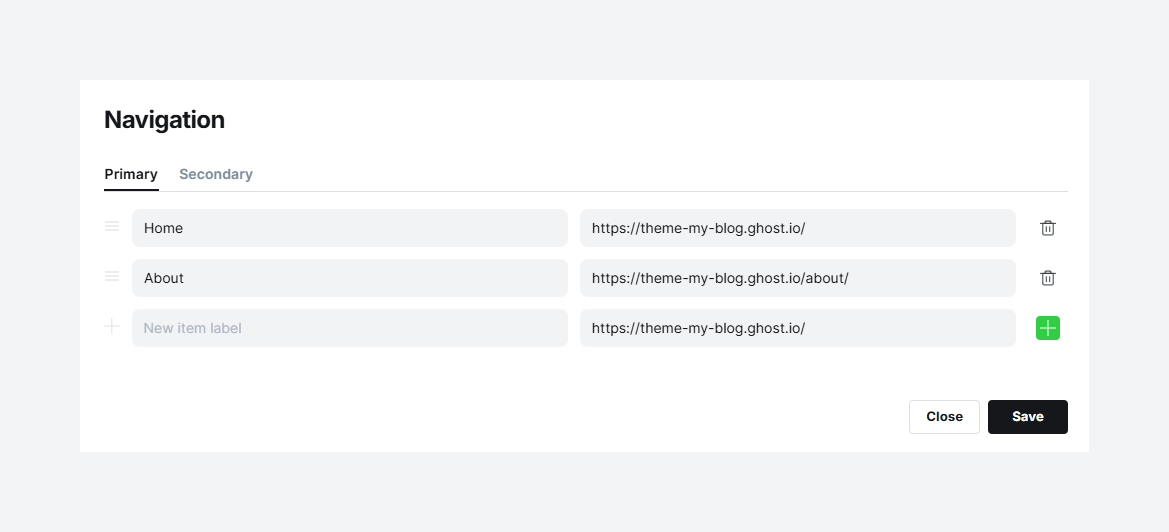
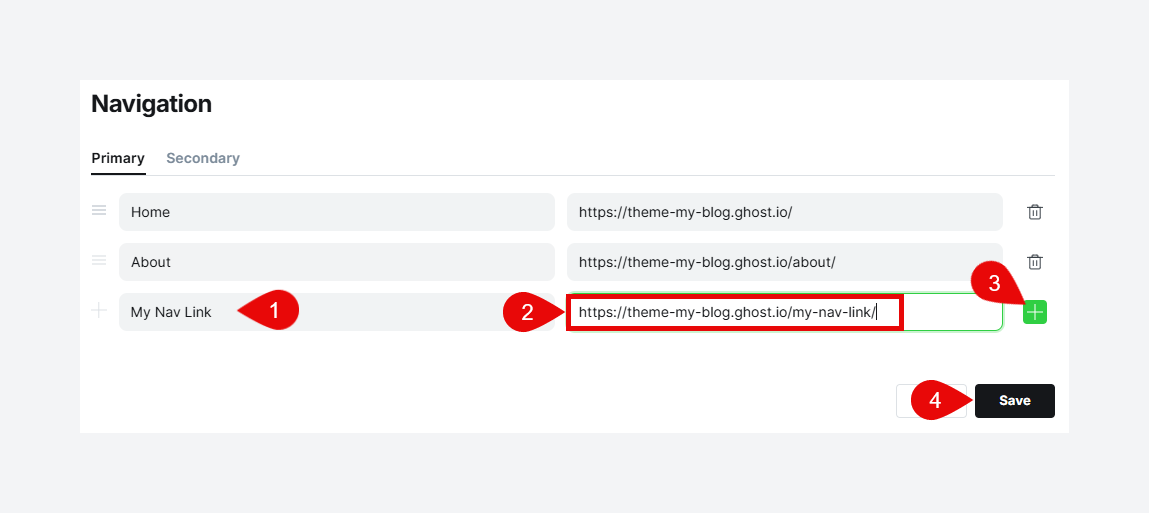
- Adding Menu Items: To add a menu link, simply type a
Label(the text that will be displayed, e.g., "My Nav Link") and paste theURLof the page it should link to. Ensure to use the correct URL to avoid404errors. You can also add any external links (like your Shopify store) to the menu.
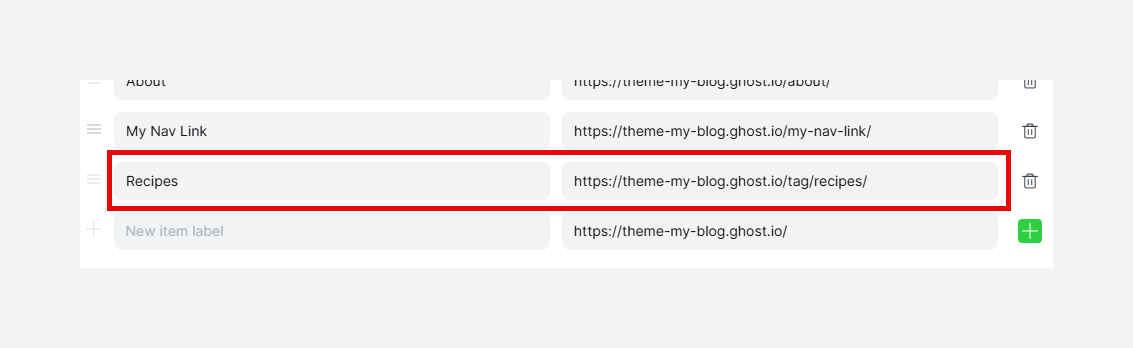
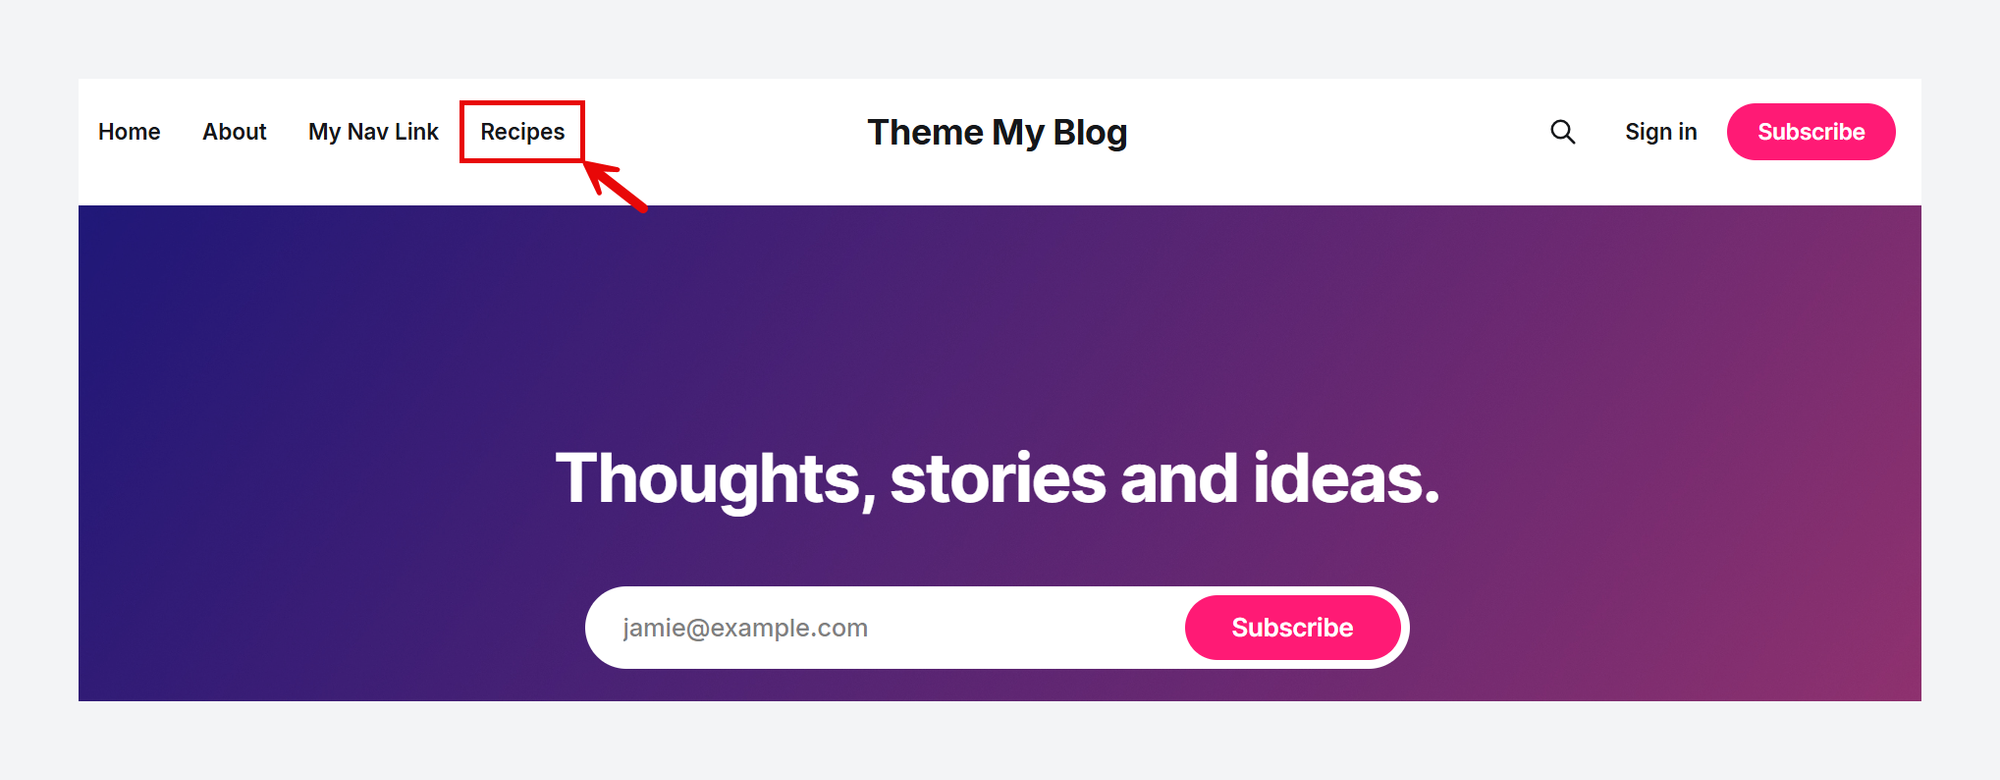
- Create Categories menu item: You can create menu items that lead to an archive of all posts with a specific tag. For example, to create a "Recipes" category in your menu:
- Use "Recipes" as the
Label. - Use
/tag/recipes/as theURL. Now, any post you tag with "recipes" will automatically appear on that page.
- Use "Recipes" as the
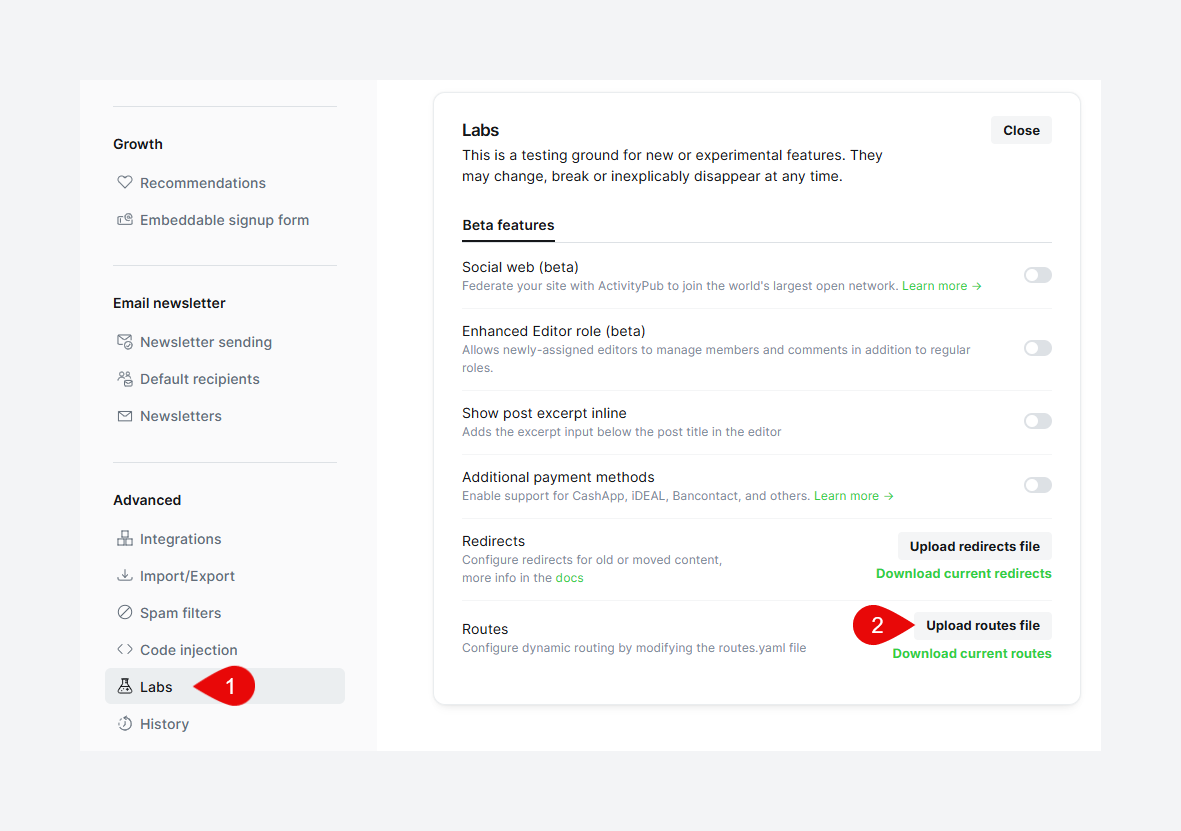
- Routes.yaml: The
routes.yamlfile acts like a simple map guiding visitors through your site. Theme developers use this file to set custom pathways for different types of content, such as creating special pages, grouping posts, or setting up landing pages. If your theme has custom pages (like Archive, Contact, Tags, etc.), chances are you have to upload theroutes.yamlfile provided with your theme. To upload, go to Settings -> Labs -> Upload routes file.
routes.yaml in Ghostroutes.yaml file. Check your theme's documentation.Step 3: Connecting Your Social Presence
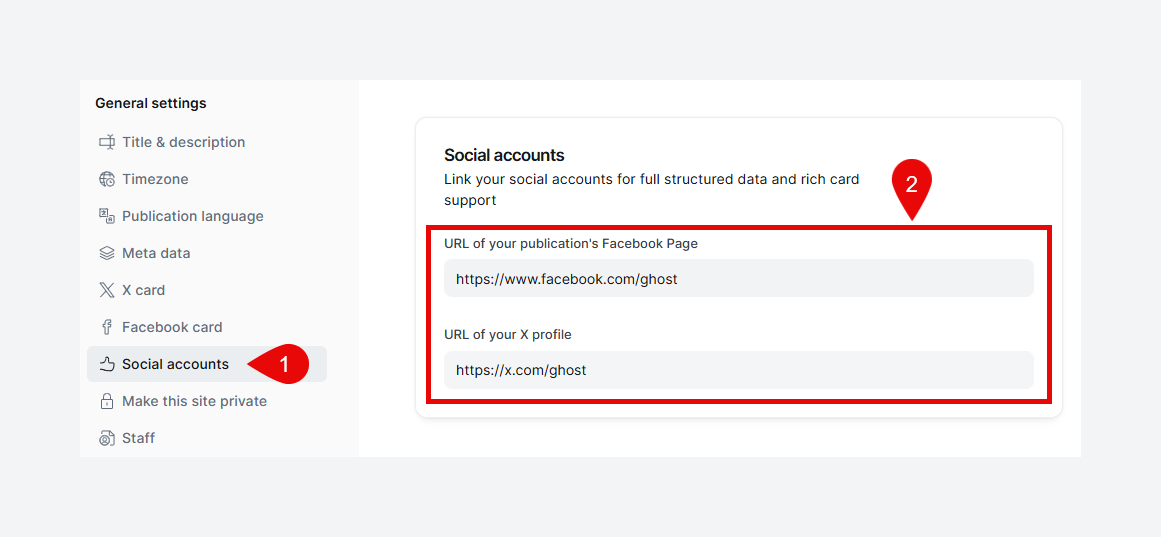
First, let's do the easy part. Go to Settings -> Social accounts. Paste the full URLs for your publication's Facebook and X (formerly Twitter) pages here. Ghost uses this information to enrich your site's metadata for social sharing.
What about other icons like LinkedIn, Instagram, or Pinterest? While not built-in, you can add them easily using a Code Injection. This might sound technical, but it's just a matter of copying and pasting.
Depending on your theme, you might need to edit the theme code to add more social media to your publication.
Choosing and Customizing a Theme
Your site's theme is its digital storefront; it dictates the entire visual experience for your readers, from typography and color to the layout of your posts. One of Ghost's greatest strengths is its ecosystem of beautiful, modern, and high-performance themes that look incredible right out of the box.
This curated approach is a significant advantage. While WordPress offers tens of thousands of themes, the quality can be inconsistent, with many being bloated or poorly coded. This can lead to slow performance and maintenance headaches.
Ghost's theme ecosystem, while smaller, has a much higher quality floor. This reduces your risk of choosing a "bad" theme and empowers you to create a professional-looking site with confidence.
Where to Find Ghost Themes?
You have several excellent options for finding the perfect theme. There are pros and cons to choosing a free theme over a premium theme.
You can find Ghost themes at:
- The Official Ghost Marketplace: It features a curated collection of free and premium themes. The default theme, Source, is a fantastic starting point. However, it also includes some old themes that are no longer being supported. So pay due diligence when choosing a theme.
- Premium Theme Marketplaces: Several independent developers and studios specialize in creating stunning Ghost themes. These often come with extensive documentation and dedicated customer support. Reputable (unofficial) marketplaces/developers include:
- Themeforest (Dominated by Fueko)
- Theme My Blog (Extensive and hard-to-find Ghost themes with super-helpful filters - built with Ghost)
- Bright Themes (Themes used by major publishers and websites)
- Theme Up Studio (Creators of the multilingual Crimson theme)
- Priority Vision
- Themex Studio
- Kusa Projects (Ghost and Webflow)
When browsing, look for a responsive theme that offers customization options/features and has clear documentation.
How to Install and Activate a New Theme
- Download the Theme: After purchasing a theme, you will download a
.zipfile. Do not unzip it. If you plan to use an official Ghost theme, then you can directly install it without leaving your Ghost Admin dashboard. - Navigate to Theme: In your Ghost admin, go to Settings -> Theme.
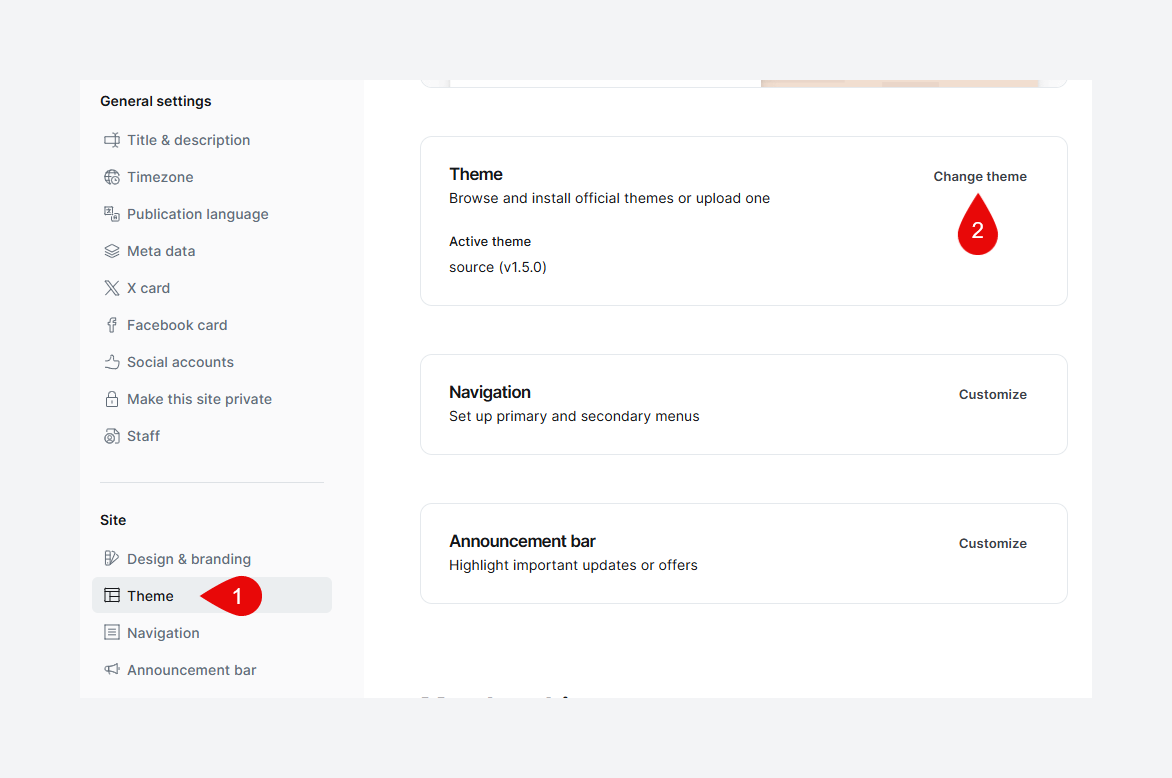
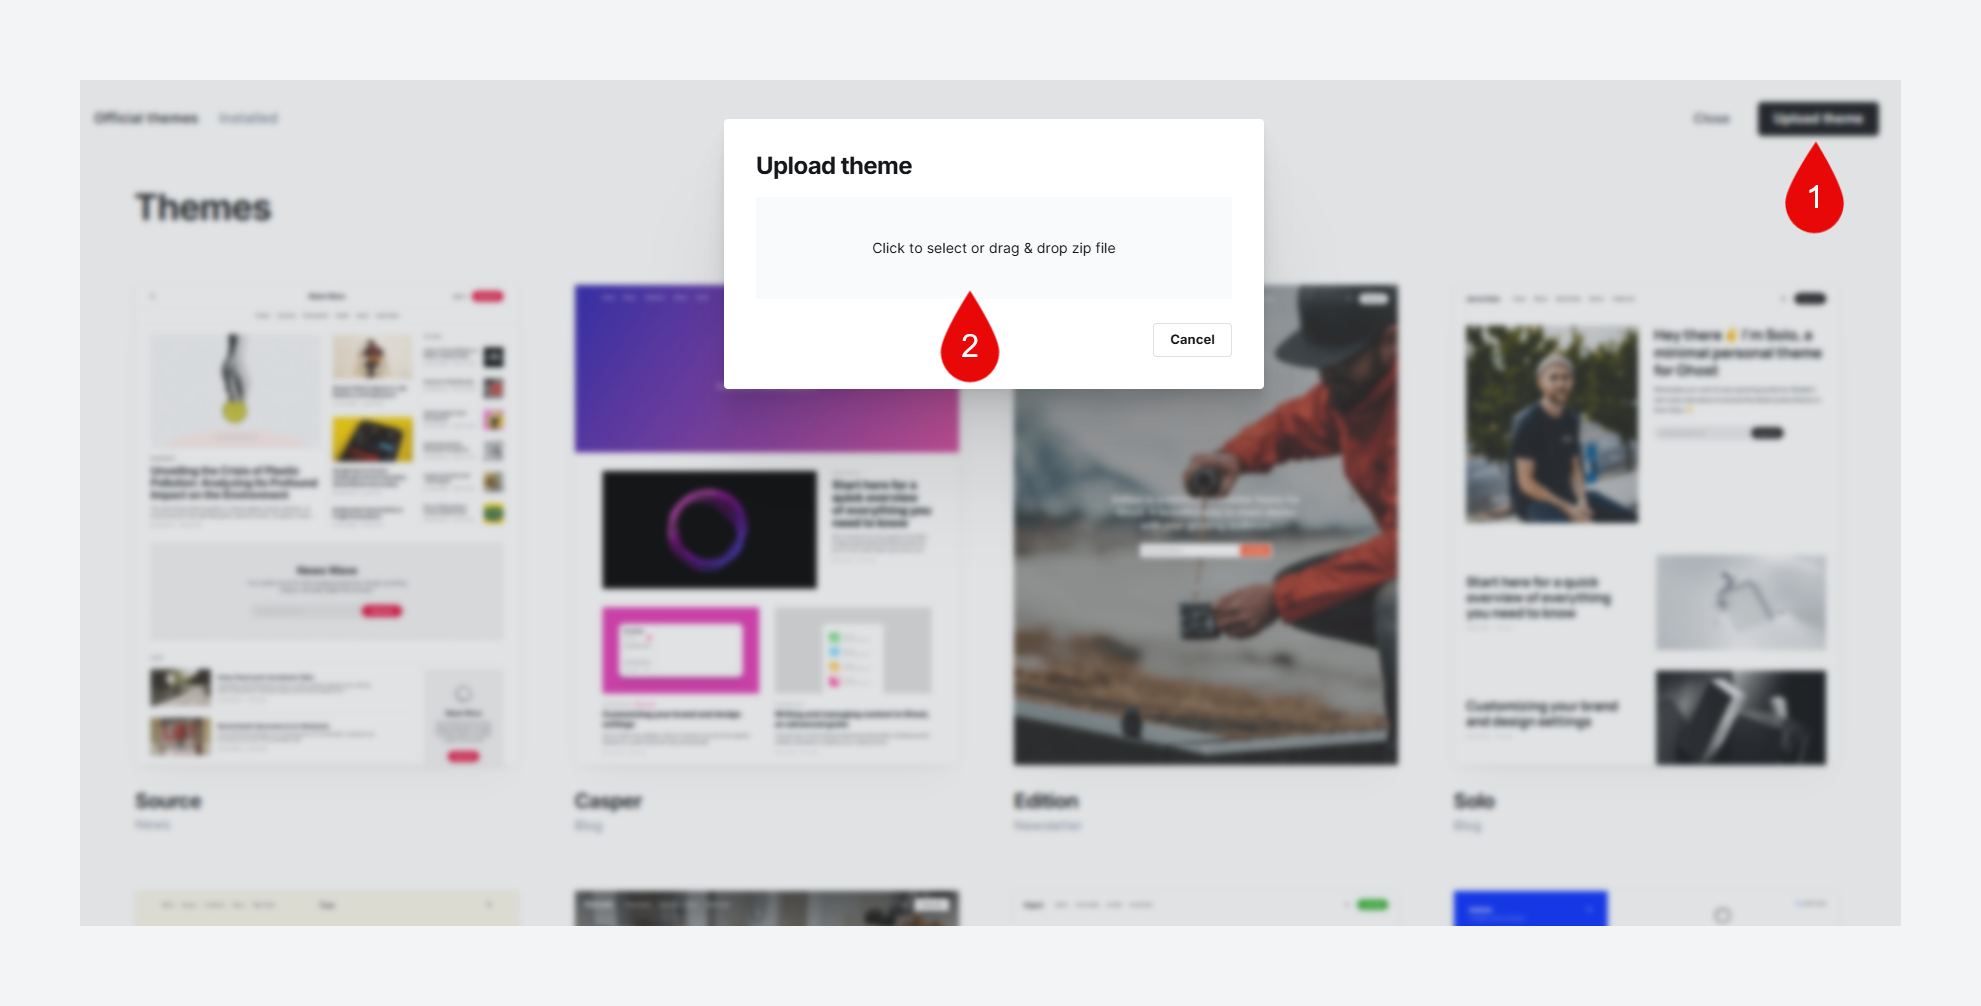
- Upload and Activate: In the top right corner of the next screen, click the
Upload a Themebutton. Select the.zipfile you just downloaded. Once it is uploaded, simply clickActivate.

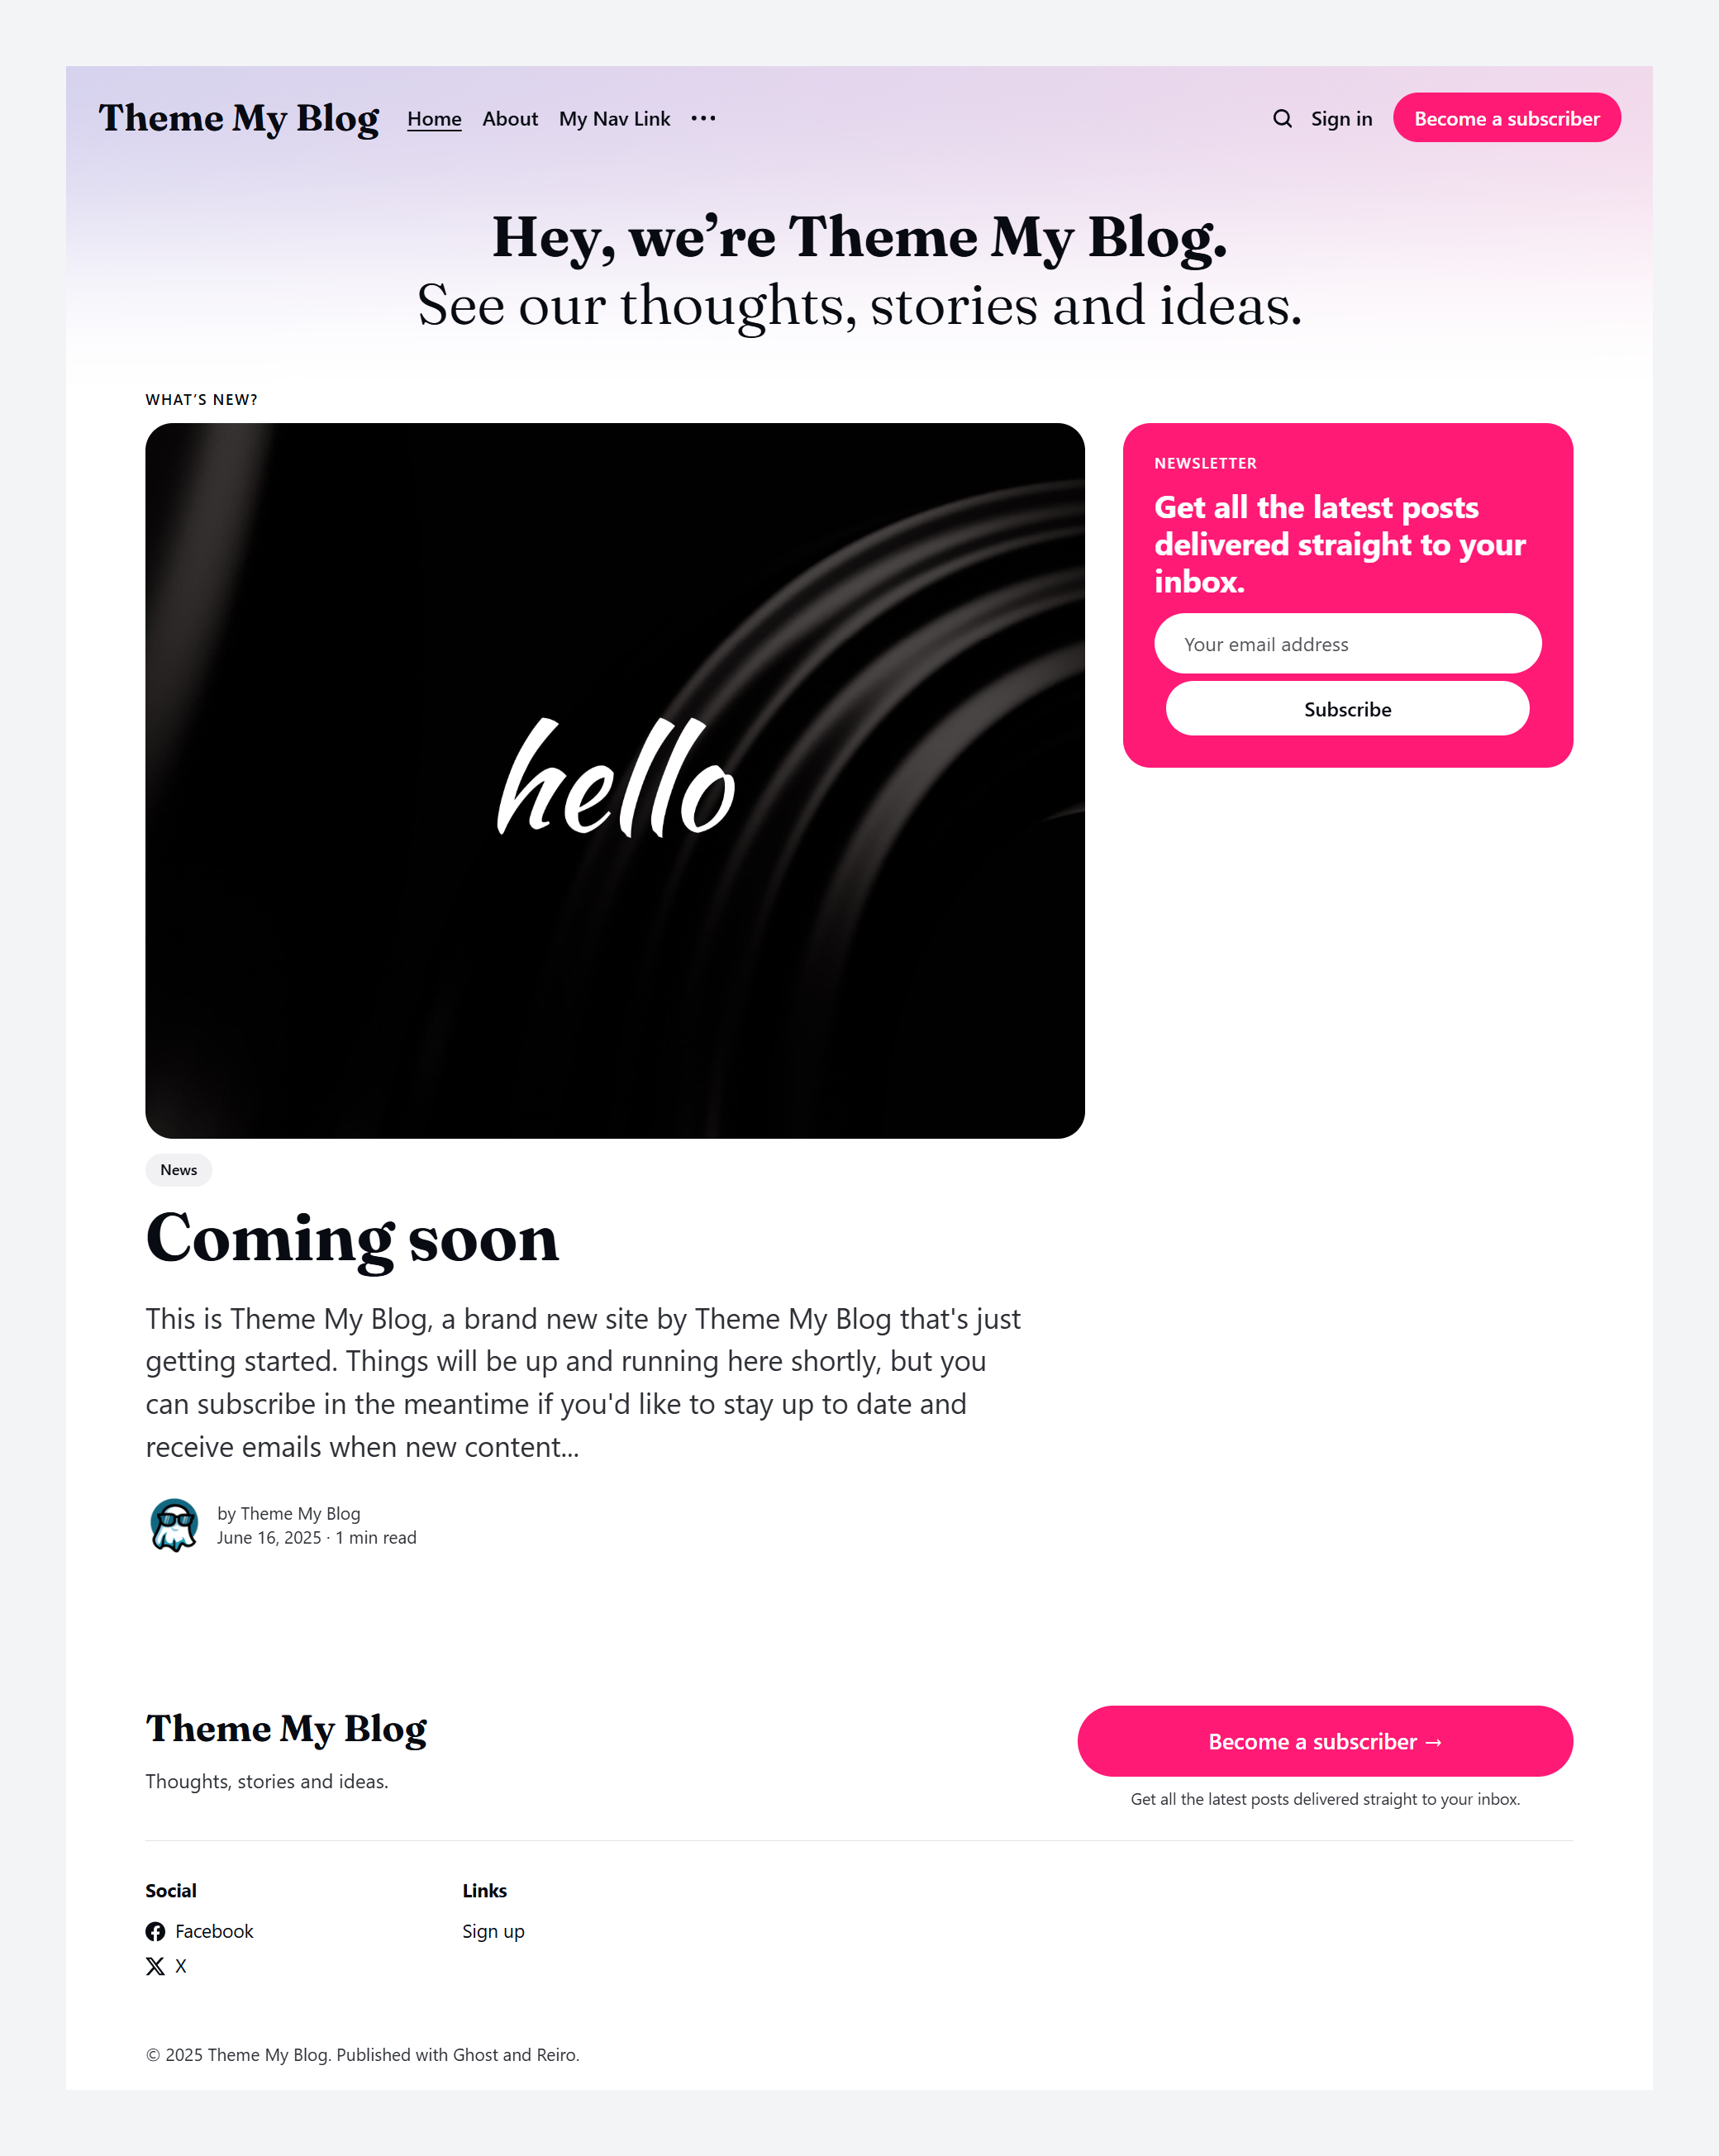
After activating, your website will drastically change in appearance. However, it will not be similar to what you saw in the theme demos. You need to add posts and pages to make it similar to the theme demos.
This is how my website looks with the new theme activated. Ghost adds a Coming soon blog post by default, and that is the only piece of content that will be visible on the website.
Easy Customization: The "No-Code" Way
You don't need to be a developer to make a theme your own. Most modern Ghost themes are built with non-technical users in mind and offer a range of customization options directly within the Ghost admin panel.
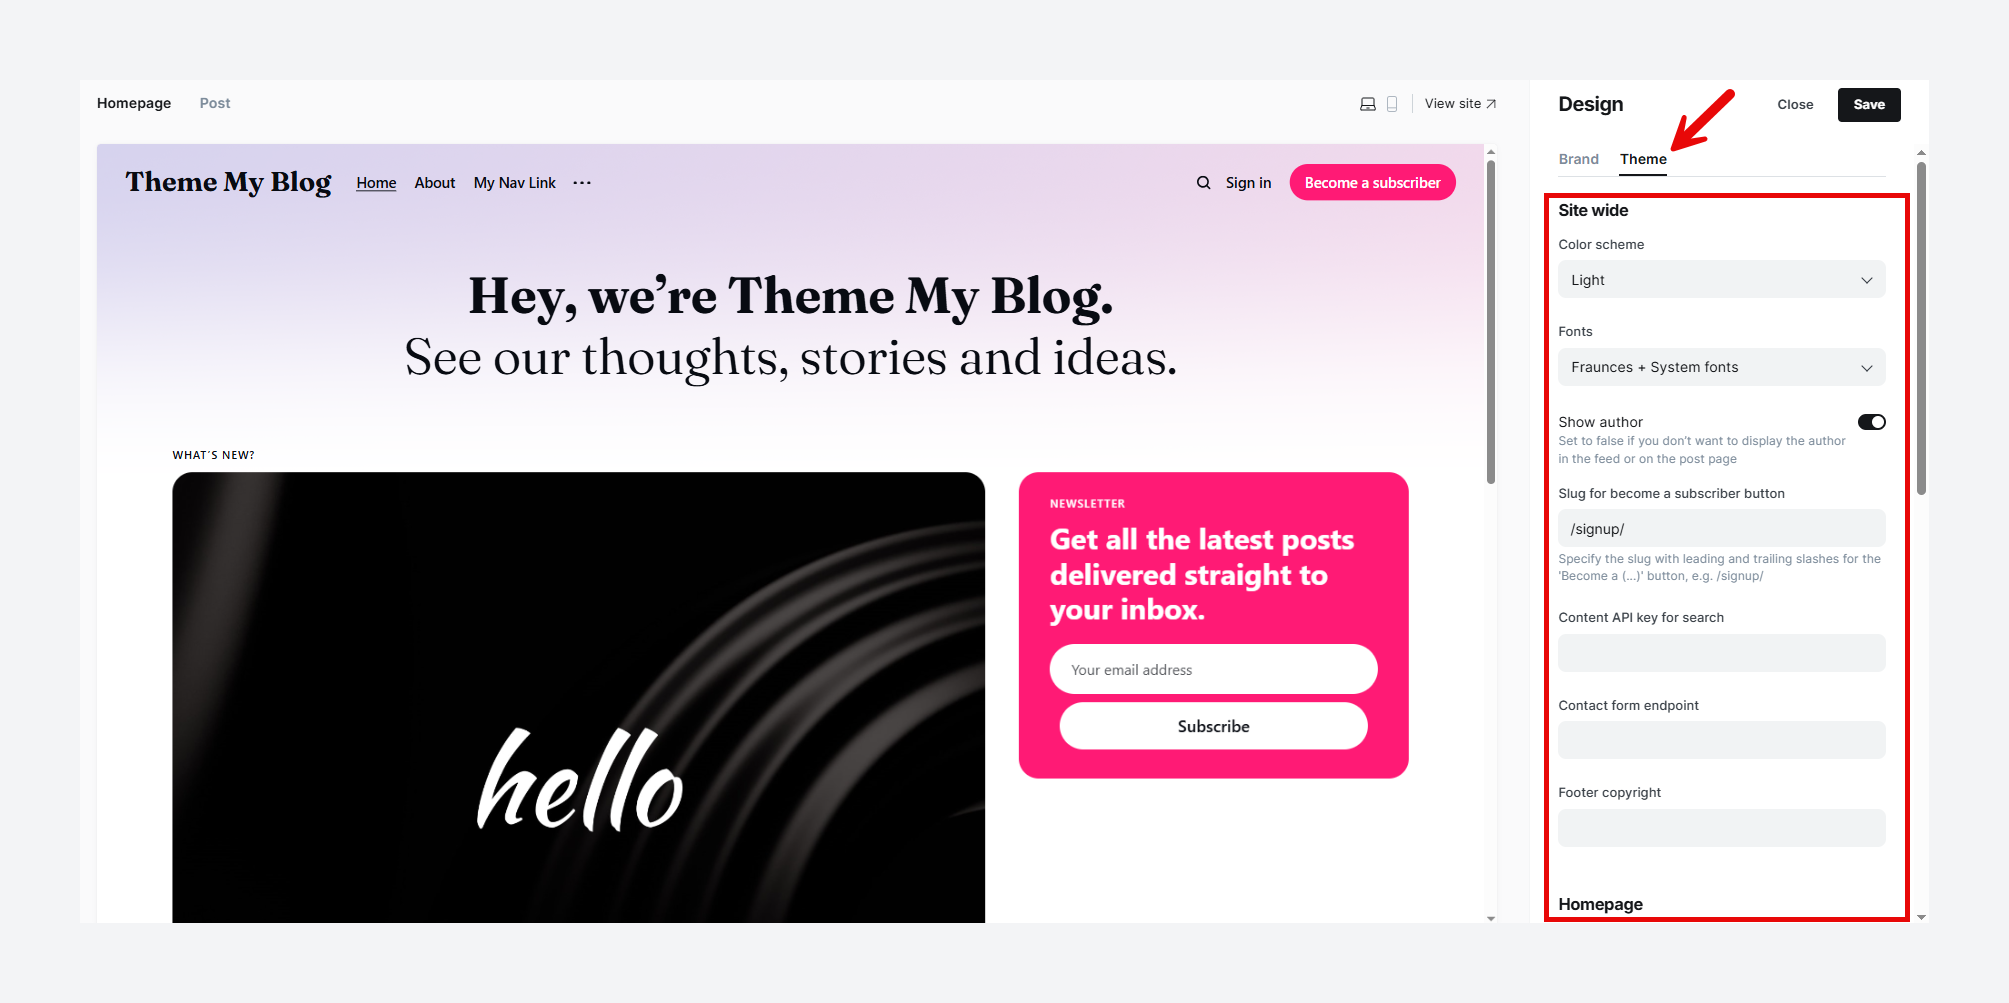
Navigate back to Settings -> Design & branding and click Customize. You'll see several tabs that your new theme has populated with options.
- Homepage settings: Many themes allow you to change the layout of your homepage, toggle elements like a featured post slider on or off, or change the number of posts displayed.
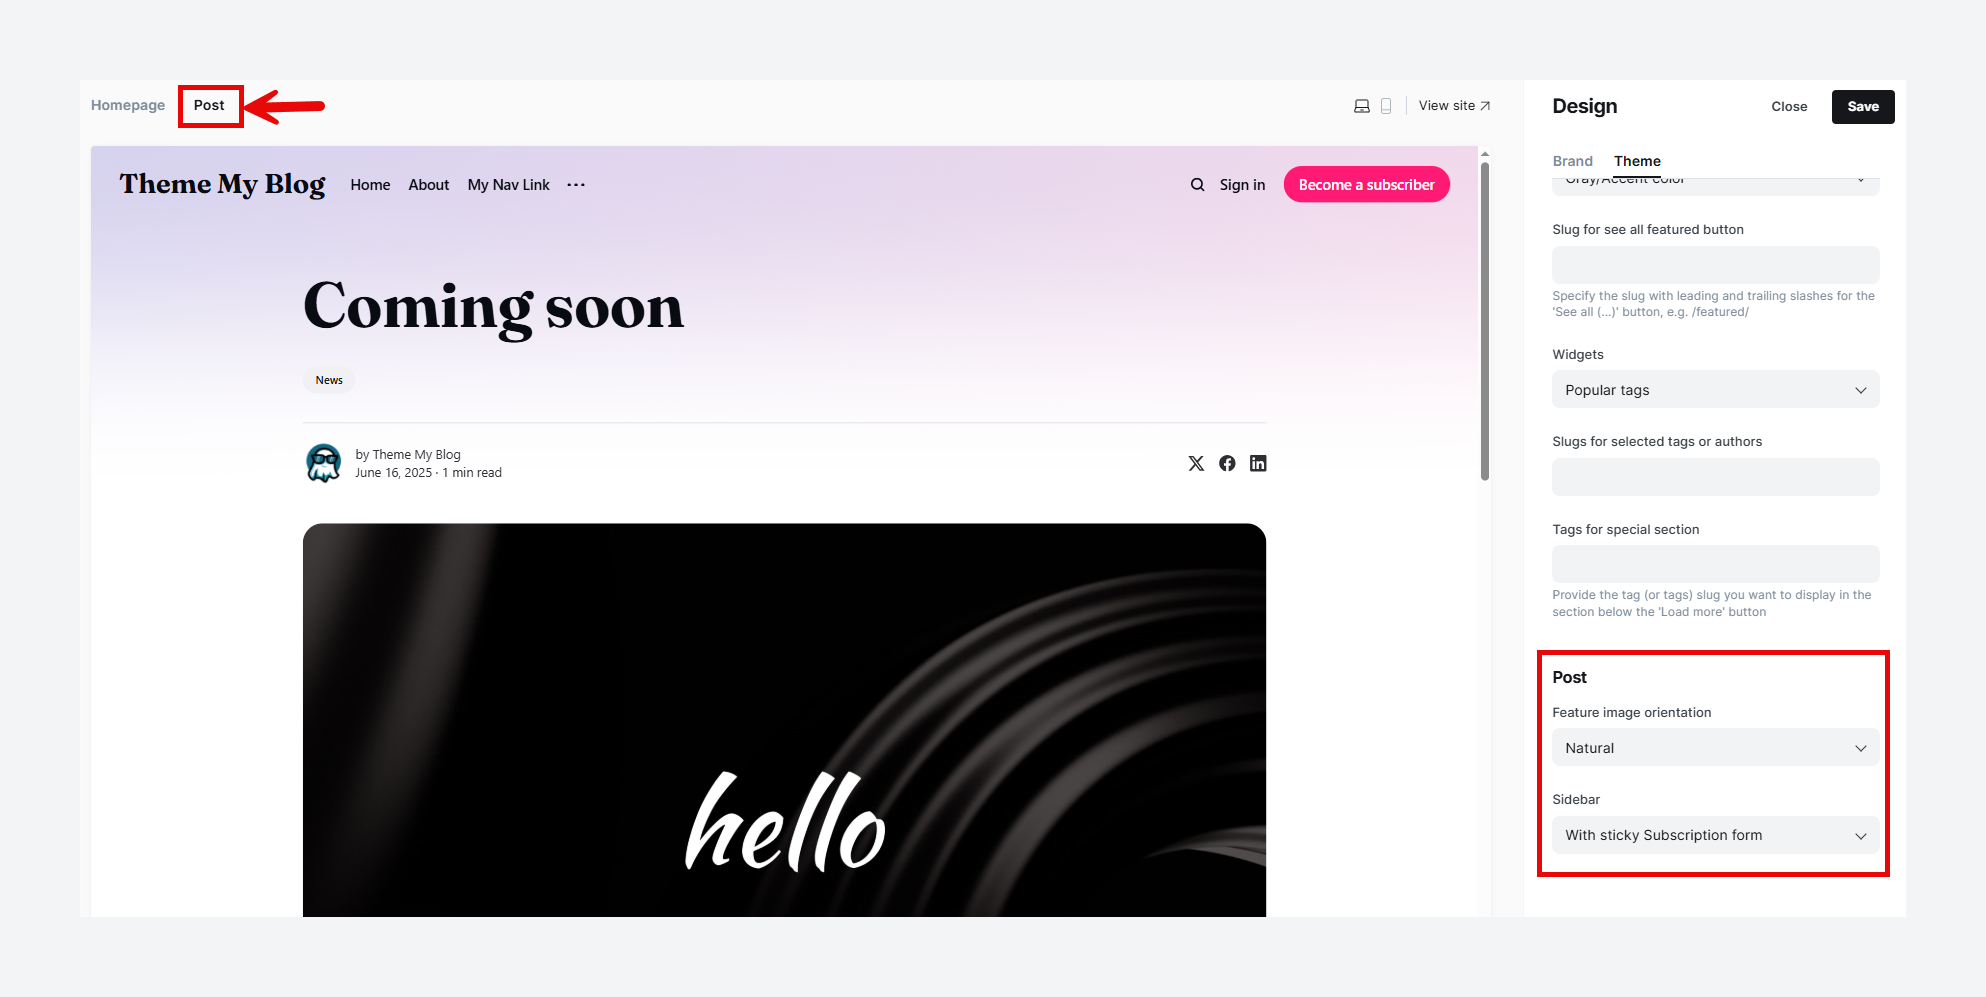
- Post settings: You might find options to change the layout of your article pages, such as hiding or showing a sidebar.
- Site-wide: Many themes provide custom settings that affect the look of your entire site, such as the default color scheme or footer copyright notice.
Explore these settings. This is the primary way you can tweak the look and feel of your site to perfectly match your brand, all without writing a single line of code.
Writing and Publishing Your First Post
The foundation is built, the design is in place—now it's time to do what you came here to do: create content.
The Ghost editor is widely celebrated as one of its best features. It's a minimal, distraction-free writing sanctuary that is both beautiful to look at and incredibly powerful under the hood.
Mastering the Ghost Editor
To create a new post, go to Posts -> New post.

When you create a new post, you're greeted with a clean, blank canvas.
- Basic Formatting: It works just like you'd expect. Start typing. Highlight text to bring up a simple toolbar for bold, italics, links, and headings. All the standard keyboard shortcuts work, and you can copy and paste content from other sources like Google Docs, and Ghost will intelligently preserve the formatting.
- Markdown Support: If you're familiar with Markdown syntax, you can simply type it and Ghost will auto-convert it into beautifully formatted content as you go.
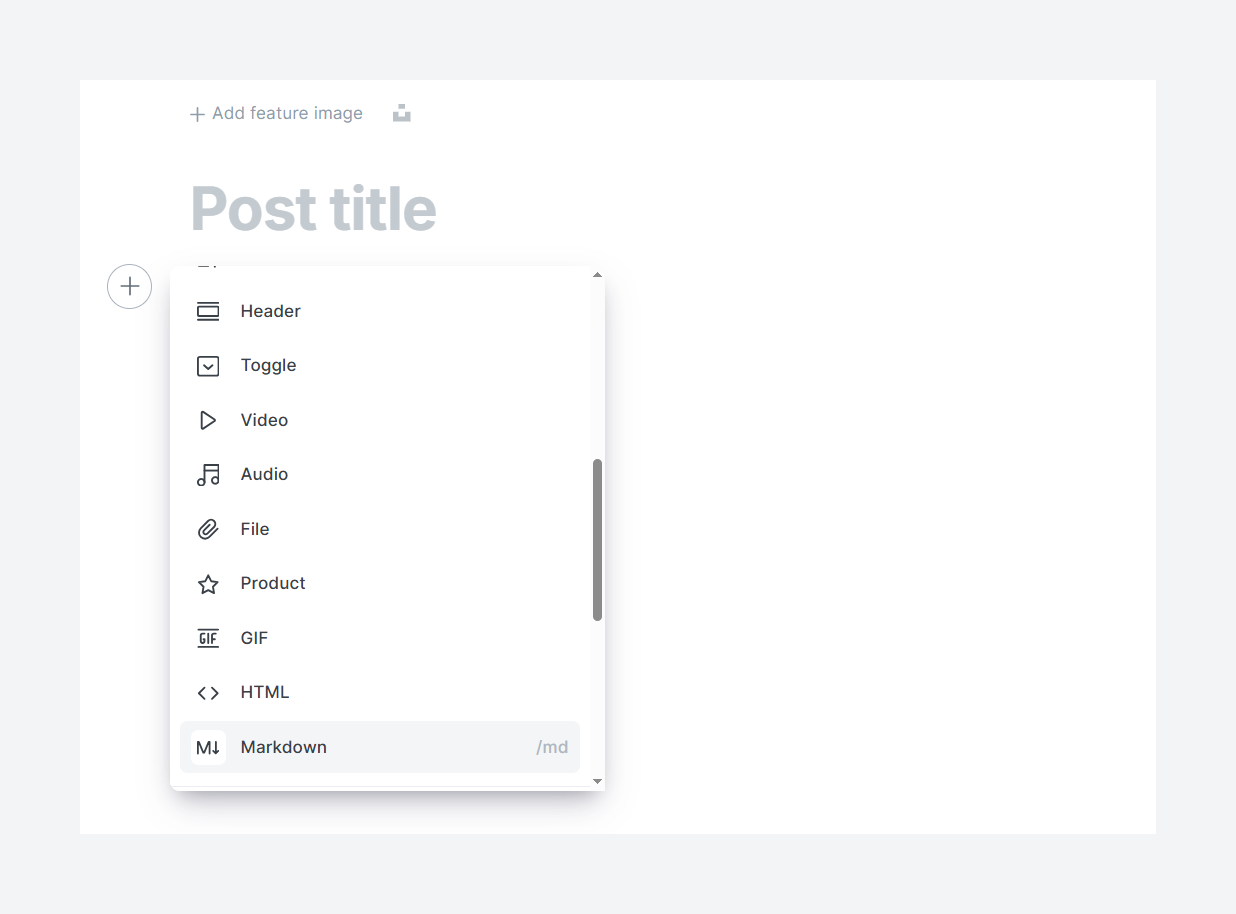
Unlocking Dynamic Content with Ghost Editor Cards
The real power of the editor lies in the cards. These are blocks of content that let you insert anything that isn't plain text. To access the card menu, simply type / on a new line or click the + icon.

Here are the essential cards you'll use constantly:
- Image / Gallery: Upload an image from your computer, or just drag and drop it into the editor. Ghost automatically compresses and optimizes images for the web. Your theme must support
webp/avifformats for better performance. - Video / Audio / Files: You can upload your own media files directly to Ghost. Depending on your plan, file size limits can be up to 1GB, which is perfect for hosting podcasts or video clips.
- Bookmark: Paste any URL and Ghost will transform it into a visually appealing preview card with the page's title, description, and image.
- Embed: Paste a link from popular services like YouTube, Spotify, X (Twitter), or SoundCloud, and Ghost will create a fully interactive embed.
- HTML Card: It allows you to paste code snippets from other services to add advanced functionality, like an email signup form from your favorite marketing tool or a custom survey.
- Header Card: Header cards in Ghost are perfect when you want to break up your post and make it easier to read. Think of them like mini headlines inside your blog—they guide your readers, highlight key points, and keep everything looking clean and organized. Super handy for longer posts!
- Email-only Card: Add content that will only appear in the email version of your post. This is perfect for adding a personal introduction or a special call to action just for your newsletter subscribers.
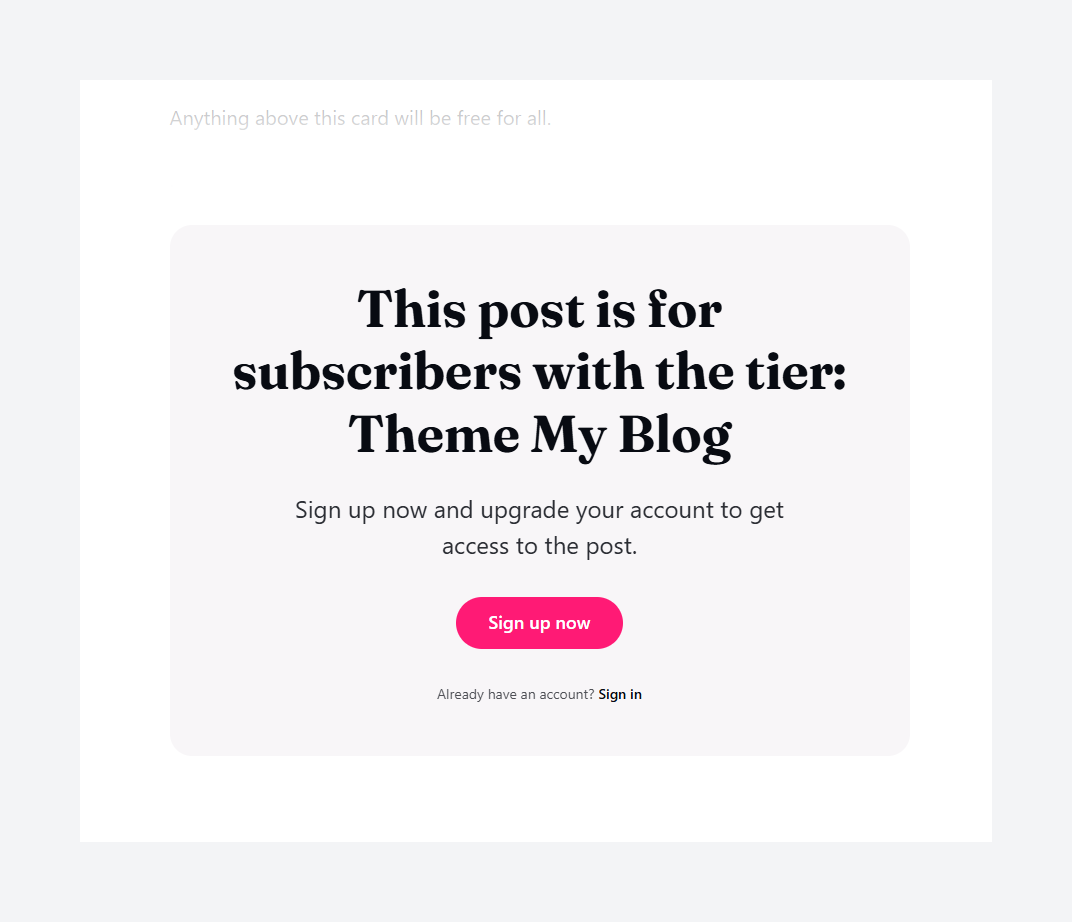
- Public preview: Public Preview cards in Ghost let you insert a clear divider (
/public-preview) in any post, page, or newsletter—showing public content above and gated member-only content below. It helps grow your paid audience by offering a taste of premium posts without fully exposing them.
There are a lot more cards for you to explore once you are in the Ghost editor.
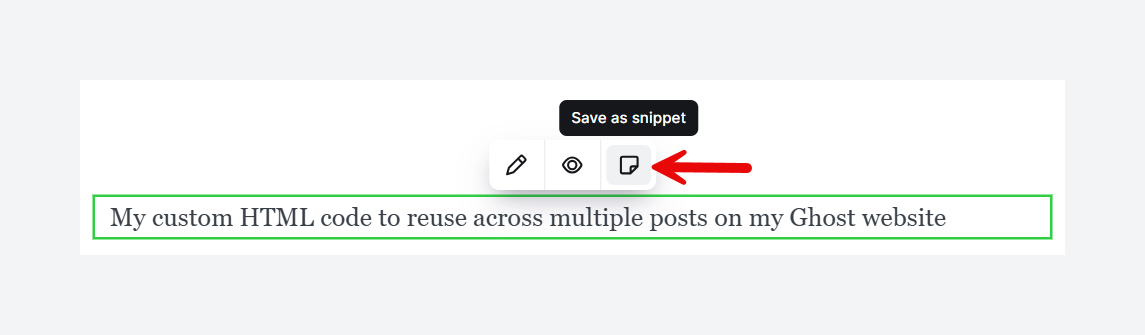
Pro-Tip: Creating Reusable "Snippets"
This is a useful feature for efficiency. If you create a piece of content you know you'll use again—like a custom-designed HTML code, a disclaimer, or a newsletter signup box—you can save it as a Snippet.
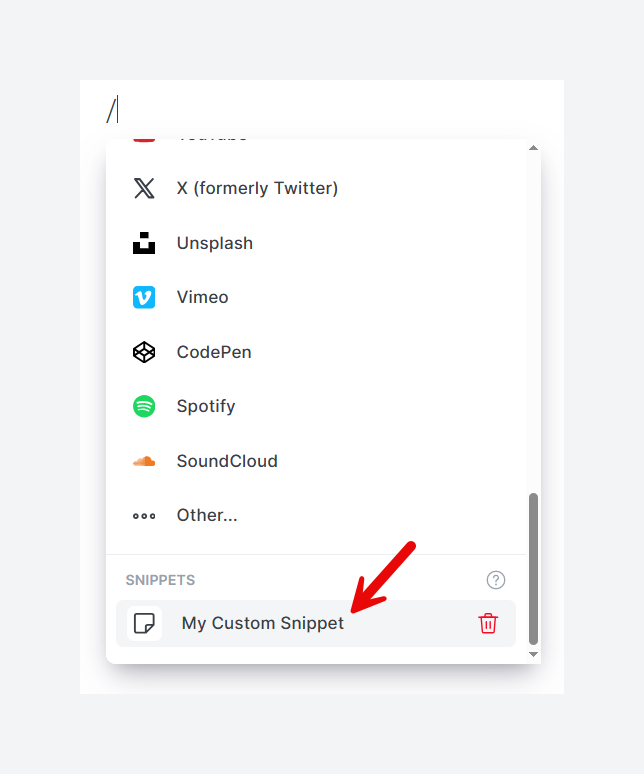
Simply highlight the content in the editor, click the snippet icon in the toolbar, and give it a name. From then on, you can insert that entire block of content anywhere by typing / and searching for its name.
The Pre-Publish Checklist (Post Settings Menu)
Before you hit publish, click the settings icon in the top right of the editor to open the Post Settings menu. Optimizing these settings is crucial for organization and SEO.
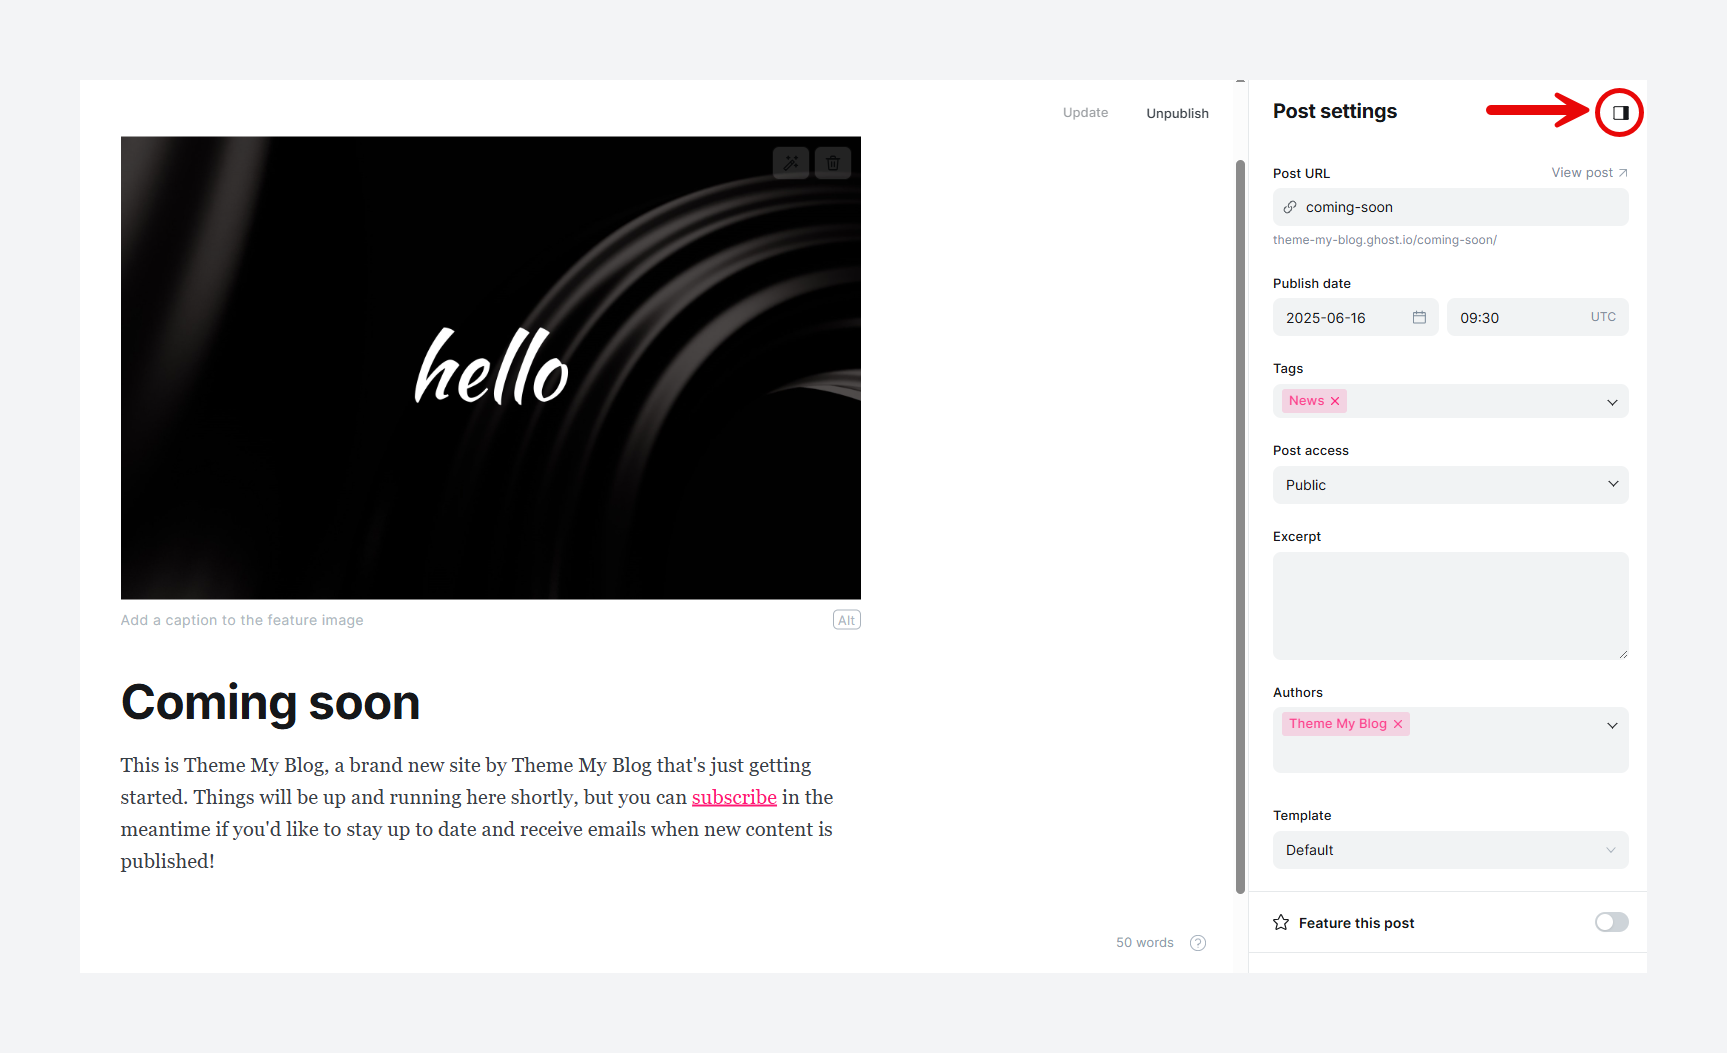
- Feature Image: Ensure that an appropriate feature image is used and compressed for faster load times. This is the First Contentful Paint (FCP), and a larger image will drastically reduce your page's performance.
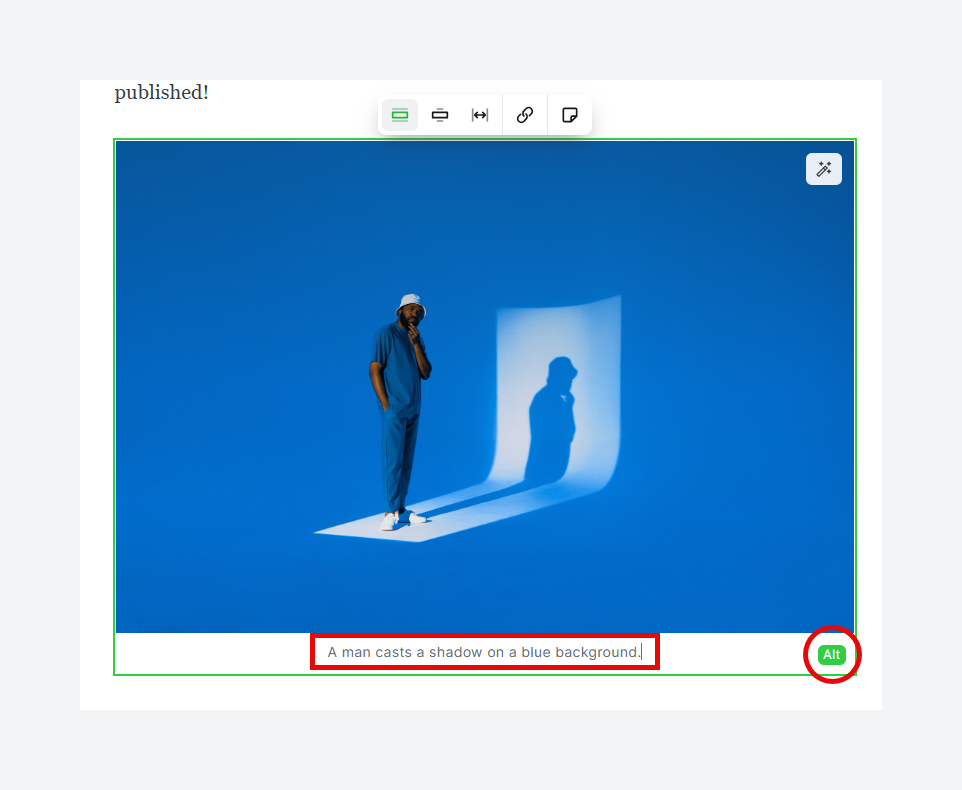
- ALT Attributes: Ensure you have added alt attributes to your images used inside the post content.
- Post URL: By default, Ghost creates a URL based on your title. You can and should edit this to be short, clean, and rich with keywords.
- Publish Date: You can schedule your post to go live at a future date and time, or even backdate it.
- Tags: Tags are how you organize your content. Add relevant public tags (like
travel,recipes) that readers can use to find related content. You can also add internal tags by starting them with a hash (e.g.,#cluster-a). These are hidden from the public and are used only for your own organization. - Post Access: This is the heart of your membership strategy. You can set access on a per-post basis:
- Public: Everyone can see it.
- Members only: Only logged-in members (both free and paid) can see it.
- Paid members only: Only members with an active paid subscription can see it.
- Specific Tiers: You can even restrict content to specific paid tiers you've created.
- Excerpt: In Ghost CMS, a post excerpt is a short summary or teaser of your content. You can add it manually in the post settings. Excerpts are shown on your post cards, social media previews, and newsletters. Using them boosts click-throughs by grabbing attention and giving readers a reason to read more.
- SEO (Meta Data): Customize the
Meta titleandMeta description. This is what appears in Google search results. Write compelling copy here to convince people to click on your link. - Social Cards (X / Facebook): Customize the image, title, and description that appear when your post is shared on social media platforms.
Sending Your Post as a Newsletter
The Ghost blogging platform is designed as a complete publishing engine, treating every post as a potential multi-format asset (web page, email, social card). This seamless workflow saves you time and ensures brand consistency across all your channels.
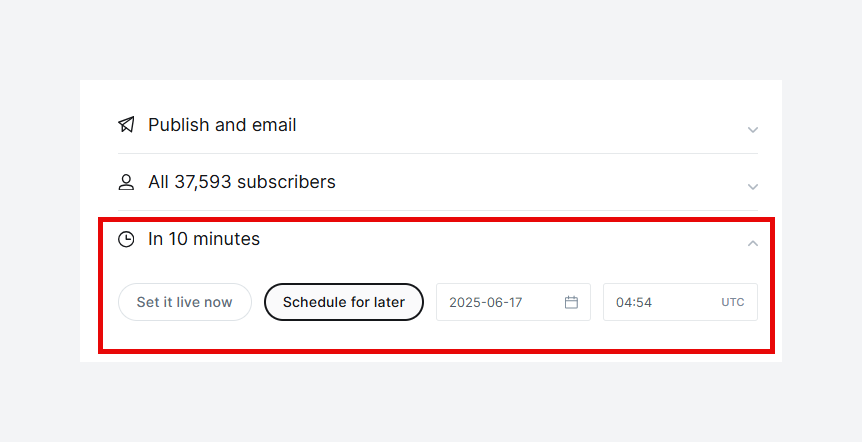
When you're ready, click the Publish button. A menu will appear with your options.
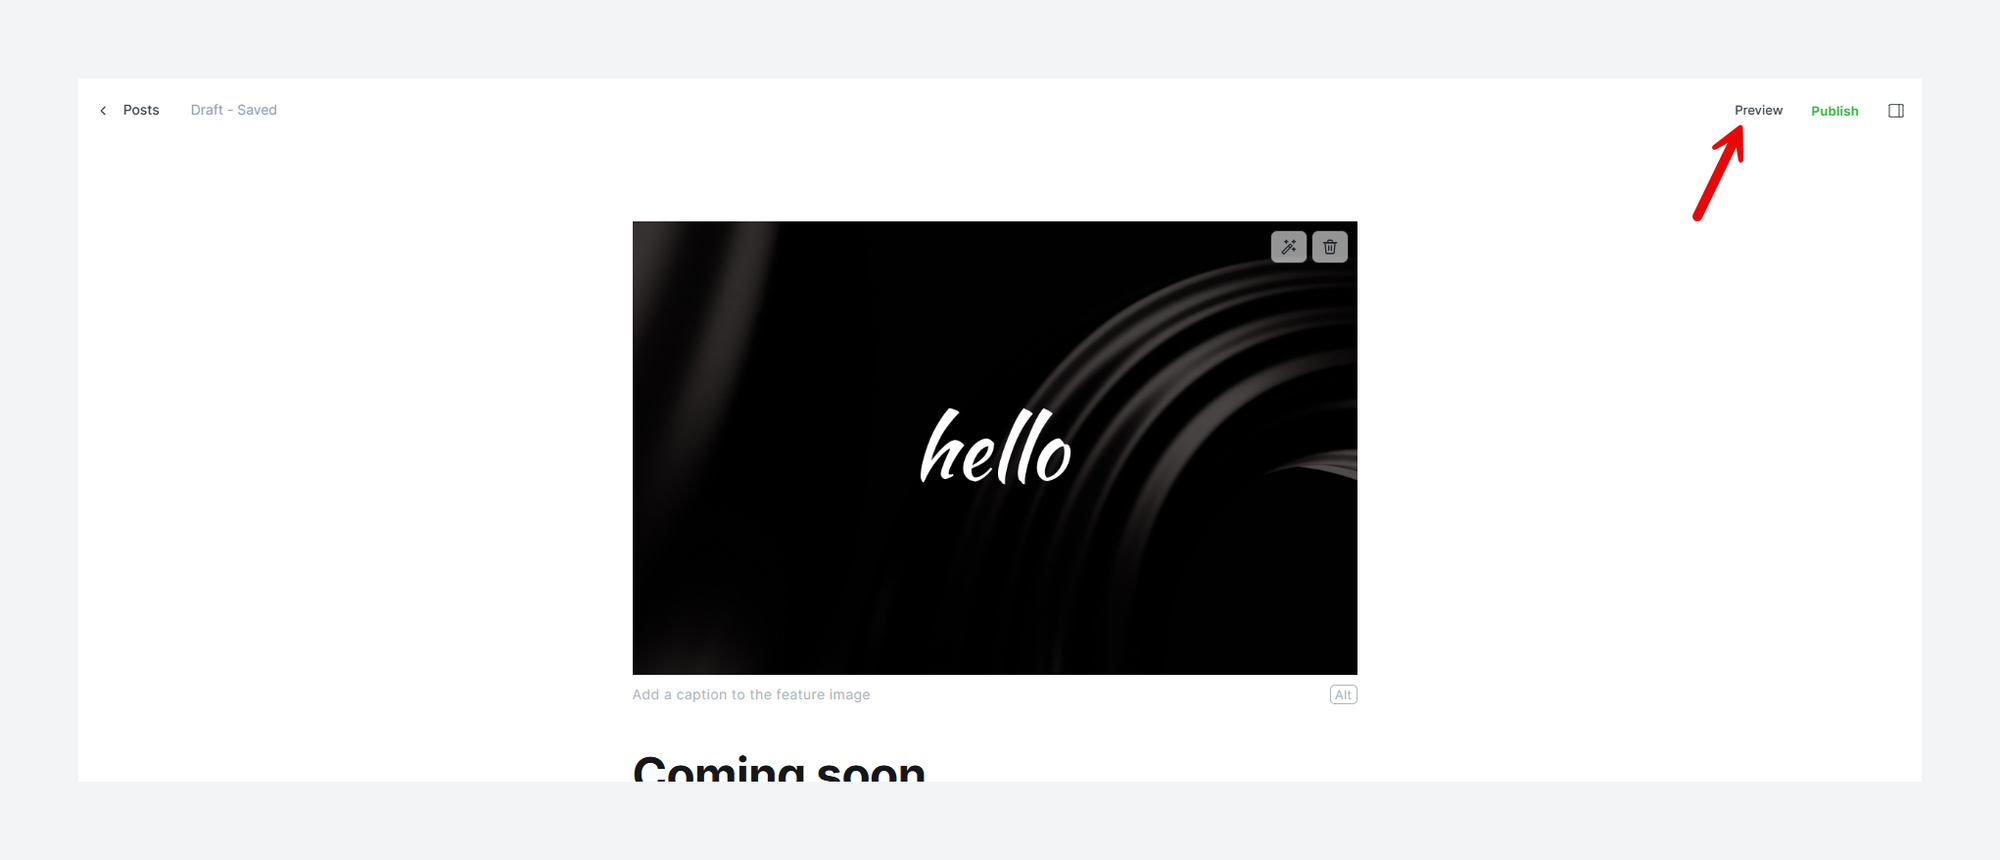
- Preview: Before you commit, click the
Previewlink. This will show you exactly how your post will look on the web, on a mobile device, in an email inbox, and as a social media card.
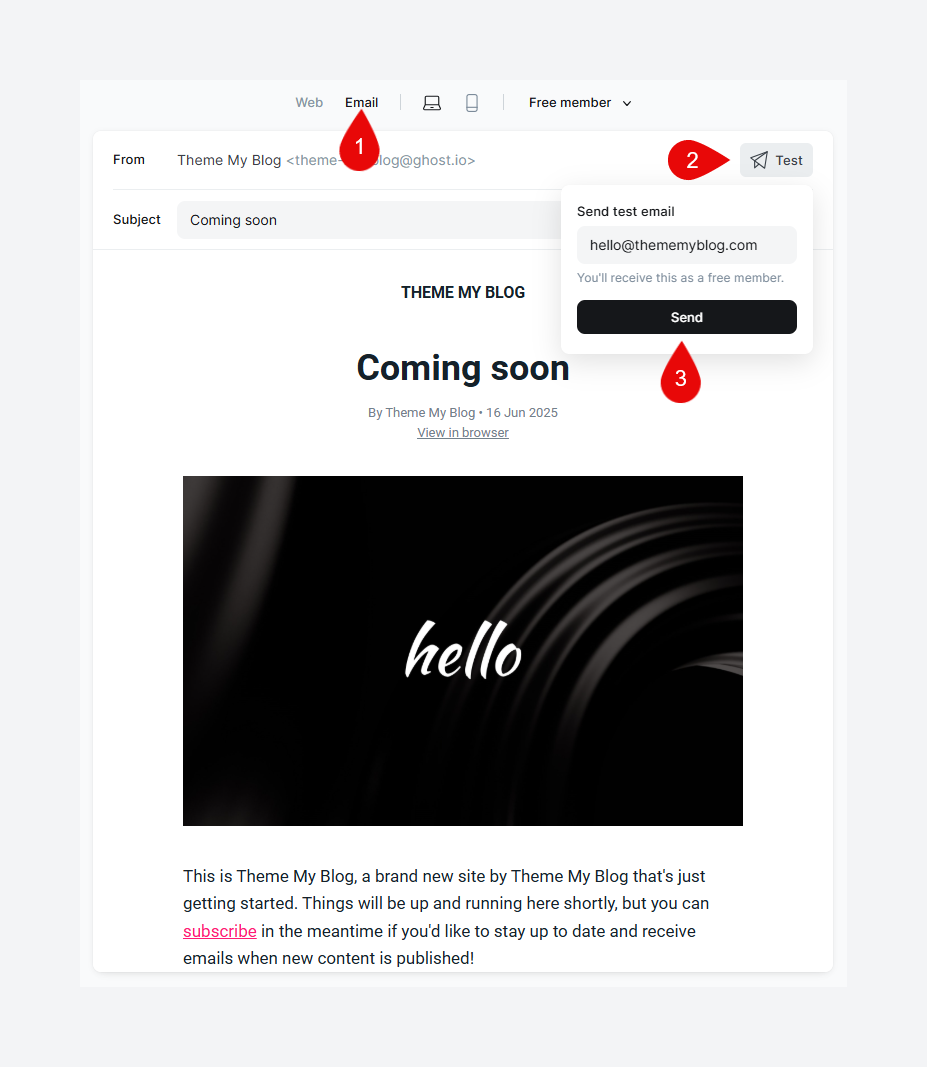
- Send a Test Email: Always, always send a test to yourself first. This lets you catch any formatting issues and see how the newsletter looks in your own email client.
- Publish and Send: Once you're happy, you can choose to simply publish the post to your website, or you can select "Publish and email". This will simultaneously make the post live on your site AND deliver it as an email newsletter to your chosen audience (e.g., all members, or just your paid subscribers).
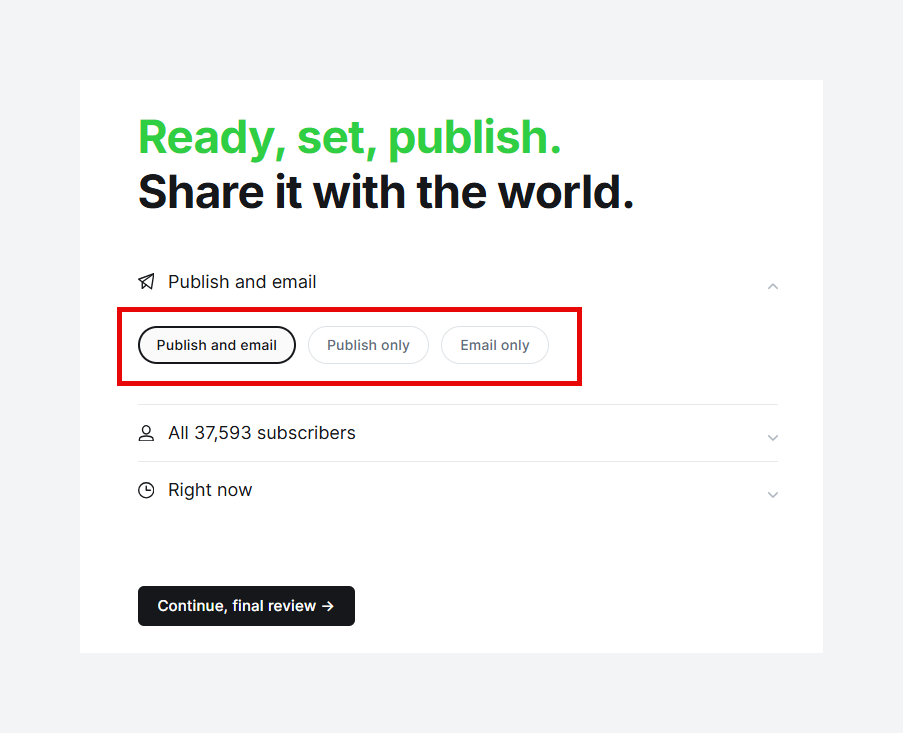
You can also schedule your posts for a later date.
Setting Up Memberships & Subscriptions
Ghost doesn't take a cut of your revenue; you keep what you earn. This is a fundamental advantage over platforms like Substack that take a 10% slice of your income.
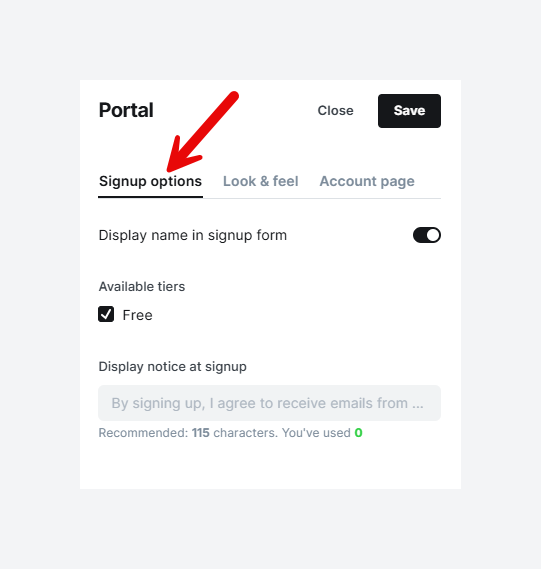
Step 1: Turning on the Magic with "Portal"
Portal is the name for Ghost's slick, built-in interface that handles everything for your members: signing up, logging in, and managing their account and subscriptions. It appears as a little floating button in the corner of your site, if enabled.
- How to Enable: Go to Settings -> Portal settings. Here, you can enable the Portal button. Portal button is a feature of Ghost core, so irrespective of the theme you are using, you can show this button.
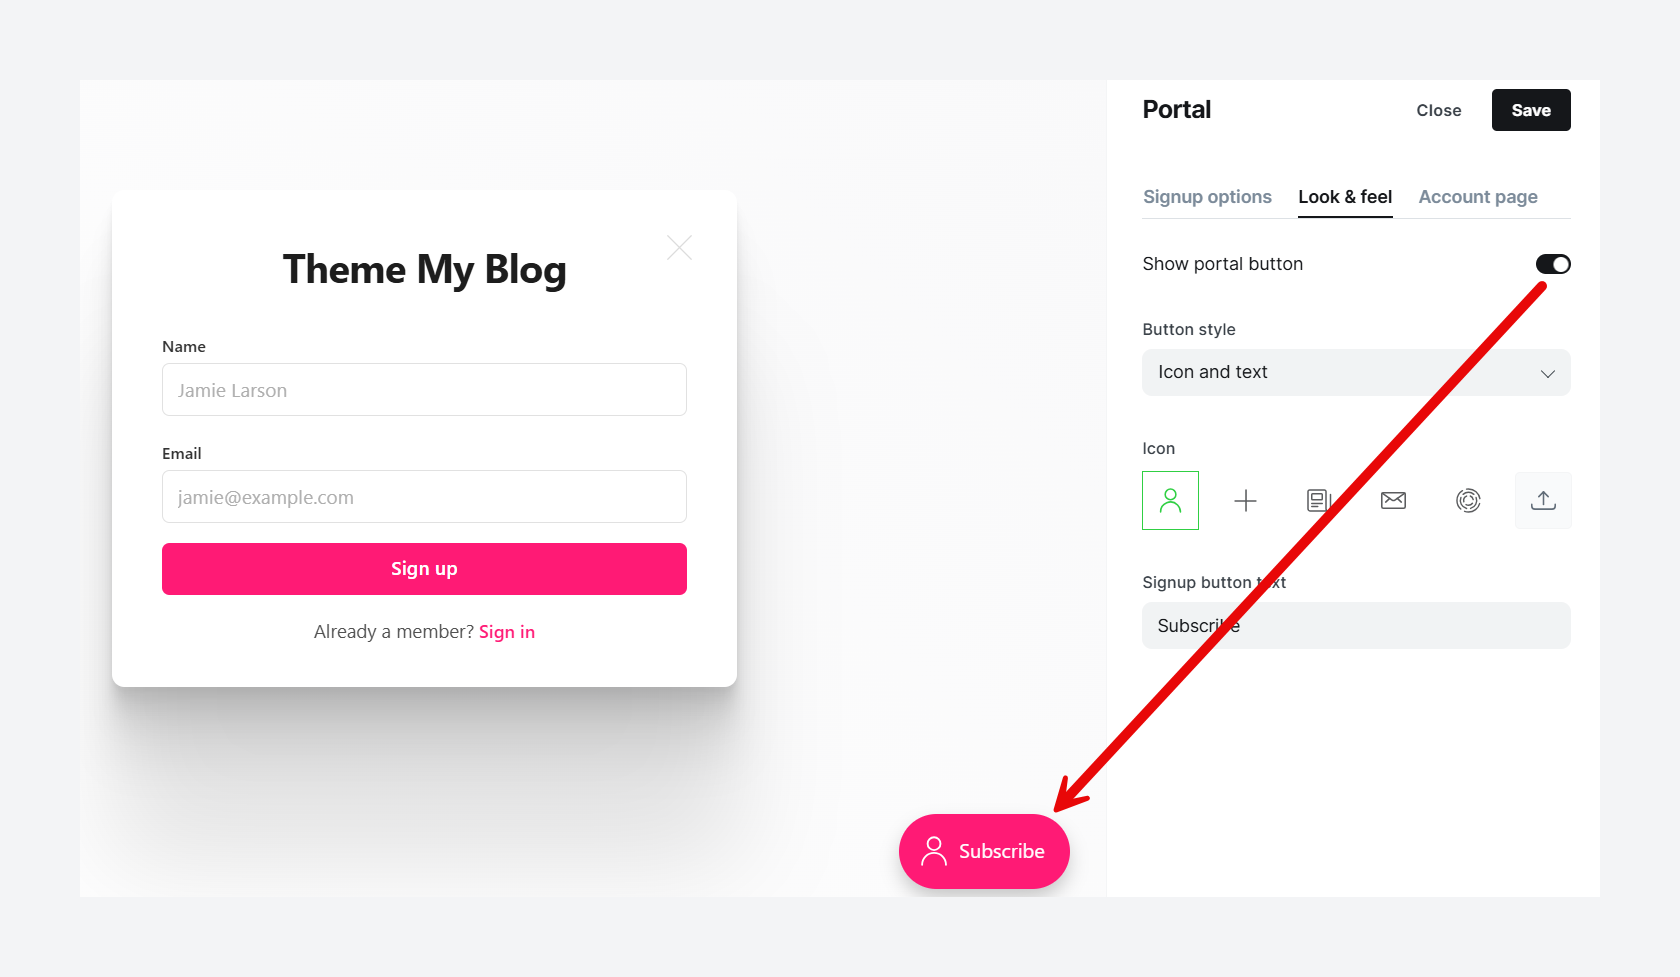
- More customizations: In the same area, you can change the text on the signup buttons, choose which membership tiers to display, and even disable the floating button if you'd prefer to use manual links in your theme.
Step 2: Getting Paid - Connecting Your Stripe Account
Ghost integrates directly with Stripe, the gold standard for secure online payment processing.
- How to Connect: In Settings -> Tiers, you'll see a prominent "Connect with Stripe" button. Clicking this will guide you through the process of either creating a new Stripe account or linking an existing one. It's a secure and straightforward process that takes just a few minutes.
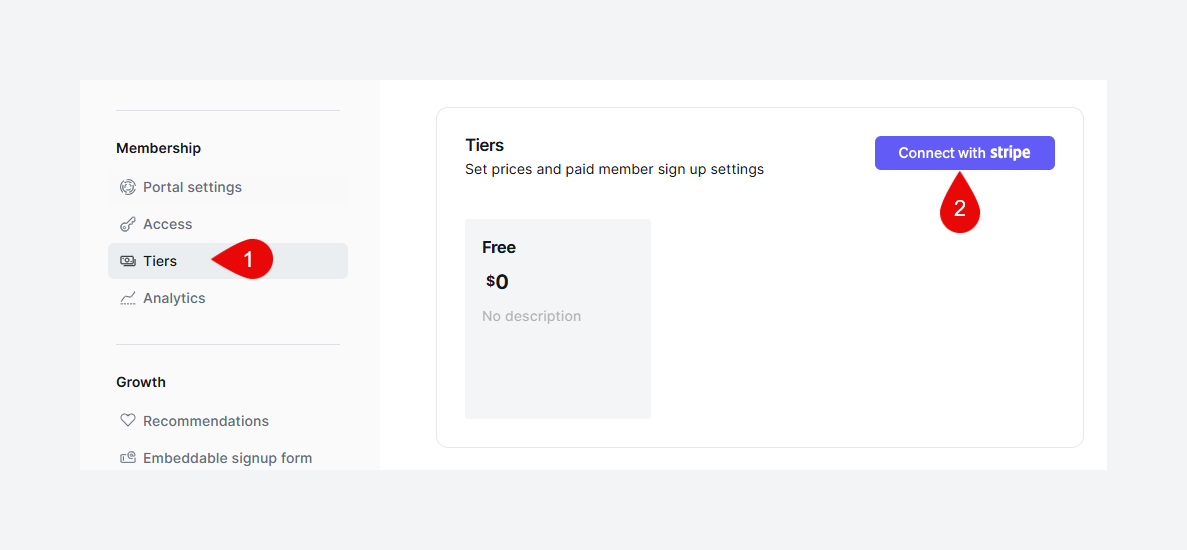
Once you log in and connect with Stripe, you will receive a secure key. Copy this key and paste it into your Ghost admin. Then, hit the Save Stripe settings button.
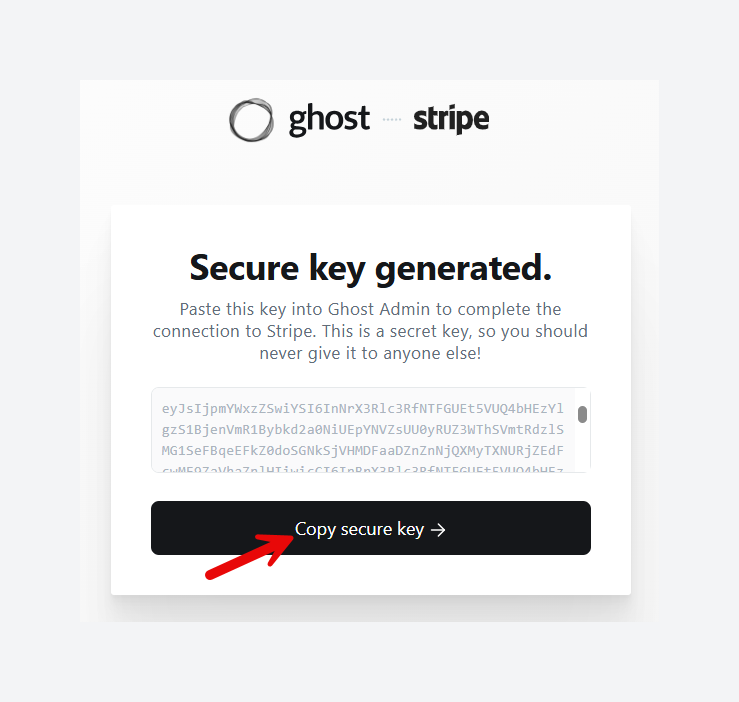

Congratulations! You are now connected to your Stripe account and can start accepting payments via your Ghost memberships.
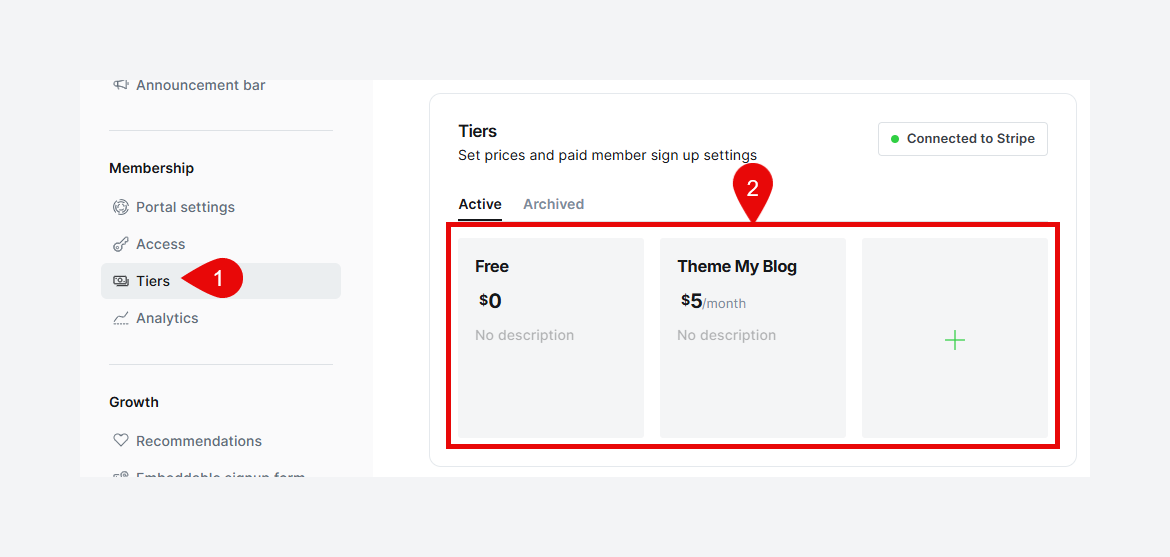
Step 3: Creating Your Membership Tiers
Once Stripe is connected, you can define what you're selling.
- How to Create: In the
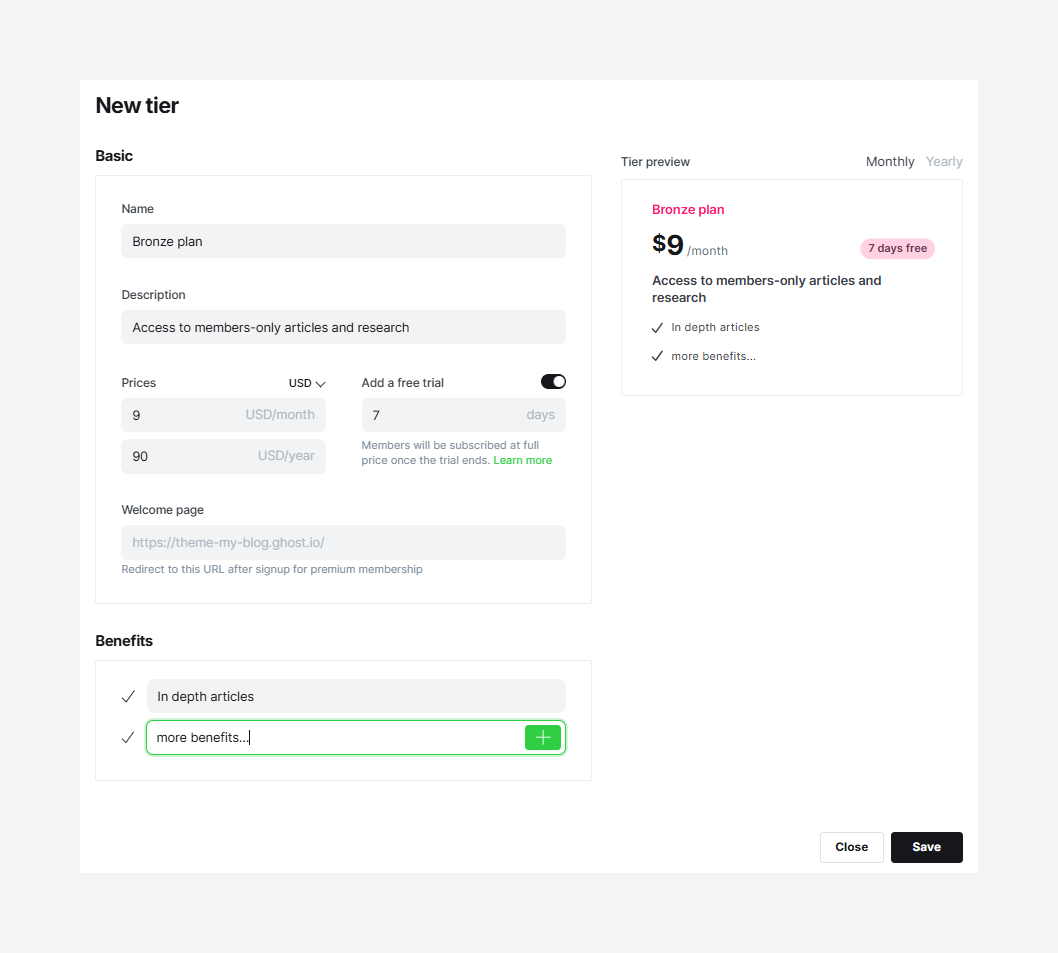
Tierssettings, you can add and edit your membership plans. For each tier, you can configure:- A Name (e.g., "Supporter," "VIP Member").
- A Description and a list of Benefits.
- Monthly and Yearly Pricing.
- A free trial period.
Step 4: Creating Exclusive Content
You have created membership tiers. Now, how do you add paywalled content in Ghost? The key tool here is the Public Preview Divider.
- How it Works: In the Ghost editor, type
/and select the "Public Preview" card. A divider line will appear in your post.- Everything above the line is public. It's visible to everyone on your website and is included in the preview emails sent to non-paying members.
- Everything below the line is locked. It's the premium content.
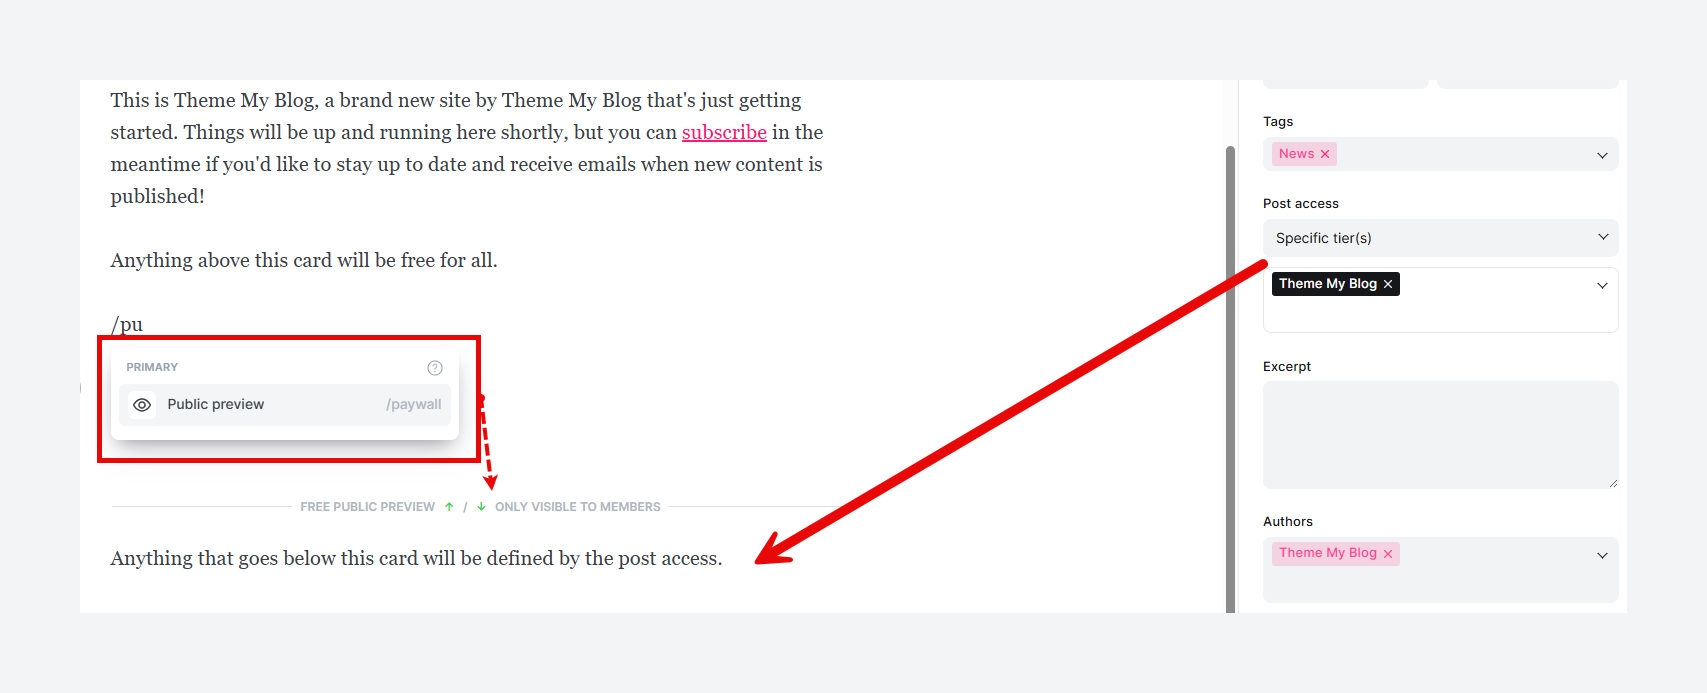
- Setting Access: To activate the paywall, go to the Post Settings menu and set the
Post accessto Members only, Paid-members only, or specific tier(s). This combination of the preview divider and the access setting creates a compelling call to action, showing readers a preview of what they're missing.
- Ideas for Premium Content: What can you put behind the paywall?
- In-depth, exclusive articles or tutorials.
- Early access to new content.
- The full audio or video of your podcast.
- Downloadable resources like templates, ebooks, or checklists (using the
Filecard). - Access to a private community or "ask me anything" threads.
Step 5: Managing Your Business in Stripe
While you'll manage members in Ghost, you'll manage the financial side in your Stripe dashboard. It's worth logging in to Stripe to handle a few key tasks:
- Customize your checkout page with your brand's logo and colors.
- Enable automatic email receipts for customer payments.
- Learn how to issue a refund or apply a discount to a specific customer's subscription.
Audience, SEO, and Monetization
You have the tools, the design, and the business model in place. Now, it's time to grow. Ghost's features are not isolated; they are designed to work together in a self-reinforcing loop to attract, convert, and monetize your audience.
Ghost SEO 101: A Simple Checklist for Better Rankings
Ghost is built with modern SEO best practices at its core, so you have a huge head start. Here's what to focus on:
- On-Page SEO: As covered in "Pre-publish checklist", meticulously optimize the
Post URL,Meta Title, andMeta Descriptionfor every single post you publish. This is non-negotiable. - Image Optimization: Always add a descriptive
Alt Textto your images. This helps search engines understand what your images are about and is critical for accessibility. - Internal Linking: This is one of the most powerful and overlooked SEO tactics. Within your articles, link to other relevant posts on your own site. This helps Google understand the structure and topical authority of your content, and it keeps readers on your site longer. Use descriptive anchor text (e.g., link the words "Ghost SEO best practices" to your article on that topic, not the generic "click here").
- Content Clusters: To take internal linking to the next level, adopt a content cluster strategy. Create one major, in-depth "pillar post" on a broad topic. Then, write several smaller, more specific "cluster posts" that link back to the main pillar. This signals to Google that you are an expert on that topic. Use Ghost's internal tags (e.g.,
#seo-cluster) to keep these organized.
A Quick Guide to Image Optimization
Slow-loading pages are an SEO killer. The number one cause of a slow site is large, unoptimized images.
- Choose the Right Format: For bigger images, always convert them to WebP. There are tons of online tools for this. Many themes automatically do that for you, and it will use the WebP version with reduced dimensions for faster performance.
- Resize Before Uploading: Never upload a massive photo straight from your camera. Use a tool like Canva to resize your images to the maximum width of your blog's content area. As mentioned before, many themes will do that for you automatically. Basically, Ghost handles the image conversion, and themes are responsible for using the correct size and format of that image.
- Use Descriptive File Names: Name your image files with relevant keywords before uploading (e.g.,
ghost-cms-editor-screenshot.jpginstead ofIMG_4587.jpg). - Lazy Loading: Ghost themes by reputed developers use lazy loading for images, meaning images that aren’t visible on the screen don’t load immediately. Instead, they load only when the reader scrolls to them. This technique improves page speed, reduces initial load time, and enhances overall performance for a smoother experience.
Driving Signups with "Offers"
Offers are Ghost's built-in tool for creating shareable discounts and free trials to entice readers to become paid members.
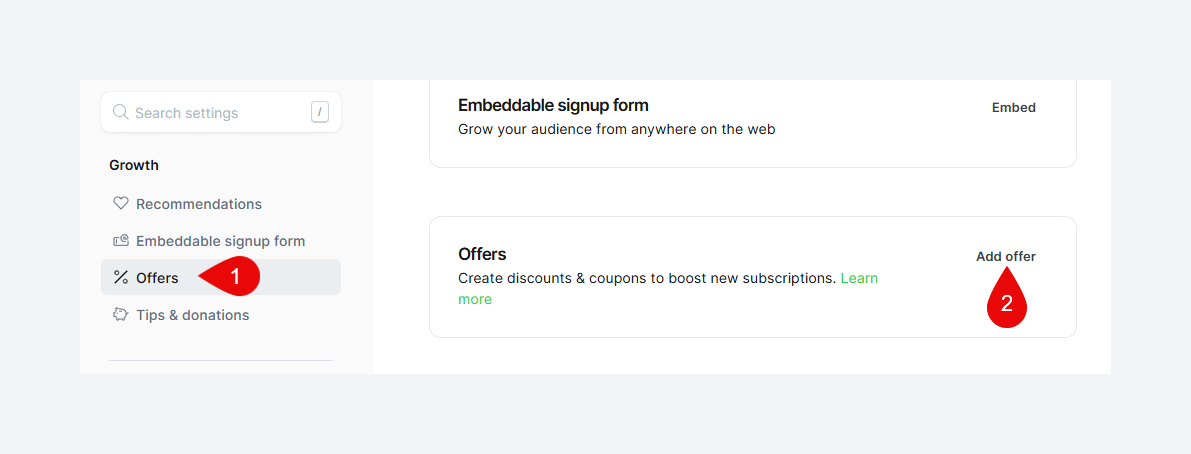
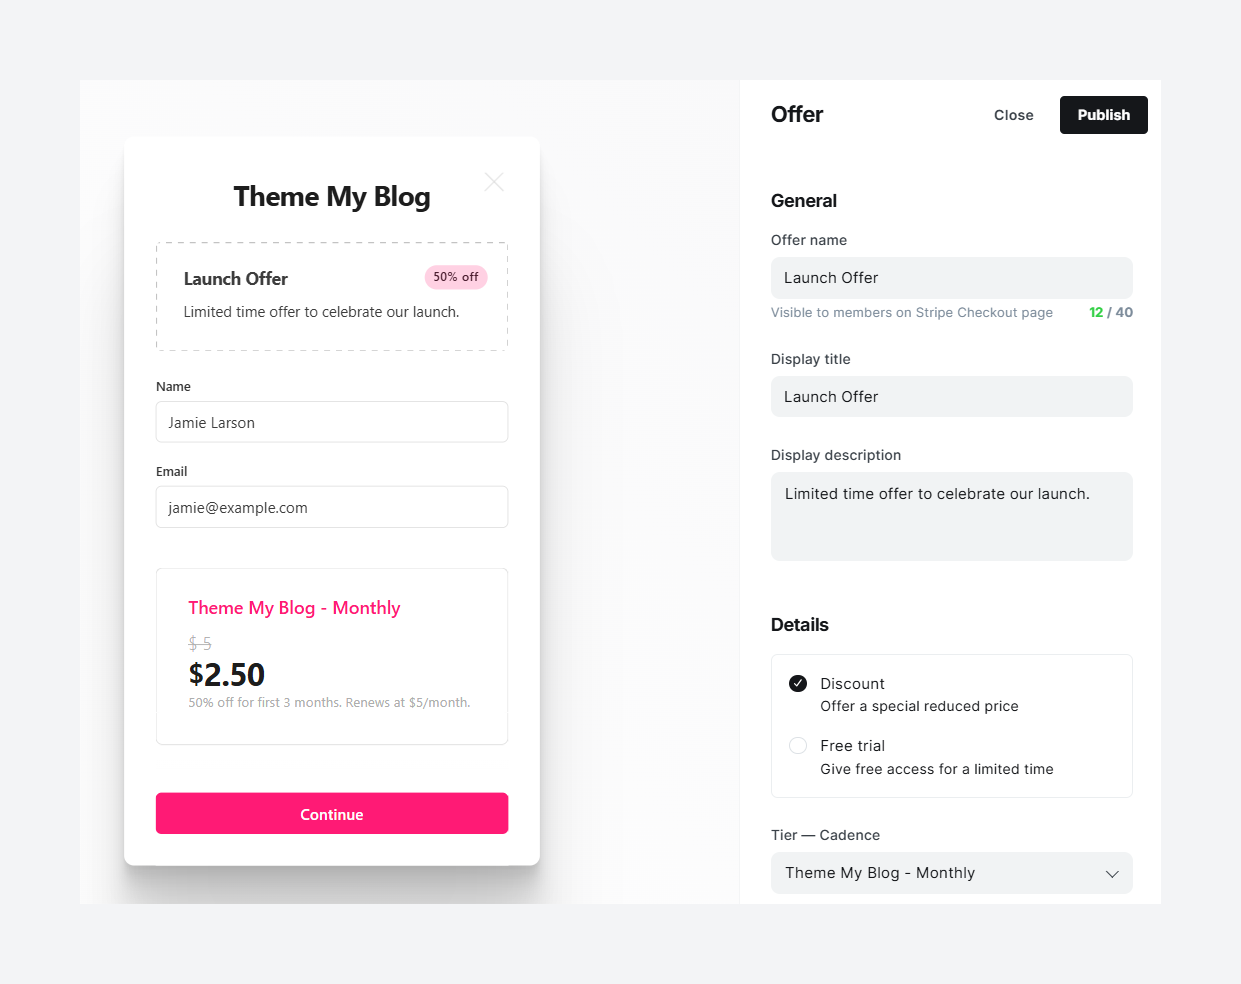
- How to Create an Offer: Navigate to Settings -> Offers. Here you can create a new offer. You can choose between a percentage discount (e.g., 20% off for 3 months), a fixed-amount discount (e.g., $10 off forever), or a free trial for a set number of days (e.g., a 7-day free trial of your premium tier).
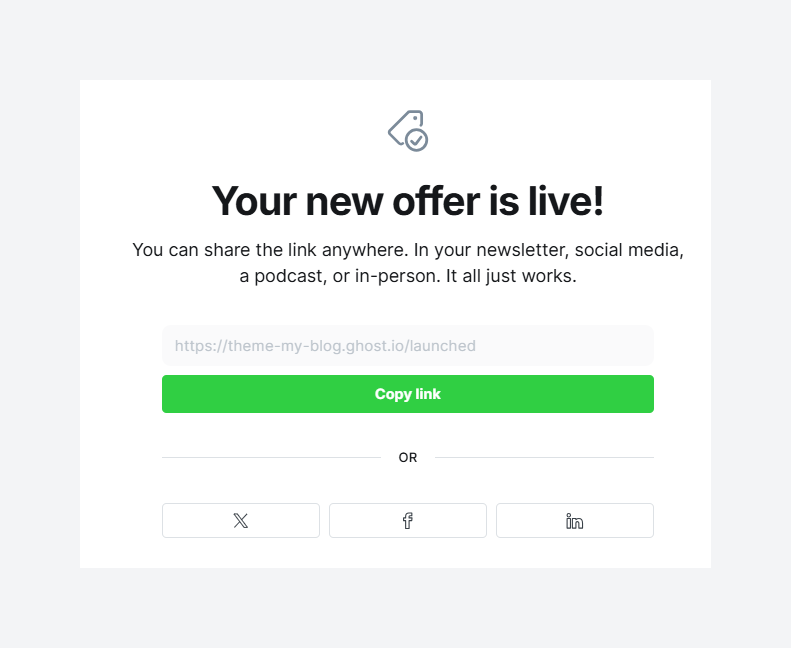
- How to Use an Offer: Each offer you create gets its own unique, shareable URL. You can link to this URL anywhere:
- In a newsletter to your free subscribers.
- On social media to run a promotion.
- In a partnership with another creator. When a visitor clicks the link, they'll see the special offer presented in the Portal pop-up, ready for them to claim.
Essential Integrations for Your New Blog
While Ghost's core features are incredibly powerful, its true potential is unlocked when you connect it to other best-in-class services. This philosophy of strategic integration, rather than trying to build every feature internally, keeps the Ghost platform lean and fast while giving you access to a limitless ecosystem of tools. You can add these integrations via the Integrations settings or the powerful Code Injection feature.
Adding a Community: How to Set Up Comments
Engaging with your readers is key to building a loyal community.
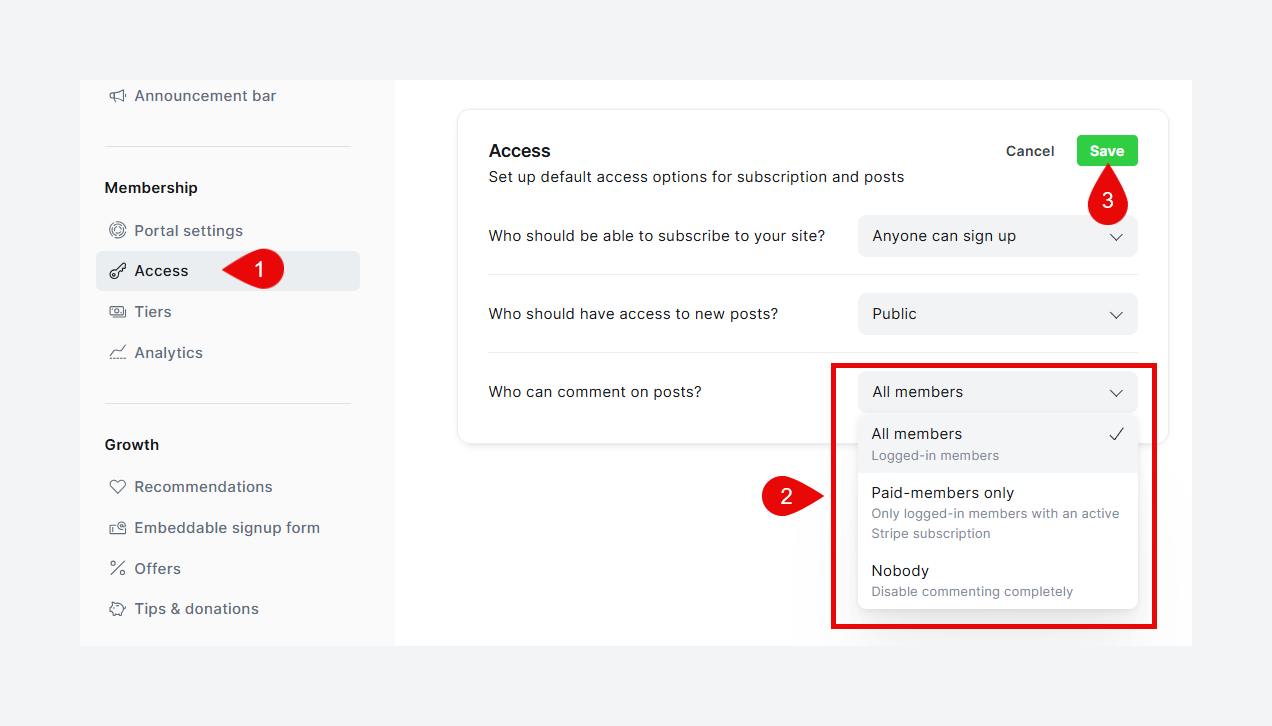
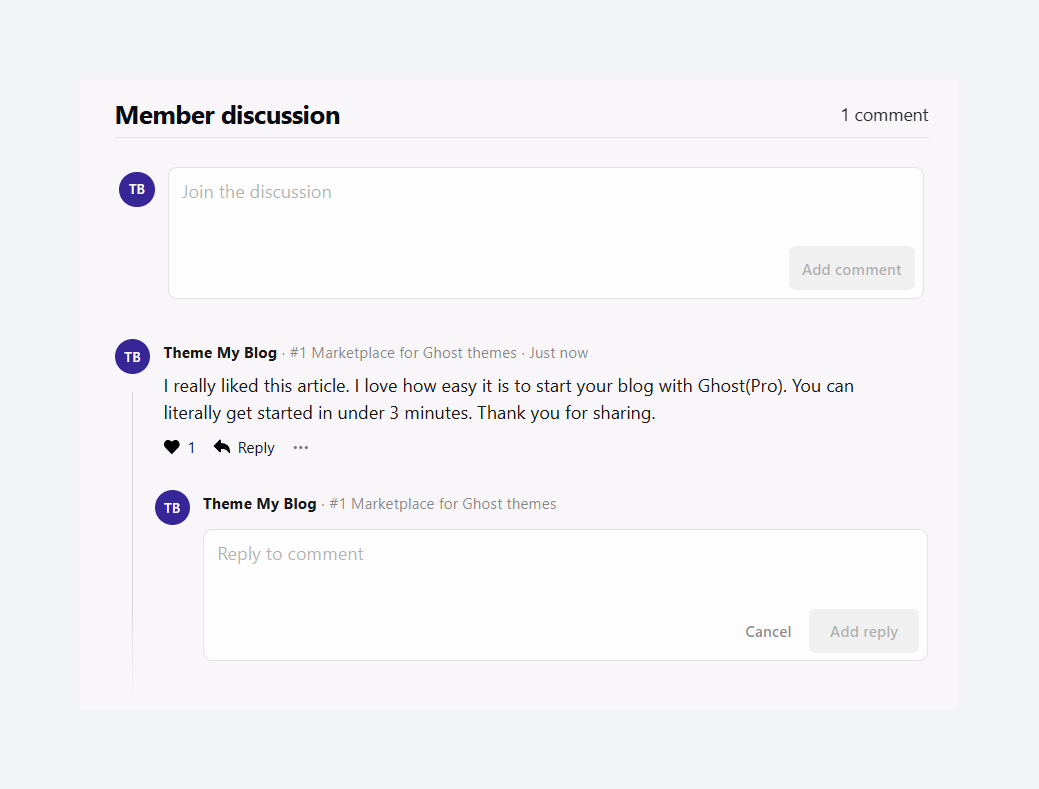
- Native Comments (Recommended): This is the easiest and most integrated option. Ghost has built-in comments for logged-in members, which is perfect for fostering a community among your subscribers. You can enable it in Settings -> Access -> Who can comment on posts?.
- Third-Party Option (Disqus/Cove): If you want more advanced features or need to allow anonymous commenting, you can integrate a service like Disqus or Cove. This is more advanced as it requires editing your theme's code (
post.hbsfile). Ensure that your theme supports these additional commenting systems. After the release of native comments, more and more themes are inclined towards native comments and have less support for 3rd party options.
A Simple Guide to Integrating Google Analytics
Ghost provides basic analytics, but for deep insights into your traffic, you'll want to connect Google Analytics (GA). Thanks to Code Injection, this is surprisingly simple.
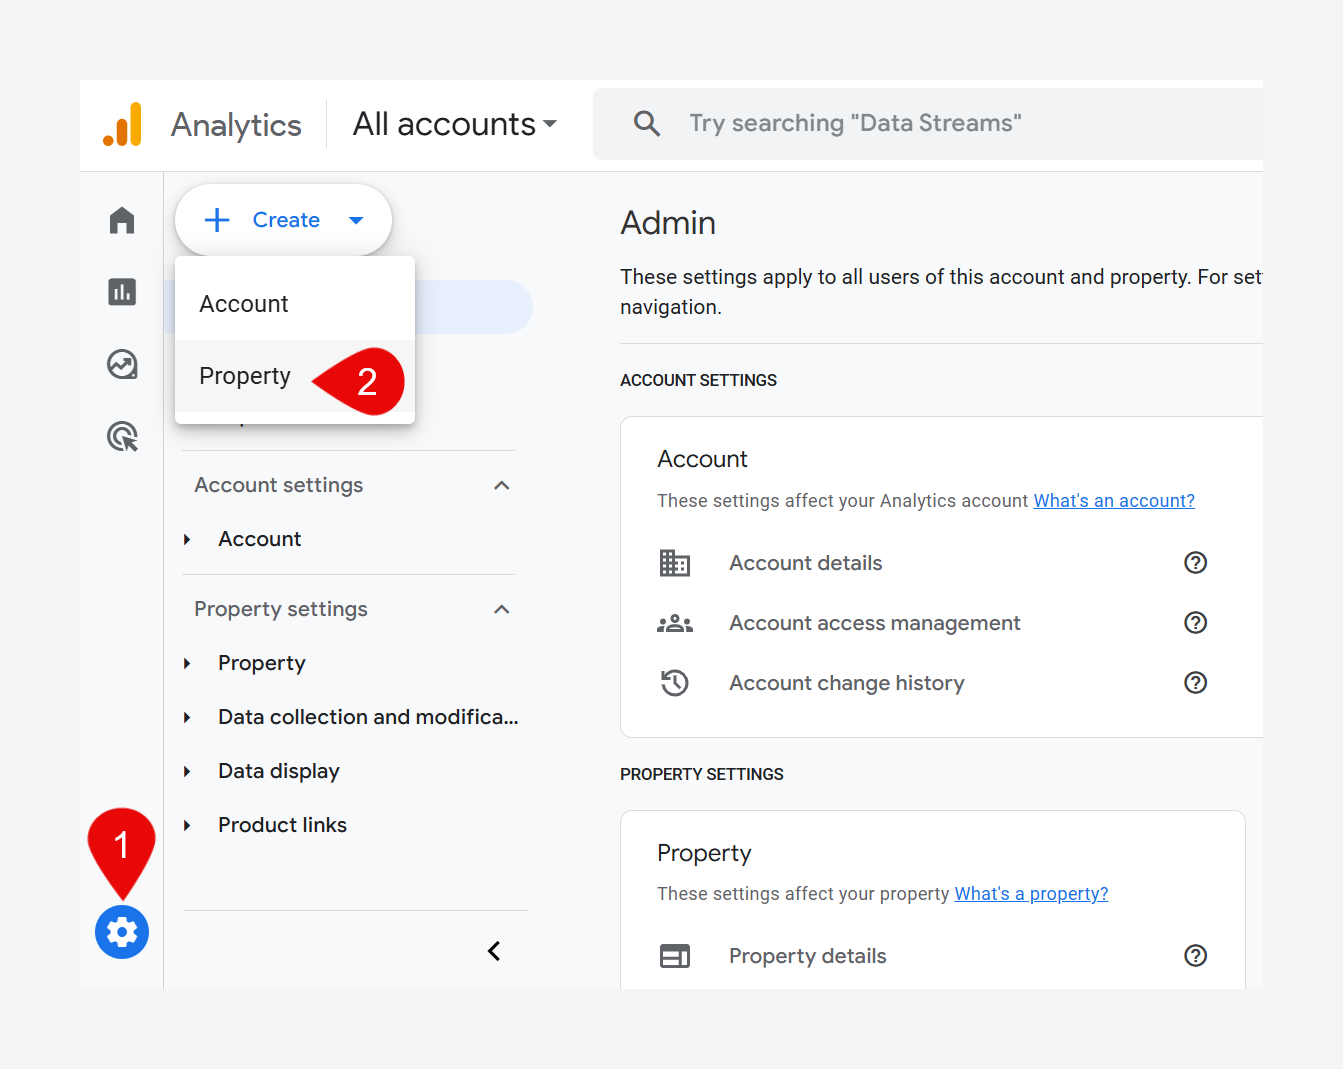
- Set Up Google Analytics: Go to the Google Analytics website, create an account, and set up a new "property" for your blog.
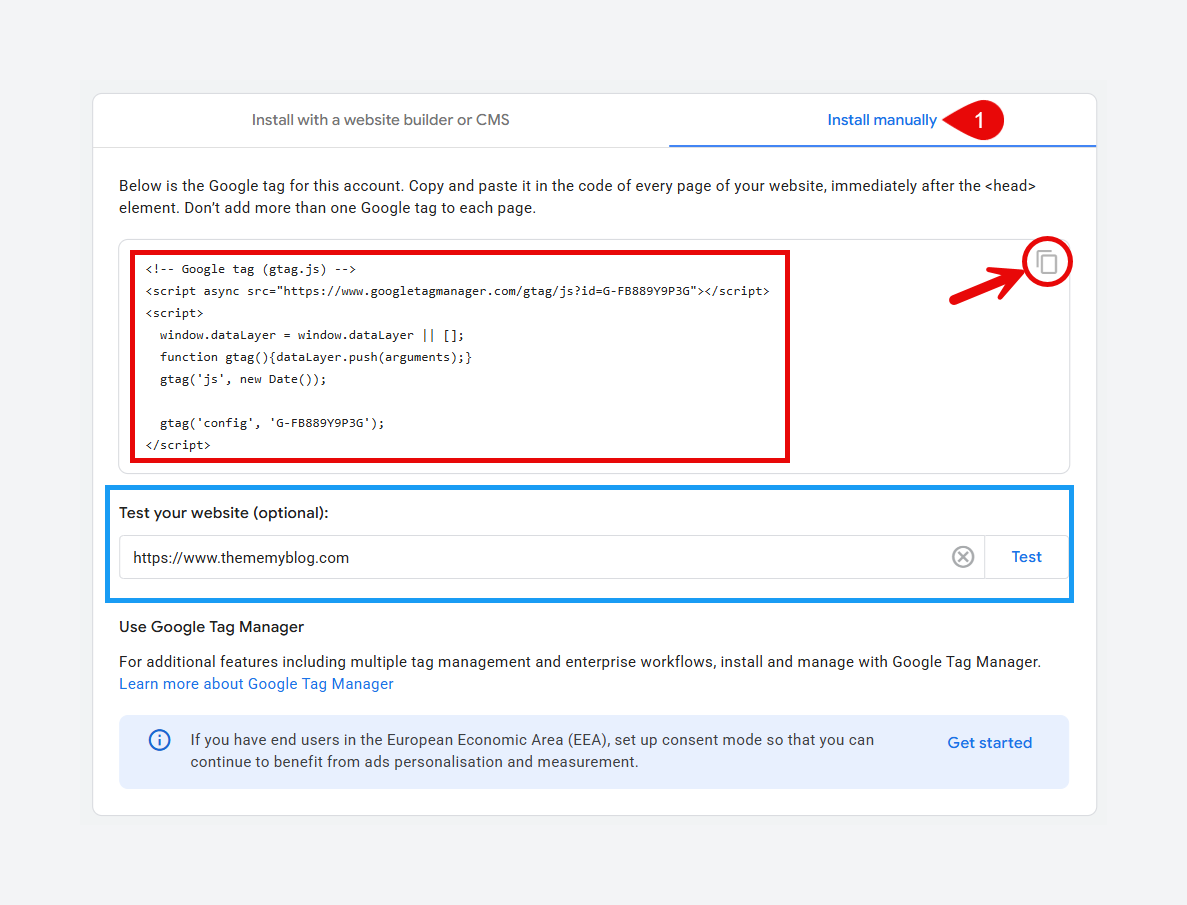
- Get Your Tracking Code: GA will provide you with a global site tag, which is a snippet of JavaScript code. Copy this entire snippet.
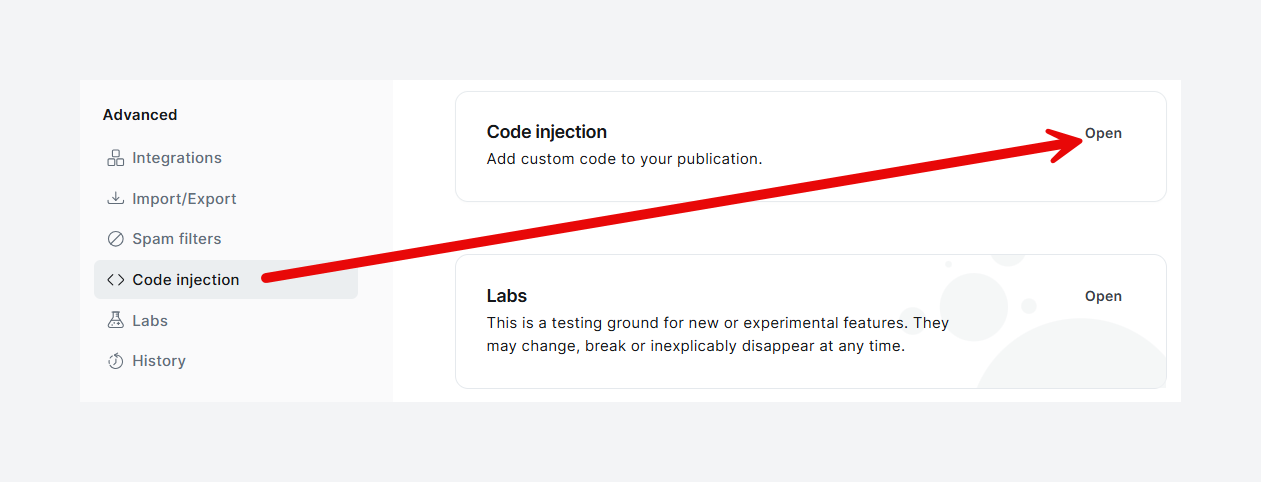
- Go to Code Injection: In your Ghost admin, navigate to Settings -> Code Injection and click Open.
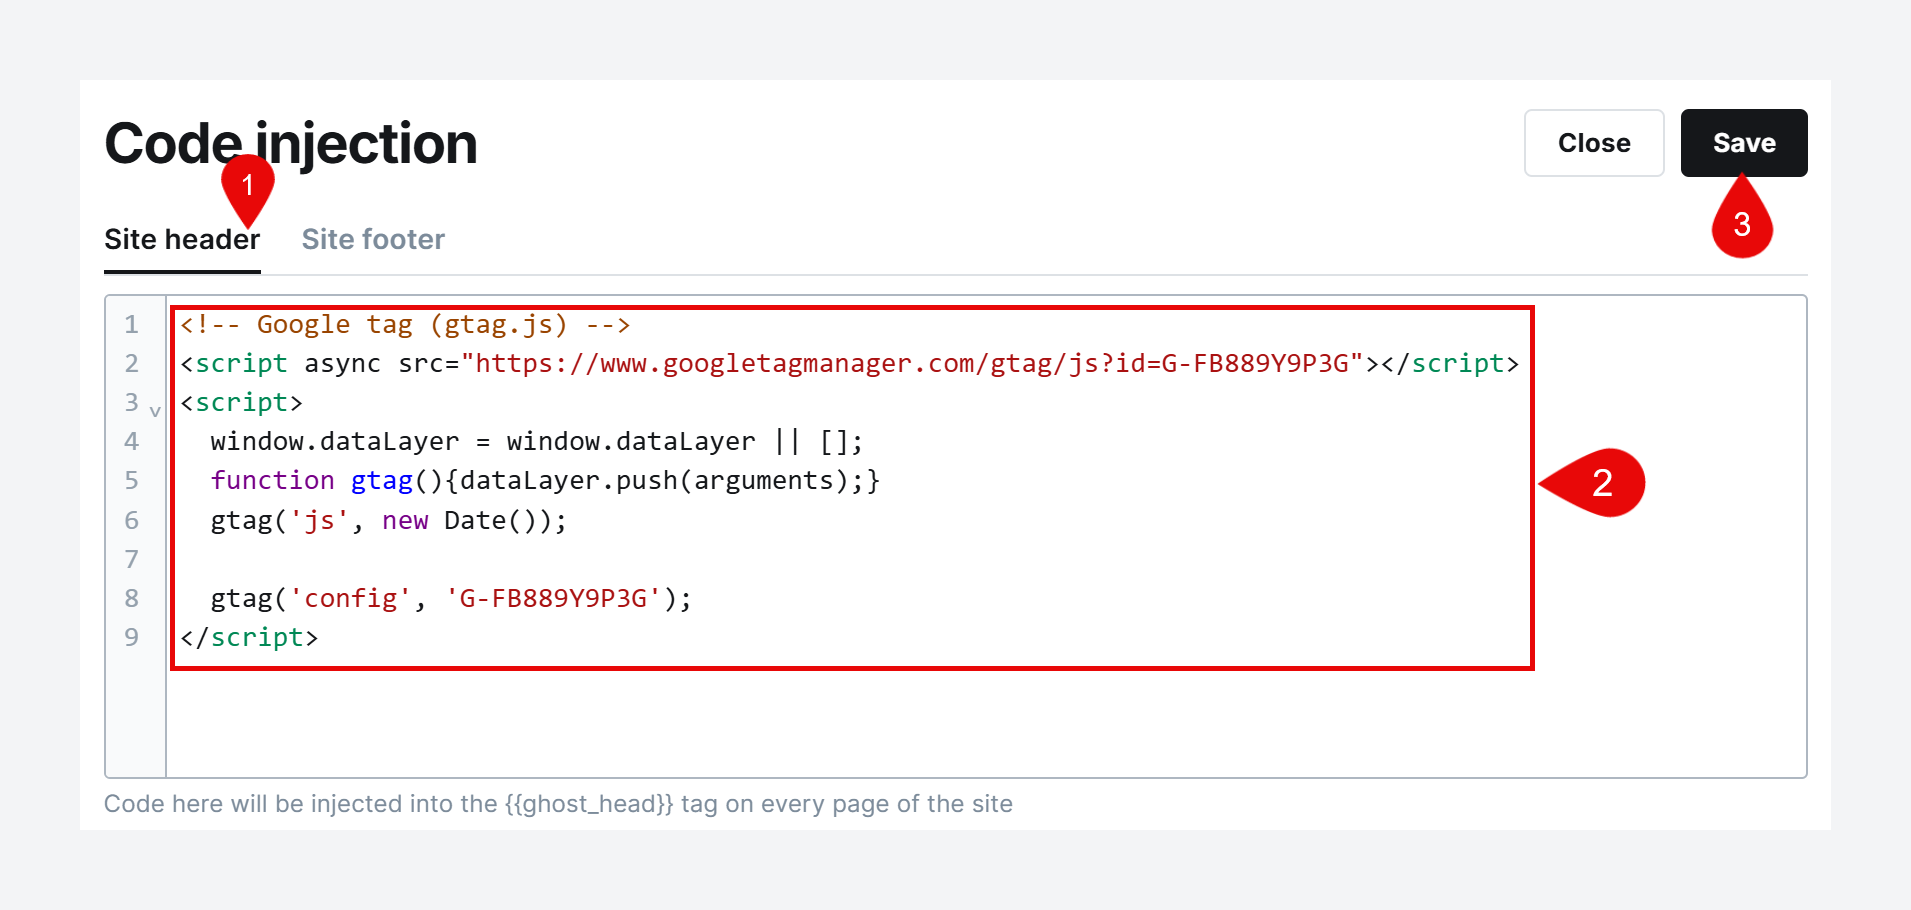
- Paste and Save: Paste the entire JavaScript snippet into the
Site Headerbox and clickSave.
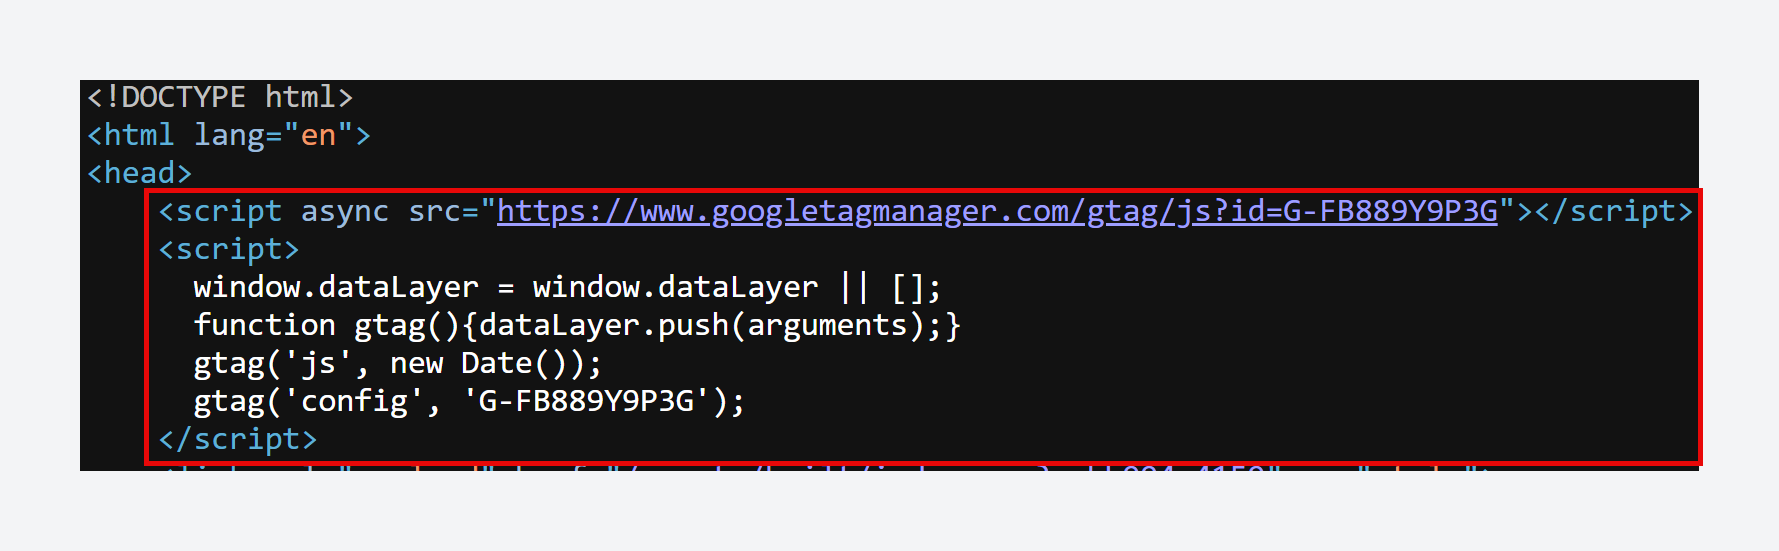
That's it. You've now connected Google Analytics to your Ghost site. You can verify the integration by opening your website and right-clicking to select View page source. You will see the Google Analytics script in the page source.
Automating Your Workflow with Zapier
Zapier is a magical no-code tool that acts as a bridge between different web apps, allowing you to automate repetitive tasks.
It works on a simple "Trigger" and "Action" system. For example: "When this happens in Ghost (Trigger), do that in another app (Action)".
Here are three simple but powerful "Zaps" every new Ghost blogger should consider setting up:
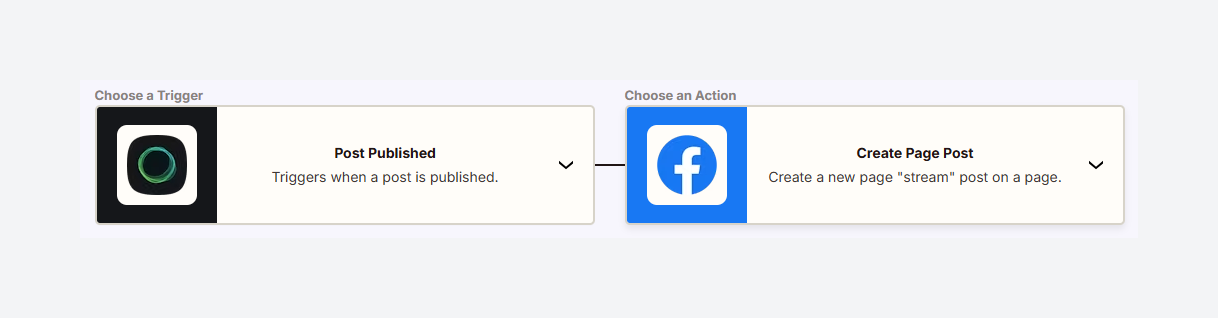
- Automatically Share New Posts:
- Trigger:
Post Publishedin Ghost. - Action:
Create Page Poston your Facebook Page orCreate Tweeton X. - Result: Your new content is instantly shared with your social followers without you lifting a finger.
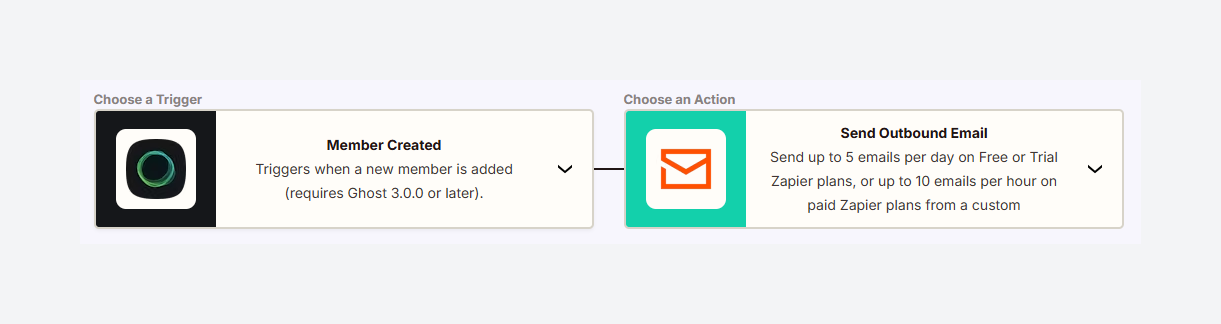
- Send a Personalized Welcome Email:
- Trigger:
Member Createdin Ghost. - Action:
Send Outbound Emailusing the "Email by Zapier" app. - Result: Every new free subscriber immediately receives a personalized welcome email from you, starting the relationship off on the right foot.
- Keep Your Own Subscriber Backup:
- Trigger:
Member Createdin Ghost. - Action:
Create Spreadsheet Rowin Google Sheets. - Result: You have a personal, automatically updated backup of your member list in a spreadsheet you control.

What's Next for Your Publication?
Congratulations! If you've followed this guide, you have successfully navigated from idea to implementation. You have a fast, beautiful, and professional publication that is ready to grow and generate revenue. You've built the foundation, and now it's time to build the house.
Inspiring Ideas for Future Growth
Your Ghost site is a flexible platform. As your audience grows, here are some ideas for what you can build next:
- Launch a Podcast: It's incredibly easy to add a podcast to your existing site. You can use Ghost's native
Audiocard to upload your episodes directly or embed a player from a service like Spotify. You can even offer premium, members-only episodes or create a custom RSS feed to submit your podcast to Apple Podcasts and other directories. Use tags (e.g.,podcast) to separate them from regular blog posts. - Develop a Course or Sell Digital Products: Use Ghost's membership tiers and the
Filecard to sell access to a premium course, an ebook, a set of templates, or any other digital product. You can also use 3rd party tools like LemonSqueezy or Gumroad to sell digital products. Use Ghost's product cards to share them on your website.
Consistency and Community
In the end, the platform is just a tool. The most advanced features and beautiful designs are meaningless without the two things that truly build a successful publication: consistency and community.
- Consistency: Commit to a regular publishing schedule that you can realistically maintain. For most beginners, publishing one high-quality piece of content every week is a perfect goal. Consistency builds trust and gives your audience a reason to keep coming back.
- Community: Your audience is not a metric; they are people. Engage with them, reply to their emails, ask for their feedback, and foster a sense of belonging. A strong community is the most valuable and defensible asset you can build.
The platform is ready. The tools are in your hands. Now go and build something amazing. If you like this article, please share it with your friends or someone who is struggling to get started with Ghost. Thank you for your time!


Start your publishing journey effortlessly with Ghost(Pro), the hassle-free, fully-managed hosting. Click the button below to get started!
-
0% Transaction fees
-
Custom domain
-
Fully managed service
-
Automatic weekly updates
-
Worldwide CDN
-
Enterprise-grade security
-
Threat & uptime management
-
Migration from current CMS
(For Yearly billing) Disclaimer: This CTA may contain affiliate links. We may earn a commission at no cost to you. Not sponsored or endorsed by Ghost.org, the Ghost Foundation, or any third-party developer or agency. Features, pricing subject to change without notice.